# Introduction

Welcome to the CESS Document Center.

## 🗂 Introduction

{% hint style="success" %}
**CESS: The first decentralized data infrastructure with L1 chain, infinite storage capacity and ethical AI.**
{% endhint %}

In this section, we provide a [high level overview on CESS](/readme/what-is-cess), its [technical highlight](/readme/technical-highlight), and [a few use cases](/readme/use-cases) on using CESS.

For those interested in exploring more about CESS technology, we invite you to delve into our [whitepaper](/readme/whitepaper). Should you have any inquiries, please don't hesitate to [reach out to us](/readme/contact).


# 5Ws-1H about CESS

In this article, we explore the **what, when, why, where, who**, and **how** of **CESS**, shedding light on its core features, benefits, and impact.

## What is CESS?

**CESS** is the world’s first **decentralized data infrastructure** built with its own **Layer-1 blockchain**, designed to support **infinite storage capacity** and enable **ethical AI**.

At its core, CESS is a **blockchain-powered**, **decentralized cloud storage network** equipped with a native **Content Decentralized Delivery Network (CD²N)**. It allows users and creators to **store, share, and monetize** data on-chain, while providing builders with the tools to deploy and scale DApps with ease.

CESS offers an optimal Web3-native solution for managing **high-frequency dynamic data**, delivering unmatched performance for applications in AI, gaming, enterprise, and beyond. Its architecture ensures **data sovereignty**, **user privacy**, and a **fair value distribution** of digital assets.

As a public blockchain, CESS combines a **distributed storage system** with m**illisecond-level data retrieval speeds** through its high-performance CD²N. It also unlocks new possibilities for AI innovation by leveraging secure and programmable Web3 protocols.

In a digital world overwhelmed by entropy, CESS emerges as a groundbreaking solution—**secure, scalable, and ethically aligned**—to restore control and trust in how data is stored, shared, and utilized.

## When did the story of CESS begin?

The journey of **CESS** began in **2019**, driven by a global team of innovators from the **UK, USA, India, China (Hong Kong), UAE, and Argentina**. United by a shared vision to reshape the digital world, our team brings together deep expertise in **cryptography, distributed storage, and computer science.**

Fueled by youthful energy and a commitment to meaningful impact, we set out to build technology that challenges convention and redefines the future of data. From day one, our mission has been clear: to leave a lasting mark on the digital landscape through innovation, inclusivity, and ethical advancement—one breakthrough at a time.

## Why CESS?

**CESS** is the first **enterprise-grade, decentralized storage infrastructure** purpose-built for large-scale, high-performance Web3 applications. It empowers users to store their data securely in **encrypted formats**, using advanced cryptographic techniques to guarantee **end-to-end privacy** and ensure that only authorized parties can access their data.

As a fully **open-source and public blockchain**, CESS serves as the foundational infrastructure for a decentralized data economy. By leveraging **blockchain** and **peer-to-peer technologies**, CESS eliminates reliance on centralized intermediaries—making it inherently **censorship-resistant**, **tamper-proof**, and **trustless**.

CESS delivers the most **optimized Web3-native solution** for **storing and retrieving high-frequency, dynamic data,** enabling a fairer, more transparent distribution of data value. It protects **user privacy**, ensures **data sovereignty**, and supports a wide range of use cases, from AI and gaming to enterprise and government services.

Built on a **DePIN (Decentralized Physical Infrastructure Network)** model, CESS incentivizes the **global deployment of network nodes**, ensuring both scalability and resilience through broad physical decentralization.

Technologically, CESS is **compatible with both EVM and WebAssembly (Wasm)**, allowing for seamless integration across ecosystems. Its robust blockchain framework supports **cross-chain** and **cross-ecosystem applications**, making it a powerful and flexible foundation for the next generation of Web3 development.

### So, why choose CESS?

Here’s why CESS is the right choice:

#### 🌍 Location-based Storage Selection

CESS enables **compliance-aware data routing**, ensuring sensitive data remains within national borders. This supports **data localization policies** and addresses **national security concerns**—making it ideal for enterprises and governments.

#### 🔐 User Privacy Authorization

Through **Proxy Re-Encryption (PRE)**, CESS allows **secure, permissioned data sharing** without exposing the content. Only authorized users can access shared data, maintaining **zero data leakage** and **full user control**.

#### 🤖 Privacy-Preserving AI

CESS empowers **responsible AI development** by embedding **user consent**, **smart contract governance**, and **privacy-preserving algorithms**, ensuring that sensitive data is handled ethically and securely.

#### 🛡️ Blockchain-Based Disaster Recovery

Using **Proof of Data Reduplication and Recovery (PoDR²)** within a **Trusted Execution Environment (TEE)**, CESS ensures **data availability and integrity** at all times—even under node failure or attack. Storage nodes are c**ontinuously challenged** to prove they hold valid data.

#### ⚡ Millisecond Data Retrieval

CESS's native **Content Decentralized Delivery Network (CD²N)** enables **millisecond-level access** to frequently requested (hot) data, achieving true **high-speed performance** in a decentralized environment.

#### 📜 Industry-First IEEE Standard Protocol

CESS leads the way with the first IEEE-approved blockchain-based decentralized storage protocol, [**P3220.02**](https://standards.ieee.org/ieee/3220.02/11522/), driving forward industry adoption and standardization of decentralized data systems.

## Where can CESS be used?

CESS is designed to support a wide range of real-world applications across industries that demand secure, scalable, and privacy-preserving data infrastructure. From AI training and content delivery to enterprise backups and digital asset storage, CESS provides the decentralized foundation needed for today’s data-driven world.

Explore some examples of how CESS can be applied in different sectors in our [Use Cases](/readme/use-cases).

## Who can join CESS?

There are many user roles in CESS ecosystem. If you have identified yourself as a certain role in the ecosystem, feel free to jump right in.

* [dApp Users](/user)
* [dApp Developers](/developer)
* [Storage Miners](/cess-miners/storage-miner)
* [Consensus Miners](/cess-miners/consensus-miner)
* [Community Members](/community)
* [Products](/products)

## How does CESS work?

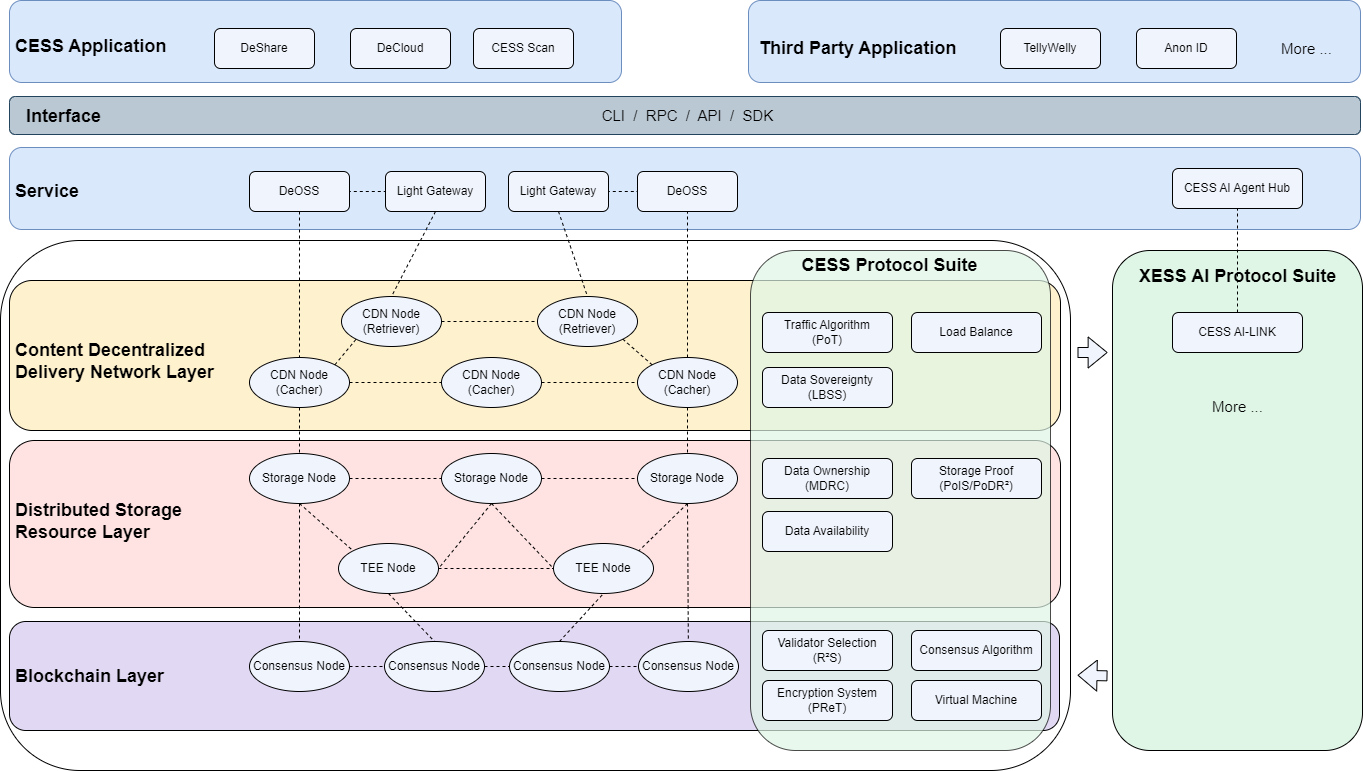
CESS adopts layered and loosely coupled system architecture, which is divided into **CESS Protocol Suite** and **XESS AI Protocol Suite**.

CESS Protocol Suite includes a **blockchain service layer**, **distributed storage resource layer**, and **distributed content delivery layer**.

The **XESS AI Protocol Suite** leverages advanced AI technologies to enable secure, privacy-preserving collaborative model training across the CESS network.

The **Interface** provides CLI/RPC/API/SDK interfaces to support data storage service, blockchain service, high-speed content delivery service and AI Agent Service, etc.

<figure><img src="/files/eRm9rtEnvnRQ1zYcaTwh" alt="CESS Architecture"><figcaption><p>CESS Architecture</p></figcaption></figure>

CESS guarantees data security and integrity through proprietary technologies with data ownership protection, Proof of Data Reduplication and Recovery (**PoDR²**), Multi-format Data Rights Confirmation (**MDRC**) and Proxy Re-encryption Technology (**PReT**).

CESS leverages blockchain technology to ensure the integrity and security of the data stored within the system. When a user stores data on CESS, it is broken down into smaller encrypted fragments and then distributed across multiple nodes within the network. To access the data, the user needs to authenticate themselves and retrieve the encrypted fragments from the network. The fragments are combined and decrypted locally on the user's device, ensuring that the data is never exposed in its entirety during the retrieval process. This distributed and encrypted storage mechanism provides a high level of security and privacy, safeguarding user's data from unauthorized access.

## Conclusion

With the increasing concern around data privacy and security, CESS addresses a critical need in today's digital landscape. Traditional storage solutions expose users' data to vulnerabilities and the risk of unauthorized access. By using CESS, users can regain control over their data, knowing that it is encrypted and stored securely. Additionally, CESS promotes decentralization and empowers individuals by removing the reliance on centralized storage providers. The high performance and reliability can also satisfy the enterprise need on storage requirement.

In conclusion, CESS provides a secure and private storage solution for individuals and organizations, enabling them to regain control over their data. By leveraging blockchain technology and advanced encryption, CESS ensures that data remains inaccessible to unauthorized parties. CESS aligns with the core principles of blockchain and empowers users to protect their data in an increasingly digital world.


# Technical Highlight

### 1. Disaster Recovery Guarantee

The **Proof of Data Reduplication and Recovery (PoDR²)** protocol is designed to ensure the validity and availability of stored data by challenging storage nodes regularly. To prevent data loss and maintain data integrity in any situations, such as when some storage nodes are offline or even if a disaster occurs in part of the internet or data centers, the data files and can be recovered because of the redundant and recovery mechanism.

### 2. Verifiable Unused Storage

The **Proof of Idle Space (PoIS)** is designed to verify whether storage nodes have honestly contributed available storage resources to the CESS network, which will be used to store user data. Storage nodes can also exchange their storage contributions for incentives.

### 3. Smart Space Management

The CESS network aggregates storage space contributed by storage nodes from around the world in what we call Smart Space Management. For storage nodes, the committed storage space will be flexibly allocated and used by the CESS network. For users, it makes the CESS network like cloud storage, with features of horizontal scalability, elasticity, and durability.

### 4. Unified Storage Price

Unlike the storage space bidding of alternative decentralized storage protocols, CESS users only need to bid on a single price point on CESS storage. CESS middle layer has a pricing mechanism to calculate an optimized price point for storage users while balancing the incentives of storage providers.

### 5. IPFS Compatiblity

{% hint style="info" %}
Will be launched in 2026 Q4
{% endhint %}

CESS is compatible with IPFS standard and allows developers to integrate their dApps with an array of storage solutions that utilize IPFS. Data stored on CESS can also be addressed with cryptographic hashes, making the content immutable and tamper-resistant.

### 6. Secure Data Access

{% hint style="info" %}
Will be launched in 2026 Q3
{% endhint %}

**Proxy Re-encryption Technology (PReT)** is built on top of Public Key Encryption to allow users to authorize decryption permissions to others without disclosing the data's contents. User data is also processed and accessed in [Trusted Execution Environment](https://en.wikipedia.org/wiki/Trusted_execution_environment) (TEE) within the storage nodes.

### 7. Fast Data Retrieval

Data indexing and Content Decentralized Delivery Network (CD²N) improve searching and download speed from user endpoints. Consensus mechanism has been iterated on top of [Polkadot GRANDPA](https://wiki.polkadot.network/docs/learn-consensus#finality-gadget-grandpa) to achieve low gas fees and high transaction throughput.

### 8. Data Ownership Traceability

{% hint style="info" %}
Will be launched in 2026 Q4
{% endhint %}

Data ownership can be verified with **Multi-format Data Rights Confirmation technology (MDRC)**. This protocol extracts fingerprints from all data and permanently stores them on-chain for traceability.

### 9. CESS AI-LINK

{% hint style="info" %}
Will be launched in 2025 Q4
{% endhint %}

Various organizations possess private data, some of which is sensitive or restricted by national laws, hindering its sharing for AI development. The CESS network offers a solution by facilitating the exchange of encrypted parameters and models through **CESS AI-LINK**, ensuring compliance with privacy regulations. This enables the creation of a global model where data remains secure and local, yet contributes to a broader industry or global AI framework without compromising privacy or regulatory compliance.


# Use Cases

### DA Service

The DA (Data Availability) Service is a crucial use case of the CESS network, offering a robust solution for ensuring continuous and reliable access to data. Below are some key details of the DA Layer:

* Ensuring Data Availability: The DA Service ensures that data is always accessible, even in the event of network disruptions or node failures. By replicating data across multiple nodes, it provides redundancy and fault tolerance, ensuring that data remains available despite potential issues with individual nodes.
* Layer 2 Storage for Blockchain Networks: The DA Service can perform as a Layer 2 storage solution for major blockchain networks like Bitcoin (BTC), Ethereum (ETH), etc. This use case allows these blockchain networks to offload large datasets to the CESS network, reducing on-chain storage costs and improving transaction speeds while maintaining decentralized and secure storage.
* Applications in Various Sectors: The robust and scalable nature of the DA Service makes it suitable for a wide range of applications, including decentralized finance (DeFi), enterprise storage solutions, and large-scale data management systems. These applications benefit from the DA Service's ability to provide reliable and secure data storage without relying on centralized services.

### VR Streaming Media

The CESS network is ideal for VR streaming media, offering high-speed data transfer and low latency. CESS combines CDN and P2P technologies to deliver smooth VR content streaming, offering users an engaging and immersive experience. The decentralized nature of the network eliminates bottlenecks and single points of failure, enhancing the reliability and quality of VR streaming.

### Data Lake

CESS supports the creation of data lakes, enabling organizations to store and analyze large volumes of unstructured data. The system's polymorphic data storage access interface provides a unified API for accessing object, block, and file storage, making it easy to integrate various data sources. With CESS, organizations can build scalable, cost-effective data lakes that support advanced analytics and machine learning applications.

### Distributed AI Training

Various organizations with private data face challenges in utilizing it for AI development due to sensitivity and legal constraints. The CESS network provides a solution by enabling the secure exchange of encrypted parameters and models through CESS AI-LINK. This allows organizations to collaborate on building a global AI model while ensuring data privacy and compliance with regulations. The use of the CESS network facilitates the creation of industry-wide or global AI frameworks, leveraging diverse data sources without compromising privacy or regulatory requirements.

CESS facilitates distributed AI training by providing secure and scalable storage for training data. The network's high bandwidth and low latency ensure efficient data transfer between nodes, allowing faster training times. Leveraging the CESS network enables AI developers to collaborate on training models while maintaining data privacy and security. This is achieved through the implementation of federated learning and encryption technologies.

![Enabling Secure and Compliant Global AI Development](/files/l4XJlBTTsbcYfXaTusC5)

### AIGC Innovation

CESS supports AI-generated content (AIGC) innovation by providing a secure and scalable platform for storing and processing large datasets. The network's distributed architecture allows efficient data sharing and cooperation among AI researchers and developers. With CESS, AIGC applications can leverage the power of decentralized storage to enhance creativity and innovation while maintaining data integrity and security.

### Web3 Games

he CESS network enhances Web3 gaming by providing secure and scalable storage for game assets and player data. CESS utilizes blockchain technology to guarantee the authenticity and ownership of in-game assets, allowing for secure and transparent transactions. The network's decentralized design also boosts online gaming's performance and reliability, offering players a smooth and uninterrupted experience.

### RWA

CESS enables the tokenization and secure storage of real-world assets (RWA) on the blockchain. Users can trade and manage these assets securely and transparently by digitizing physical assets, such as real estate or art, and storing their provenance and ownership data on the CESS network. This approach ensures the integrity and authenticity of asset data, providing a reliable foundation for RWA transactions.

### Distributed Network Disk

CESS provides a unique Distributed Network Disk service for end users that offers several key benefits over traditional providers of Network Disk services. These advantages include enhanced security, protection of ownership rights, cost-effectiveness, and increased storage capacity. Unlike conventional cloud server-based storage solutions, CESS stores data across multiple independent nodes, eliminating reliance on centralized services. This decentralized approach establishes faster download and upload speeds without restrictions. CESS guarantees data privacy and security without central servers or potential risks of data loss using blockchain technology and cutting-edge cryptographic technology. Additionally, CESS storage nodes can dynamically join the network and contribute their unused space, allowing limitless expansion of the network's storage capabilities.

### Decentralized Digital Assets Marketplace

The secure storage, decentralization of digital assets, and trading data are imperative for building trust in the digital assets marketplace. To validate NFTs, developers and owners upload their files to be verified by CESS using the Multi-format Data Rights Confirmation Mechanism (MDRC). The data files are distributed to storage nodes following this verification process.

CESS automatically captures important structural, subject, and semantic characteristics in its vector space for accurate indexing, mapping, improving public discovery, and secure private retrieval of digital assets within the system.

![Client-Platform Interaction](/files/xJGJy8vAIzPgKnui7NzS)

A typical CESS client and platform interaction involves several steps:

* **Querying Storage Price**: The data storage client queries the CESS chain to obtain the current storage price.
* **Placing an Order**: The client submits an order for data files via an on-chain smart contract.
* **Uploading Data**: Once the payment is made and the order is approved, the client uploads the data file using the API. The file is not directly uploaded to storage nodes but to a CESS storage scheduling node.
* **Data Processing**: The scheduling node, with a secure hardware environment (Trusted Execution Environment or TEE) processes, encrypts, and shards the data file.
* **Data Distribution**: The scheduling node distributes data segments to storage nodes.

### Data Rights Protection

From the clients' perspective, CESS delivers as a decentralized and user-managed data content-sharing platform. The platform's mission is to return data ownership to users, encouraging them to explore the value of their digital assets while safeguarding their rights. CESS has implemented an on-chain smart contract-based data-sharing platform that is self-executing, fair, and transparent. This encompasses the entire data rights confirmation, tracking, and protection lifecycle.

CESS offers two types of smart contracts with different client-profit models. When users upload data files, they can choose their preferred model values. Data file attributes are generated based on user inputs, including client-profit model type, whitelist, blacklist, and other preferences. These attributes are published alongside the user data.

The underlying smart contract runs based on the instructions set by the file's owner when clients of a data provider access a data file. The system checks the file attributes to see if the data buyers are authorized. If authorization is confirmed, the system charges the buyers following the client-profit model and initiates the data download.

Data users on CESS can customize their data file attributes. All data file retrieval records are recorded on the blockchain, providing a traceable history. A recording module that lets users see their data file retrieval records is part of the CESS data rights protection mechanism, providing compelling proof that user data rights are protected.

![Data Right Confirmation and Protection](/files/y0fR37EqIrqTGWczt4LL)


# Whitepaper

[The latest version of CESS Whitepaper](https://github.com/CESSProject/Whitepaper/blob/main/cess-whitepaper.pdf)


# Contact & Social Media

If you have questions and feedback about CESS, please contact us! We also invite you to join our vibrant community and build up the Web3 ecosystem.

If you are interested in building up the CESS protocol and contribute to the decentralized future together, don't hesitate to apply for our job opening today!

### Contact

e-mail: [**hello@cess.network**](mailto:hello@cess.cloud)

### Get Involved

👀 [Ambassador Program](https://cess.network/ambassador.html)

🌐 [CESS Blogs](https://cess.network/posts/news)

🗓 [CESS Events](https://cess.network/posts/events)

### Job Openings

👥 [Our Team](https://cess.network/team.html)

📝 [Job Openings](https://cess.network/jobs.html)

### Community

<img src="/files/70P3lkO2EcM7v4AWTdu7" alt="" data-size="line"> [Github](https://github.com/CESSProject)

<img src="/files/E2mirRZBKCcqizG1o4Do" alt="" data-size="line"> [X](https://twitter.com/CESS_Storage) (formerly Twitter)

<img src="/files/PcOmkMS2DP2KWDWEi1Fb" alt="" data-size="line"> [Discord](https://discord.gg/cess) - join our Discord channel today!

<img src="/files/imaK4HirV9g6QpX7sbrA" alt="" data-size="line"> [Telegram](https://t.me/CESS_Storage_official)

<img src="/files/XwbANoS0mP4eFbbSYH2e" alt="" data-size="line"> [Youtube](https://www.youtube.com/@cess_storage2312)

<img src="/files/EcH3SGpkUiUnSr6S61Ql" alt="" data-size="line"> [Medium](https://medium.com/@CESS_LAB)

<img src="/files/vO6oaS4n7tj35qZa8uuz" alt="" data-size="line"> [LinkedIn](https://uk.linkedin.com/company/cessnetwork)


# CESS Nodes

The CESS Network consists of **4** types of nodes: **Consensus Nodes**, **Storage Nodes**, **CDN Nodes**, and **TEE Nodes**.

{% hint style="success" %}
CESS testnet RPC address: `wss://testnet-rpc.cess.network/ws/`.
{% endhint %}

## Consensus Nodes

The Consensus Node is the foundational builder of the CESS blockchain, responsible for packaging and publishing blocks through the proprietary **R²S** consensus mechanism. R²S extends the classic PoS algorithm by introducing a dynamic selection process, choosing **11** consensus nodes as validators in each cycle. This selection is based on node workload, the number of staked tokens, and a randomized factor. Validators play a key role in block production and confirmation, earning CESS tokens as rewards for their efforts. All consensus nodes have the following features:

* Record and store the transaction results and state changes
* Communicate among nodes that form a peer-to-peer network in a decentralized fashion
* Execute consensus algorithm to ensure on-chain data's security and sustained growth
* Contain cryptographic algorithm for signatures and transaction verifications

Users can either run their own consensus node to become a **Validator**, or stake tokens and be a **Nominator** to support validators, participating in the block production rewards.

### Validator

The Validator is consensus node selected by the consensus algorithm within a specific period. They are responsible for block packaging and confirming the consistency of blockchain state within the current era. Validators who successfully produce blocks will receive block rewards.

### Nominator

The Nominator is a cryptocurrency holder who indirectly participates in blockchain consensus and shares profits by supporting validators through collateral tokens.

{% hint style="success" %}
If you are interested in running a consensus node, please refer to the section [**Consensus Nodes**](/cess-miners/consensus-miner).
{% endhint %}

## Storage Nodes

The Storage Node is a fundamental component of the CESS network, acting as the primary entity for data storage and ensuring the integrity of user data. It offers verifiable and efficient idle storage capacity by utilizing the **Proof of Idle Space (PoIS)** mechanism. This mechanism helps identify unused storage resources and enables their repurposing for persistent data storage, all while maintaining high reliability through intelligent space management technology.

To safeguard data, the network employs the **Proof of Data Reduplication and Recovery (PoDR²)** mechanism, which ensures data redundancy and quick recovery in case of data loss. In the event of accidental data loss, the network's storage nodes automatically engage in data recovery procedures to maintain sufficient redundancy, ensuring high data availability.

The CESS chain periodically challenges storage nodes to verify both the availability of idle space and the integrity of the stored data. Storage nodes that successfully pass these challenges are rewarded with incentives for their participation. Users can easily deploy a storage node using simple command-line tools, minimizing configuration efforts while enabling them to monetize idle storage resources.

Storage nodes are responsible for managing their local disk resources, controlling the maximum storage capacity, and ensuring that they deliver data storage, retrieval, and proof calculation services. Nodes that provide larger amounts of storage are eligible for greater rewards, incentivizing the contribution of more substantial storage resources to the network.

{% hint style="success" %}
If you are interested in running a storage node, please refer to the section [**Storage Node**](/cess-miners/storage-miner).
{% endhint %}

## CDN Node

The **CDN Node** refers to nodes within the CESS CD²N, which play a vital role in optimizing data retrieval, balancing network load, mitigating DDoS (Distributed Denial of Service) attacks, and facilitating bidirectional data distribution between users and the CESS network. These nodes ensure seamless, low-latency delivery of data, both from users to the network and vice versa. Additionally, CDN Nodes are designed to support the processing of AI-related data, such as training datasets, models, and other AI assets, contributing significantly to the broader AI ecosystem within the CESS framework.

The CDN Node ecosystem is divided into two distinct roles: **Retriever** and **Cacher**.

#### **Retriever**

The **Retriever** node is responsible for a range of critical functions, including:

* **Data Retrieval**: Efficiently fetching user data when needed.
* **Caching**: Temporarily storing frequently accessed data to reduce latency.
* **Computation**: Performing necessary processing on data, such as transformations or analytics.
* **Load Sharing**: Managing data flow and balancing network load.
* **Traffic Proof Verification**: Ensuring that the traffic associated with cached data is valid and effective.

Retrievers share cached data across the CESS network, facilitating decentralized and highly efficient data interoperability within the CDN. Retrievers earn rewards by contributing computational power, data traffic, and supporting the overall performance of the network.

#### **Cacher**

The **Cacher** node focuses on **lightweight data caching** and can operate on **low-power DePIN devices**. Its main role is to store and cache frequently requested data, improving network responsiveness. Cachers help scale the edge cache infrastructure by leveraging a large number of low-cost, distributed devices. By contributing to the network's traffic distribution and data availability, cachers earn revenue based on the data they store and serve.

The deployment of **Cachers** enables the **unlimited scalability** of the edge cache, as the CESS network can expand by incorporating numerous small devices that contribute to the overall data distribution and traffic load.

#### Monetization and Flexibility

Users can easily deploy either role-**Retriever** or **Cacher**-using simple script tools and dedicated nodes, allowing them to monetize their resources based on the role they choose to run. This flexibility enables a wide range of participants to contribute to the CESS network, whether by providing computational power, storage, or network bandwidth, and earn rewards in return.

## TEE Nodes

The TEE Node operates within the Intel SGX (Software Guard Extensions) trusted execution environment, serving a crucial role in verifying the integrity of idle storage space and managing the initialization of user data. By leveraging the secure enclave provided by Intel SGX, the TEE Node ensures that data processing and verification occur in a trusted and tamper-proof environment, adding an extra layer of security and reliability to the network.

The TEE Node functions as an intermediary for consensus nodes, facilitating efficient validation of random challenges related to both idle space availability and the correctness of in-service data. While the TEE Node itself does not directly receive rewards, its operation enhances the overall performance of storage nodes, thereby indirectly benefiting the associated consensus nodes by increasing the likelihood of those nodes being selected as validators.

Users can quickly deploy TEE Nodes on supported devices using straightforward setup scripts. These nodes can be utilized to support the verification of storage nodes or consensus nodes, improving their efficiency and contributing to the scalability and security of the CESS network. This setup enables users to help optimize the consensus process, thus playing a key role in strengthening the overall ecosystem.

The **TEE Node** operates in three distinct modes: **Full Mode**, **Marker Mode**, and **Verifier Mode**, each serving different functions within the CESS network’s trusted execution environment (Intel SGX). These modes offer flexibility depending on the specific role and requirements of the node within the network.

#### **Full Mode**

**Full Mode** refers to the comprehensive operational mode of the TEE Node, where it supports all core functions. This includes:

* **Initialization of In-Service Data**: Handling the setup and preparation of active user data.
* **Authentication and Replacement of Idle Space**: Verifying the integrity of unused storage and repurposing it for data storage.
* **Verification of Random Challenges**: Performing random challenge validation for both idle space and in-service data to ensure integrity and availability.

The TEE nodes in Full Mode can perform all the critical tasks needed to verify and maintain data within the CESS network, contributing to the overall security and trustworthiness of the system.

#### **Marker Mode**

**Marker Mode** is a more specialized operational mode, where the TEE Node focuses solely on specific tasks excluding random challenge verification. These tasks generally include:

* **Initialization of In-Service Data**: Setting up and managing user data within the trusted environment.
* **Authentication of Idle Space**: Verifying that unused storage space can be safely utilized for data storage.
* **Replacement of Idle Space**: Repurposing idle storage space for active use.

In **Marker Mode**, the TEE Node does not interact with random challenge verification, and does not need to be bound to any specific consensus node. This mode is typically used when only the data authentication and management tasks are required, without the need for challenge-based validation.

#### **Verifier Mode**

**Verifier Mode** is focused exclusively on the **random challenge verification** function. Nodes running in this mode validate the challenges related to both idle space and in-service data, ensuring that the data integrity checks are properly executed. To operate in Verifier Mode—or as part of a **Full Mode** configuration that includes this function—the TEE Node must be bound to a **consensus node**. This binding ensures that the node's challenge verification activities are properly coordinated with the consensus mechanism.

Each mode allows the TEE Node to focus on specific tasks, optimizing the resources and operations of the CESS network based on the role it needs to fulfill, whether that is comprehensive data verification, space management, or random challenge validation.

### TEE Worker

The main task of the TEE worker is to mark data (generate file tags) for user's files that are used in PoDR² (Proof of Data Reduplication and Recovery) proofs and to generate space-holder files for the space provided by the storage miners in PoIS (Proof of Idle Space) proofs. Every job completed in the TEE worker is tamper-proof and verifiable, which can effectively ensure data authenticity.

TEE worker is developed based on the [Gramine library](https://gramineproject.io/) and currently only supports [Intel series chips](https://www.intel.com/content/www/us/en/developer/articles/tool/intel-trusted-execution-technology.html).

A TEE worker is bound to a consensus node and can only work after registering a transaction with the account signature of the consensus node. It requires a relatively high hardware requirement and needs the support of TEE functions. To balance out the higher cost, miners also earn a higher reward.

{% hint style="info" %}
If a CESS node is running in both full-node mode and TEE worker mode, it is eligible to be elected as a validator which responsible for producing and verifying blocks.
{% endhint %}

{% hint style="success" %}
If you are interested in running a storage node, please refer to the section [**TEE Node**](/cess-miners/tee-node).
{% endhint %}


# Consensus Nodes

**Consensus Node** is a fundamental role within the CESS ecosystem, responsible for supporting the security and integrity of the CESS network. By running the CESS blockchain client, Consensus Nodes participate in the consensus mechanism, helping to validate transactions and secure the decentralized infrastructure.

As key contributors to the network's governance and stability, Consensus Nodes play a critical role in maintaining the distributed ledger, ensuring that the data stored within the CESS network is both accurate and tamper-proof. Their activities include validating blocks, verifying the correctness of transactions, and participating in the protocol's decision-making processes, ultimately ensuring the CESS network's overall resilience and scalability.

Read about [how to run a consensus node client](/cess-miners/consensus-miner/running), or check to learn how [the miner is rewarded](/cess-miners/consensus-miner/reward). Refer to the [troubleshooting guide](/cess-miners/storage-miner/troubleshooting) if you encounter any problem.


# Running a Consensus Node

## System Requirement

If you're planning to run a consensus miner, it's important to make sure your system meets the recommended requirements to ensure that your miner performs at its best.

| Resource             | Specification               |
| -------------------- | --------------------------- |
| Recommended OS       | Ubuntu\_x64 20.04 or higher |
| CPU Processor Num    | ≥ 4                         |
| Memory               | ≥ 16 GB                     |
| Bandwidth            | ≥ 5 Mbps                    |
| Public Network IP    | required                    |
| Linux Kernel Version | 5.11 or higher              |

## Prepare Stash Account

* **Stash Account**: This is the account where you keep all the funds you want to stake. This account requires at least 3,000,000 TCESS for staking it can be either from the node owner itself or delegated by other users.

You can also refer to the page [Creating CESS Accounts](/user/cess-account) for creating a CESS account.

You can either use [CESS premainnet faucet](https://cess.network/faucet.html) to get TCESS, or [contact us](/readme/contact) to receive TCESS tokens for staking.

## Binding Funds to Stash Account

Open [CESS Explorer](https://polkadot.js.org/apps/?rpc=wss%3A%2F%2Ft2-rpc.cess.network%2Fws%2F#/) and Select **Network** > **Staking** > **Accounts** > **Stash**

![Add a Stash](/files/lQ08CPbScGN4IUh1mbQT)

Select the appropriate `stash account` from the drop-down menu and enter at least **3,000,000** TCESS in `value bounded` field. In `payment destination`, select **Stash Account as the reward receiving account (do not increase the amount at stake)**, which means that mining income will not be automatically added to the stake.

![Bond Fund](/files/A20UIUJBTIkYf3FdyBIo)

Click **Bond** -> **Sign and Submit** to link the Stash Account.

![Sign and Submit](/files/BRsrWyst4EGsnQyHWGBp)

Fund is bonded successfully!

![Bonded Fund Successfully](/files/7eaK4Sj40c0wdTYN7Aev)

## Run a chain node

### Run with nodeadm

#### Install nodeadm

{% hint style="info" %}
Please purge all of previous data before running a CESS consensus node on machine if an old version consensus node was installed.
{% endhint %}

```bash
    cess purge
    cess uninstall
```

The `cess-nodeadm` is a CESS node deployment and management tool. It helps to deploy and manage storage nodes, consensus nodes, and rpc node, simplifying the devOps for all CESS miners.

```bash
wget https://github.com/CESSProject/cess-nodeadm/archive/refs/tags/v0.7.0.tar.gz
tar -xvf v0.7.0.tar.gz
cd cess-nodeadm-0.7.0
sudo ./install.sh
```

{% hint style="info" %}
You can verify that you are running the latest version of [cess-nodeadm here](https://github.com/CESSProject/cess-nodeadm/releases).
{% endhint %}

On successful installation of cess-nodeadm you will see `Install cess nodeadm success` message.

If the installation fails, please check the [troubleshooting procedures](/cess-miners/storage-miner/troubleshooting).

#### Configure nodeadm

Please run the following command to configure nodeadm.

* set mode with `validator`
* set a custom node name `cess` or any other name of your choice.

```bash
$ cess config set

Enter cess node mode from 'tee/storage/validator/rpcnode' (current: validator, press enter to skip): validator
Enter cess node name (current: cess, press enter to skip): cess
Set configurations successfully
Start generate configurations and docker compose file
debug: Loading config file: config.yaml
info: Generating configurations done
info: Generating docker compose file done
e9e3df60a011799587e59f73e22db60d95c2ec7eebfe3058c358ed2d7c6d04a0
Configurations generated at: /opt/cess/nodeadm/build

$ cess start
[+] Running 3/3
 ✔ Container chain       Started
 ✔ Container watchtower  Started
```

### Run with container

1. Environment Setup Requirements

   ```shell
   curl -fsSL https://get.docker.com | bash
   docker --version
   docker pull cesslab/cess-chain:premainnet
   ```
2. Running Command

   **Make sure that port 30336 and 9944 are not occupied by other processes.**

   ```bash
   mkdir -p /opt/cess/validator

   docker run --rm -v /opt/cess/validator:/opt/cess/data cesslab/cess-chain:premainnet key generate-node-key --base-path /opt/cess/data --chain cess-premainnet >/dev/null 2>&1

   docker run -d \
   --name premainnet-rpc \
   -v /opt/cess/validator:/opt/cess/data \
   -p 30336:30336 \
   -p 9944:9944 \
   cesslab/cess-chain:premainnet \
   --base-path /opt/cess/data \
   --chain cess-premainnet \
   --port 30336 \
   --rpc-port 9944 \
   --rpc-external \
   --execution WASM \
   --wasm-execution compiled \
   --in-peers 75 \
   --out-peers 75 \
   --state-pruning archive \
   --validator \
   --max-runtime-instances 32 \
   --rpc-cors all \
   --prometheus-external \
   --rpc-methods unsafe
   ```

### Run with systemd

#### Download source files

**Get the latest `release` from** [**Github**](https://github.com/CESSProject/cess/releases)

```bash
mkidr -p /opt/cess/validator
cd /opt/cess/validator
wget https://github.com/CESSProject/cess/releases/download/cess-v0.8.0-premainnet/cess-node-v0.10.0-ubuntu22 -O cess-node
```

**Get the source files from a local container**

```bash
rm -rf /opt/cess/chain-tmp && mkdir -p /opt/cess/chain-tmp
docker pull cesslab/cess-chain:premainnet
docker run -d --name chain-tmp -p 30337:30336 -p 9945:9944 -v /opt/cess/chain-tmp:/opt/cess/data cesslab/cess-chain:premainnet --base-path /opt/cess/data --chain cess-premainnet --port 30336 --name cess --rpc-port 9944 --rpc-external --execution WASM --wasm-execution compiled --in-peers 75 --out-peers 75 --state-pruning archive --rpc-cors all --prometheus-external

docker cp chain-tmp:/opt/cess/cess-node /opt/cess/validator/cess-node
docker stop chain-tmp && docker rm chain-tmp
```

#### Run as systemd service

```bash
mkdir -p /opt/cess/validator

/opt/cess/validator/cess-node key generate-node-key --base-path /opt/cess/validator --chain cess-premainnet >/dev/null 2>&1

cat > /lib/systemd/system/validator.service << EOF
[Unit]
Description=CESS-PREMAINNET-Validator
After=network.target
[Service]
Type=simple
User=root
ExecStart=/opt/cess/validator/cess-node --base-path /opt/cess/validator --chain cess-premainnet --port 30336 --rpc-port 9944 --prometheus-external --name cess-premainnet --validator --max-runtime-instances 32 --state-pruning archive --rpc-methods unsafe 
WorkingDirectory=/opt/cess/validator
StandardOutput=append:/opt/cess/validator/validator.log
StandardError=append:/opt/cess/validator/validator.log
Restart=on-failure
[Install]
WantedBy=multi-user.target
EOF

systemctl enable logrotate.timer
systemctl restart logrotate.timer

cat > /etc/logrotate.d/validator << EOF
/opt/cess/validator/validator.log {
    daily
    rotate 7
    missingok
    notifempty
    compress
    delaycompress
    copytruncate
    create 0644 root root
}
EOF

sudo logrotate -d /opt/cess/validator/validator.log

systemctl enable validator
systemctl restart validator
systemctl status validator
tail -f /opt/cess/validator/validator.log
```

***

{% hint style="warning" %}
consensus node(validator) is one of the most important part in cess network, it is recommended to set alert for consensus node to ensure that the service is always online.
{% endhint %}

## Become a Validator

1. Start the chain node

Make sure that the chain node is running normally before proceeding.

```bash
$ ps -efww | grep cess-node
```

2. Generate a session key

   ```bash
   # generate by nodeadm
   cess tools rotate-keys

   # generate by docker
   docker exec chain curl -H 'Content-Type: application/json' -d '{"id":1, "jsonrpc":"2.0", "method": "author_rotateKeys", "params":[]}' http://localhost:9944 2>/dev/null

   # generate by http request
   curl -H 'Content-Type: application/json' -d '{"id":1, "jsonrpc":"2.0", "method": "author_rotateKeys", "params":[]}' http://localhost:9944 2>/dev/null
   ```

   ![rotate-keys Output Example](/files/Woxnnyczj4acp5zqtSH5)
3. Set up a session key

   Navigate to [CESS Explorer](https://polkadot.js.org/apps/?rpc=wss%3A%2F%2Ft2-rpc.cess.network%2Fws%2F#/), choose **Network** > **Staking** > **Accounts** > **Session Key**

   ![Session Key 01](/files/q9ihsKaZZgLXaotQWa1g)

   Fill in the **Session Key** in the red box

   ![Session Key 02](/files/hsfN9Oq5LCnNmDzsikSr)

   Click **Sign and Submit**

   ![Session Key 03](/files/W4JrYgFUNSCPSVaXARPe)
4. Becoming a validator

   Navigate to [CESS Explorer](https://polkadot.js.org/apps/?rpc=wss%3A%2F%2Ft2-rpc.cess.network%2Fws%2F#/), click **Network** > **Staking** > **Accounts** > **Validate**

   ![Validator 01](/files/5JluA7UW8eKm68moNMFF)

   ![Validator 02](/files/nHX8qpbIcYY0ZMj1CRgo)

   Enter **100** in *reward commission percentage*, indicating that the reward will not be distributed to others.

   Select **No, block all nominations** in *allows new nominations* dropdown, indicating that no nominations will be accepted.

   Again, click **Sign and Submit**.

   ![Validator 03](/files/mLhaZ7YdPqWLjZZdNC12)

   After completing the steps above, open the [CESS Explorer](https://polkadot.js.org/apps/?rpc=wss%3A%2F%2Ft2-rpc.cess.network%2Fws%2F#/) and click **Network** > **Staking** > **Waiting**.

   ![Validator 04](/files/wAfLU9IfHT9KcuL1Slv3)

   You should see that the node has already appeared on the candidate node list.

### Redeeming Rewards

Navigate to CESS Explorer: **Network** > **Staking** > **Payouts** > **Payout**.

![Redemption: First Step](/files/Cp3nNpnTHr85aVMlJ0t7)

In Payouts, click **Payout** to initiate a payment. Any account can initiate a payment.

![Redemption: Second Step](/files/QsewfYvJpMvJ0S2UGd94)

{% hint style="info" %}
Please claim the reward within 84 era (each era of the test network is 6 hours), which is 21 days. Those who hasn't claimed the reward in this period will not be able to claim it.
{% endhint %}

### Exiting Consensus from Validation

1. Stop the Consensus

   In [CESS Explorer](https://polkadot.js.org/apps/?rpc=wss%3A%2F%2Ft2-rpc.cess.network%2Fws%2F#/), navigate to: **Network > Staking > Account Actions > Stop**.

   ![Exiting-01](/files/mgeGjFOe5d4OxUso0ryp)
2. Clear Session Keys

   In [CESS Explorer](https://polkadot.js.org/apps/?rpc=wss%3A%2F%2Ft2-rpc.cess.network%2Fws%2F#/), navigate to: **Developer -> Submission**

   ![Exiting-02](/files/XsgODfyWdO783O5gkamv)

   Enter controller account in *using the selected account controller*. Then in *submit the following extrinsic*, enter **session** and choose **purgeKeys()** in the box next to it.

   ![Exiting-03](/files/GCzetyVge2x1tbNzcGSk)

   Click **Submit Transaction** button to clear session keys

   ![Exiting-04](/files/MfkGRE6Yyz5WpNuIGs2B)

### Redeeming Stake

1. Unbond fund

   After 28 eras (each era of the test network is 6 hours), goto [CESS Explorer](https://polkadot.js.org/apps/?rpc=wss%3A%2F%2Ft2-rpc.cess.network%2Fws%2F#/), navigate to: **Network > Staking > Account Actions > Unbond Funds**.

   ![Staking 01](/files/Fx039pTfAWW8TK5ij38i)
2. Stop the CESS client

   ```bash
   cess stop
   ```

## Upgrade CESS Nodeadm Client

### Stop and Remove All Services

```bash
cess stop
cess down
```

### Remove All Chain Data

{% hint style="warning" %}
Do not perform this operation unless the CESS network has been redeployed, and it is confirmed that the data can be cleared.
{% endhint %}

```bash
cess purge
```

### Update `cess-nodeadm`

```bash
wget https://github.com/CESSProject/cess-nodeadm/archive/refs/tags/<new-version>.tar.gz
tar -xvf <new-version>.tar.gz
cd cess-nodeadm-<new-version>
./install.sh --skip-dep --retain-config  --no-rmi
```

### Pull Images

```bash
cess pullimg
```


# Reward Mechanism

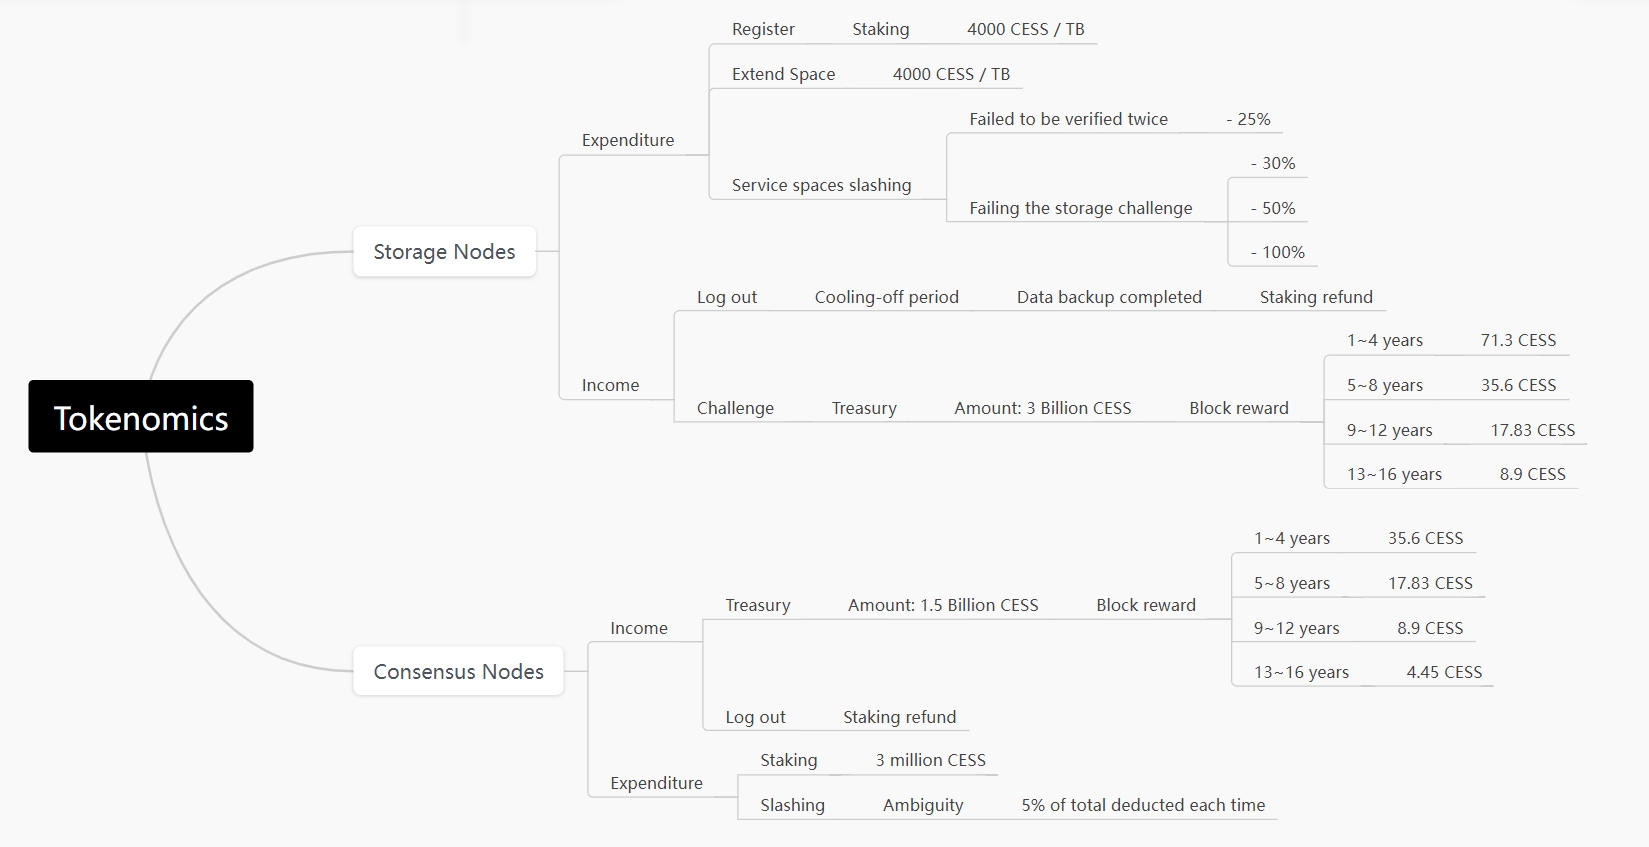
Referring to CESS overall tokenomics as below:

<figure><img src="/files/WhStZRFSL2DZ0vB2S6Yz" alt=""><figcaption><p>CESS Miner Revenue (Estimated)</p></figcaption></figure>

The CESS network will issue a total of **10 billion tokens**, with **30% allocated as rewards for Storage Miners** and **15% for Consensus Miners**.

In the first year, approximately **1.018 billion tokens** will be issued for miners, distributed evenly throughout the year in each era. The total rewards decrease in a stepwise manner each year, with an annual decay rate of 0.841 (0.5<sup>0.25</sup>), resulting in a halving of rewards every four years.

## Reward

For each era (which lasts 6 hours in CESS), miners receive rewards in proportion to the era points they have collected. Era points are obtained through the following:

* Authoring canonical blocks.
* Authoring references to previously unreferenced uncle blocks.
* Authoring referenced uncle blocks.

{% hint style="info" %}
Uncle blocks are relay chain blocks that are valid in all aspects but fail to become the canonical blocks. This occurs when two or more validators become block producers in the same slot, and one validator's block arrives at the next block producer before the other blocks. We refer to these lagging blocks as uncle blocks.
{% endhint %}

Rewards are distributed at the end of each era. Regardless of the amount staked by miners, block production rewards are generally distributed evenly among all miners. However, the rewards for specific miners may differ based on era points, as mentioned above. While earning era points has a probabilistic component and may be slightly influenced by factors such as network connectivity, well-performing miners should typically have a similar total sum of era points over a large number of eras.

Miners can also receive "tips" from transaction senders as an incentive for including their transactions in the blocks they produce. Miners receive 100% of these tips directly.

## Slashing

### No Response

If a validator fails to produce any blocks and does not send a heartbeat signal during an era, it will be reported as "no response". Depending on the number of repeated violations and the no response or offline status of other validators during that era, reduction penalties may be imposed.

Validators should have a robust network infrastructure to ensure node operation and reduce the risk of reduction or cooldown. It is advisable to have high availability setups and backup nodes that are only activated after the original node is verified as offline (to avoid double signing and potential ambiguity that could lead to reduction penalties, see below).

The formula for calculating the penalty due to no response is as follows:

**Let x = number of offenders, n = total no. of validators in the active set**

$$\boxed{min (\cfrac{3 \* (x - (\frac{n}{10} + 1))}{n}, 1) \* 0.07}$$

### Ambiguity

Both GRANDPA and BABE ambiguities use the same formula to calculate the penalties:

* **GRANDPA Ambiguity**: Validators signing two or more votes for different blocks in the same round.
* **BABE Ambiguity**: Validators producing two or more blocks in the same slot.

**Let x = number of offenders, n = total no. of validators in the active set**

$$\boxed{min((\cfrac{3 \* x}{n})^2, 1)}$$

Miners can run nodes on multiple computers to ensure that they can continue their validation work even if one of the nodes fails. However, mining operators should exercise caution when setting up these nodes. If they do not coordinate well in managing the signing machines, ambiguities may occur, and the penalty rate for ambiguous violations is higher than that for similar offline violations.

If a validator is reported for any violation, it will be removed (cooled down) from the validator set and will not receive rewards during its absence. It will be immediately considered inactive and will need to re-state its validation intent.


# Storage Nodes

Storage miner is a core user role type in our ecosystem that run a node client and contribute to the storage space in the CESS network.

Read about [how to run a storage node client](/cess-miners/storage-miner/running), or refer to the [troubleshooting guide](/cess-miners/storage-miner/troubleshooting) if you encounter any problem.


# Running a Storage Node

## Server Requirement

The recommended requirement of a storage server:

| Resource             | Specification            |
| -------------------- | ------------------------ |
| Recommended OS       | Linux 64-bit Intel / AMD |
| # of CPU Cores       | ≥ 4                      |
| Memory               | ≥ 8 GB                   |
| Bandwidth            | ≥ 20 Mbps                |
| Public Network IP    | required                 |
| Linux Kernel Version | 5.11 or higher           |

## Server Preparation

### Install Docker

Please refer to the [official documentation](https://docs.docker.com/engine/install/) for Docker installation.

### Firewall Configuration

{% hint style="info" %}
The following commands are executed with root privileges. If error messages of `permission denied` appear, switch to root privilege or add `sudo` at the beginning of these commands.
{% endhint %}

By default, the storage node uses port 15001 for network connections, please ensure that the firewall or security group is configured to allow incoming traffic on this port.

### Optional: Mount Additional Drive

{% hint style="info" %}
This step is required only if you are mounting another disk / storage device to your server.
{% endhint %}

Check the hard disk status using the `df -h` command:

```bash
df -h
```

If the disk is not mounted, the hard drive for storage mining cannot be used. Use the commands below to view unmounted hard disks:

```bash
fdisk -l

# Output result
Disk /dev/vdb: 200 GiB, 214748364800 bytes, 419430400 sectors
Units: sectors of 1 * 512 = 512 bytes
Sector size (logical/physical): 512 bytes / 512 bytes
I/O size (minimum/optimal): 512 bytes / 512 bytes
Disklabel type: dos
Disk identifier: 0x331195d1
```

From the above, we can see that the unmounted disk is `/dev/vdb`. We will be using `/dev/vdb` to demonstrate the mounting operation.

Allocate the `/dev/vdb` disk:

```bash
fdisk /dev/vdb

Enter and press Enter:
n
p
1
2048
the value after default
w
```

Format the newly divided disk into ext4 format:

```bash
mkfs.ext4 /dev/vdb
```

Enter "y" to continue if the system asks to proceed:

```bash
Proceed anyway? (y,N) y
```

Create `/cess` directory to mount the disk. Using `/cess` as an example:

```bash
sudo mkdir /cess
sudo echo "/dev/vdb /cess ext4 defaults 0 0" >> /etc/fstab
```

Replace `/dev/vdb` with your own disk name. /cess has to remain the same as created in the previous step. If you are not under root privileges, try:

```bash
echo "/dev/vdb /cess ext4 defaults 0 0" | sudo tee -a /etc/fstab
```

Mount `/cess`:

```bash
mount -a
```

Check the disk mounting status:

```bash
df -h
```

If `/cess` appears, the disk has been successfully mounted.

## Prepare CESS Accounts

Storage node need to create at least two wallet accounts.

* **Earning Account**: Used to receive mining rewards.
* **Staking Account**: Used to pay for staking TCESS.
* **Signature Account**: Used to sign blockchain transactions. If no staking account is specified, this account will also be used to pay staking TCESS.
* **Storage Deposit**: To keep the storage node in honoring its service commitment, the storage node account will have its native tokens locked for the storage amount pledged to offer. Currently in testnet, it is 4,000 TCESS per TB. The pledged space is **round up** to the closest TB unit and locked for that amount multiply with 4,000 TCESS. The minimum locked token is also 4,000 TCESS.

**Note：Each signature account can only be used by one storage node, otherwise an exception will occur.**

Please refer to [Creating CESS Accounts](/user/cess-account) for creating a CESS account, goto [CESS faucet](https://cess.network/faucet.html) to get our testnet tokens, TCESS, or [contact us](/readme/contact) to get assistance.

## Install CESS Client

1. Check for the latest version at: <https://github.com/CESSProject/cess-nodeadm/tags>
2. Download and install

   ```bash
   wget https://github.com/CESSProject/cess-nodeadm/archive/v0.6.1.tar.gz
   tar -xvzf v0.6.1.tar.gz
   cd cess-nodeadm-0.6.1/
   ./install.sh
   ```

   If a message `Install cess nodeadm success` shows up at the end, it means the installation is completed.

   If the installation fails, please check the [troubleshoot procedures](/cess-miners/storage-miner/troubleshooting).
3. Stop and removing existing services

   Stop existing services:

   ```bash
   sudo cess stop
   # or
   sudo cess down
   ```

   Remove existing services：

   ```bash
   sudo cess purge
   ```

## Configure CESS Client

### Setup a Running Network

```bash


# Running the storage node on test network:
sudo cess profile premainnet

# or Running the storage node on local development network:
sudo cess profile devtnet
```

### Setup Configuration

```bash
sudo cess config set

Enter cess node mode from 'tee/storage/validator/rpcnode' (current: storage, press enter to skip): storage
Enter cess storage listener port (current: 15001, press enter to skip): 
Start configuring the endpoint to access Storage-Miner from the internet
  Do you need to automatically detect extranet address as endpoint? (y/n) y
  Try to get your extranet IP ...
  Your Storage-Miner endpoint is http://x.x.x.x:15001
Enter cess rpc ws-url (current: local-chain, to use an external chain, type WS-URL directly, or press enter to skip):
Enter cess storage earnings account: cXf5MAAmRm85fmZEJRBDVbwEWSfZmkHEGWgBsJBF5LstfKe2D
Enter cess storage signature account phrase: apple pen used tree divide popular force aunt actor text tourist abstract
Enter cess storage disk path (default: /opt/cess/storage/disk): /cess
Enter cess storage space, by GB unit (current: 300, press enter to skip):
Enter the number of CPU cores used for mining; Your CPU cores are 4
  (current: 0, 0 means all cores are used; press enter to skip):
Enter the staking account if you use one account to stake multiple nodes (if it is the same as the signature account, press enter to skip):
Enter the TEE worker endpoints if you have any (separate multiple values with commas, press enter to skip):
Set configurations successfully
```

* If a staker payment account is provided, for testnet, the pledged space (answer to the **Enter cess storage space**) is **round up** to the closest TB unit and that amount multiply with 4,000 amount of TCESS will be locked as a miner deposit.
* If a staker payment account is not provided, then the signature account will be used as the staking account. If the staking account different from signature account is provided, can only [increase stake in block browser manually](https://docs.cess.network/core/storage-miner/troubleshooting).
* Default TEE Node endpoints for the chain will be used if you don't provide any TEE Node endpoints. This doesn't affect your reward as a storage miner.

Start CESS storage node

```bash
sudo cess start

[+] Running 3/0
 ✔ Container chain       Running                                                0.0s
 ✔ Container miner       Running                                                0.0s
 ✔ Container watchtower  Running                                                0.0s
```

If you want to speed up your earnings, you can choose to deploy a Marker-type TEE Node to help storage nodes certify space and mark user service files. Please refer to the [TEE Node User Guide](/cess-miners/tee-node/running).

## Common Operations

### Check CESS Chain Sync Status

```bash
docker logs -f -n 50 chain
```

As shown below, if we see that the height of the block corresponding to "best" is about the latest height in [CESS Explorer](https://testnet.cess.network/), it means the local chain node synchronization is completed.

![CESS Blockchain Synchronization Completed](/files/ME6jxd2AnPI0PrMQA9O2)

Only when the chain synchronization is completed can you operate other functions such as increase the staking, view the status of the node, etc.

### Check Your Storage Node Status On-chain

You can check your storage node status on-chain.

1. Goto [**Polkadot-js Apps**: Developer > Chain state](https://polkadot.js.org/apps/#/chainstate)
2. On *selected state query*: select **sminer** pallet and **allMiner()** storage item
3. Click the button on the right to query the state
4. At the bottom of the returned list, you should find the storage node address that your mnemonic (with root path) generated from your answer to `sudo cess config set`. See below for an example.

   ![CESS query on all miners](/files/2keeJVen15FenVdE7VBi)
5. You can also check your detail miner info with selecting **sminer** pallet and **minerItems(AccountId32)** storage item. In the *Option\<AccountId32>*, choose/input the storage node address. It will return your detail information on-chain. See below for an example.

   ![CESS query on my miner item](/files/E6gMxLDWFhUzS70t1zYd)
6. Go to [the **Accounts** page](https://polkadot.js.org/apps/#/accounts) and check your account details, you would see a certain amount of TCESS has been reserved as the storage deposit.

   ![Token is reserved as a storage miner](/files/F6jcP7YTZfgSJN8CytDI)

### View the Storage Node Log

```bash
docker logs -f -n 50 miner
```

As shown below, the storage node will sync the chain at first and then fetch key from tee node, finally start to generate idle files and start mining.

![Storage Node Log](/files/FBH4xv2QWpzaxRPD6g0S)

### View Storage Node Status

```bash
sudo cess miner stat
```

An example of the returned result is shown below：

![CESS Miner Stat](/files/RLqb7j4fDrT7q8WcV2gS)

Refer to the [Glossary](/glossary#storage-miner) on the names above.

At the beginning of the storage node synchronization, all your **validated space**, **used space**, and **locked space** are 0. It is only when the validated space been incremented above 0 that the storage miner start earning rewards.

Please wait for chain synchronization if you get the output like `you are not registered as a storage miner...`, otherwise, please config a public chain node to skip local chain synchronization.

### Increase Storage Node Staking

Make sure that the signatureAcc is the same as stakingAcc can use this command

```bash
sudo cess miner increase staking <deposit amount>
```

### Withdraw Storage Node Staking

After your node **has exited CESS Network** (see below), run

```bash
sudo cess miner withdraw
```

### Query Reward Information

```bash
sudo cess miner reward
```

### Claim Reward

```bash
sudo cess miner claim
```

### Update All Service Images

```bash
sudo cess pullimg
```

### Stop and Remove All Services

```bash
sudo cess down
```

### Update Earnings Account

```bash
sudo cess miner update earnings [earnings account]
```

### Exit CESS Network

```bash
sudo cess miner exit
```

## Upgrade CESS Client

### Stop and Remove All Services

```bash
sudo cess stop
sudo cess down
```

### Remove All Chain Data

{% hint style="warning" %}
Do not perform this operation unless the CESS network has been redeployed and it is confirmed that the data can be cleared.
{% endhint %}

```bash
sudo cess purge
```

### Update `cess-nodeadm`

```bash
wget https://github.com/CESSProject/cess-nodeadm/archive/vx.x.x.tar.gz
tar -xvf vx.x.x.tar.gz
cd cess-nodeadm-x.x.x
sudo ./install.sh --skip-dep
```

### Update All Service Images

```bash
sudo cess pullimg
```


# Running MultiNodes

## Architecture

Install multi-nodes can be illustrated as below:

* WatchTower: When there is a difference between the local storage node image and the official storage node image, watchtower will automatically pull the new official image, create a new miner, and then delete the old one.
* Storage node: A storage node communicate with each other via HTTP. The ports configured in the config template are: 15001, 15002.
* Chain: A chain node. storage node query blockchain data through the chain node's 9944 port by default; chain nodes synchronize data among themselves through the default port: 30336.
* Watchdog: storage nodes monitor. can scrape node's data from different hosts and alert user when some exception occurs.
* Dashboard: The dashboard of storage node monitor. can display the storage node data in a web page.

![Multi-miner Architecture](/files/czn7k2llU3jq1vPtkGh9)

## System requirements

Minimum Configuration Requirements:

| Resource             | Specification            |
| -------------------- | ------------------------ |
| Recommended OS       | Linux 64-bit Intel / AMD |
| # of CPU Cores       | ≥ 4                      |
| Memory               | ≥ 8 GB                   |
| Bandwidth            | ≥ 20 Mbps                |
| Public Network IP    | required                 |
| Linux Kernel Version | 5.11 or higher           |

Each storage node requires at least 4GB of RAM and 1 processor, and the chain node requires at least 2GB of RAM and 1 processor.

At least 10GB of RAM and 3 processors if running 2 storage nodes and 1 chain node at the same time

## Storage environment requirements

Installation operation has certain requirements on the storage environment in the current host, and different configurations are required based on the disk configuration.

### Multiple Disks

As shown in the figure below, where `/dev/sda` is the system disk, `/dev/sdb` and `/dev/sdc` is the data disk, users can directly partition and create file systems on the data disks, and finally mount the file systems to the working directory of the miner.

![Multi Disk](/files/NXuAEfzniEZ5DxpkZta7)

```bash
fdisk /dev/sdb

# 2048: The starting sector of a new disk is usually set to 2048. This ensures that the partition boundaries are aligned with the physical sectors of the hard disk.
# the value after default: The default is the maximum sector value, which partitions the entire disk.

Enter and press Enter:
n
p
1
2048
the value after default
w

# create filesystem in /dev/vdb
sudo mkfs.ext4 /dev/sdb

Proceed anyway? (y,N) y

# create a diskPath of a storage node
sudo mkdir /mnt/cess_storage1

# mount filesystem
sudo mount /dev/sdb /mnt/cess_storage1

# auto mount when your reboot your server
sudo cp /etc/fstab /etc/fstab.bak

# modify <disk: /dev/sdb> <mount path: /mnt/cess_storage1>
sudo sh -c "echo `blkid /dev/sdb | awk '{print $2}' | sed 's/\"//g'` /mnt/cess_storage1 ext4 defaults 0 0 >> /etc/fstab"
```

Repeat the above steps to partition `/dev/sdc` and create a filesystem, then mount it to the file directory: `/mnt/cess_storage2`

{% hint style="warning" %}
In the case where a disk is divided into many partitions, when the disk is damaged, all storage nodes that use its partitions for work will be affected.
{% endhint %}

### Single Disk

This procedure is suitable for environments with only one system disk.

#### Scene 1

As shown in the following example, if there is only one 50GB system disk, the `Last sector value` of partition `/dev/sda3` of disk `/dev/sda` is already at its maximum value (50GB disk can not be partitioned anymore).

```bash
[cess@cess ~]# lsblk 
NAME   MAJ:MIN RM  SIZE RO TYPE MOUNTPOINT
sda    253:0    0   50G  0 disk 
├─sda1 253:1    0    2M  0 part 
├─sda2 253:2    0  200M  0 part /boot/efi
└─sda3 253:3    0 49.8G  0 part /
```

As shown above, the current system kernel is using this partition, so it can not modify the partition to build the running environment required for multi-nodes.

If the partition does not take up the entire disk and there is still storage space available for partitioning, you can configure the partition by referring to the configuration method of **Multiple Disks**.(In this situation, the running of multi-nodes will depend on this single disk)

#### Scene 2

As shown in the figure below, the current environment has only one `/dev/nvme0n1` system disk with about 1.8T of storage space, which is partitioned three times, including `/dev/nvme0n1p1`, `/dev/nvme0n1p2` and `/dev/nvme0n1p3`.

The current system relies on the virtual logical disk `/dev/ubuntu-vg/ubuntu-lv` created in the third partition `/dev/nvme0n1p3`. Since this virtual logical disk occupies only 100GB of storage space, you can configure a multi-nodes environment by using `lvm` to create multiple virtual logical volumes on the remaining space.

![Single Disk](/files/onvNEn4bmCGh9ogdiotW)

```bash
# use command: vgs to show current volume group, and find that the current volume group name is: ubuntu-vg, VFree displays the remaining storage space of the current volume group.
$ vgs
cess@cess:/home/cess# vgs
  VG        #PV #LV #SN Attr   VSize   VFree
  ubuntu-vg   1   1   0 wz--n- <1.82t  1.7T

# use command: lvcreate to create a 100GB logic volume named cess_storage from volume group: ubuntu-vg
$ sudo lvcreate -L 100g -n cess_storage ubuntu-vg -y
# use command: lvcreate to create logic volume named cess_storage from all remaining space of volume group: ubuntu-vg
# sudo lvcreate -l 100%FREE -n cess_storage ubuntu-vg -y

# use command: lvdisplay to display logic volume your have created, name: cess_storage, path: /dev/ubuntu-vg/cess_storage
$ sudo lvdisplay
cess@cess:/home/cess# lvdisplay
  --- Logical volume ---
  LV Path                /dev/ubuntu-vg/ubuntu-lv
  LV Name                ubuntu-lv
  VG Name                ubuntu-vg
  LV UUID                zxJiPj-Anon-CG3r-XEIJ-Nydi-xxxx-U6oWqW
  LV Size                100.00 GiB
   
  --- Logical volume ---
  LV Path                /dev/ubuntu-vg/cess_storage
  LV Name                cess_storage
  VG Name                ubuntu-vg
  LV UUID                33Z2eL-AVma-oV4V-1vnE-G3YC-xxxx-wtzxHs
  LV Size                <1.72 TiB

# create filesystem in /dev/ubuntu-vg/cess_storage
$ sudo mkfs.ext4 /dev/ubuntu-vg/cess_storage

# create a diskPath of a storage node
sudo mkdir /cess

# mount filesystem
sudo mount /dev/ubuntu-vg/cess_storage /cess

# auto mount when your reboot your server
sudo cp /etc/fstab /etc/fstab.bak
# modify <lv path>, <diskPath>, <filesystem type>
sudo sh -c "echo `blkid /dev/ubuntu-vg/cess_storage | awk '{print $2}' | sed 's/\"//g'` /cess ext4 defaults 0 0 >> /etc/fstab"
```

{% hint style="warning" %}
Warning: If create multiple logic volumes on a single disk by lvm, then mount multiple logic volumes on different `diskPath`, when the disk is damaged, all nodes relying on lvm will be affected!
{% endhint %}

## 1. Download and install multi-nodes client

```bash
sudo wget https://github.com/CESSProject/cess-multiminer-admin/archive/latest.tar.gz
sudo tar -xvf latest.tar.gz
cd cess-multiminer-admin-latest
sudo bash ./install.sh
```

## 2. Customize your own configuration

{% hint style="info" %}
After executing the above installation command, customize your own config file at: `/opt/cess/mineradm/config.yaml`.
{% endhint %}

* **UseSpace:** Storage capacity of the storage node, measured in GB.
* **UseCpu:** Number of logical cores used by the storage node.
* **TeeList:** The public key of tee node, storage node will not use public tee nodes on chain if set custom tee nodes in config.yaml.
* **port:** Storage node use that port to communicat with each other, the port of each storage node must be different and not occupied by other process.
* **apiendpoint:** An external IP address or domain which can be accessed by internet, default value: `hostPublicIP:port`.
* **diskPath:** Absolute system path where the storage node run, requiring a file system to be mounted at this path.
* **earningsAcc:** Used to receive mining rewards. [Get earningsAcc and mnemonic](/user/cess-account)
* **mnemonic:** Account mnemonic, consisting of 12 words, with each storage node requiring a different mnemonic, set mnemonic as node's signatureAcc in /opt/cess/mineradm/config.yaml.
* **stakingAcc:** Used to pay for staking TCESS. 4000 TCESS at least is required for stakingAcc([Get TCESS](https://cess.network/faucet.html)). SignatureAcc also can be a stakingAcc when delete property: stakingAcc or make it empty in /opt/cess/mineradm/config.yaml.
* **chainWsUrl:** As an RPC node for blockchain synchronization. The priority of `miners[].chainWsUrl` is higher than `node.chainWsUrl` in /opt/cess/mineradm/config.yaml.
* **backupChainWsUrls:** Backup RPC nodes that can be official RPC nodes or other RPC nodes you know. The priority of `miners[].backupChainWsUrls` is higher than `node.backupChainWsUrls` in `/opt/cess/mineradm/config.yaml`.
* **Timeout:** Timeout about storage miner transaction with chain.
* **watchdog.enable:** Enable watchdog to monitor the health of the storage node.
* **watchdog.apiUrl:** A public url that can access to the watchdog service, user can set a `dns resolution` and `proxy service` to these watchdog server. default value: `http://<host public ip>:$port`.
* **watchdog.port:** Watchdog server listen at this port.
* **watchdog.hosts:** Watchdog server can scrape nodes data from these hosts, `ip` is the host ip, `port` is the port which docker daemon listen. TLS configuration must be set if scrape data from a host in a public network. [how to set docker daemon tls](/cess-miners/storage-miner/troubleshooting)
* **watchdog.alert:** Enable alert or not. Watchdog will send alert to the email address you set in `watchdog.alert.email.receiver` and send webhook to the webhook url you set in `watchdog.alert.webhook` if alert enable.
* **watchdog.auth:** Auth Configuration for web

**/opt/cess/mineradm/config.yaml Template as below:**

```yaml
## node configurations template
node:
  ## the mode of node: multiminer
  mode: "multiminer"
  ## the profile of node: devnet/testnet/mainnet
  profile: "testnet"
  # default chain url for storage node, can be overwritten in miners[] as below
  chainWsUrl: "ws://127.0.0.1:9944/"
  # default backup chain urls for storage node, can be overwritten in miners[] as below
  backupChainWsUrls: [ "wss://testnet-rpc.cess.network" ]

## chain configurations
## set option: '--skip-chain' or '-s' to skip installing chain (mineradm install --skip-chain)
## if set option: --skip-chain, please set official chain in miners[].chainWsUrl or others chains you know
chain:
  ## the name of chain node
  name: "cess"
  ## the port of chain node
  port: 30336
  ## listen rpc service at port 9944
  rpcPort: 9944

## storage nodes configurations  (multi nodes mode)
miners:
  - name: "miner1"
    # Use this endpoint to receive/send file, can be a domain or ip:port, default value: hostPublicIp:port
    apiendpoint: ""
    # storage miner listen at this port
    port: 15001
    # Maximum space used in each miner, the unit is GiB
    # The declaration space on chain is auto set by the value of `UseSpace after round up to the closest TB` when the miner first run
    # If set UseSpace 2300, that means declare 3 TiB space on the chain
    # If set UseSpace 300, that means declare 1 TiB space on the chain
    UseSpace: 1000
    # Number of cpu's processor used, 0 means use all
    UseCpu: 2
    # earnings account
    earningsAcc: "cXxxxxxxxxxxxxxxxxxxxxxxxxxxxxxxxxxxxxxxxxxxxxxxx"
    # Staking account
    # If you fill in the staking account, the staking will be paid by the staking account you set,
    # otherwise the staking will be paid by the signatureAcc(mnemonic).
    stakingAcc: ""
    # Signature account mnemonic
    # each miner's mnemonic should be different
    mnemonic: "aaaaa bbbbb ccccc ddddd eeeee fffff ggggg hhhhh iiiii jjjjj kkkkk lllll"
    # miner work at this path
    diskPath: "/mnt/cess_storage1"
    # The rpc endpoint of the chain
    # `official chain: "wss://testnet-rpc.cess.network"`
    chainWsUrl: "ws://127.0.0.1:9944"
    backupChainWsUrls: [ "wss://testnet-rpc.cess.network" ]
    # Timeout about storage miner transaction with chain 
    Timeout: 12
    # Tee public key, can get this key from the starting log of cifrost container
    # Attention: Storage miner will not use public tee nodes on chain if set custom tee nodes in config.yaml
    # TeeList:
    #  - 0x3222602a6be742ec9edc3c31cb48dd8a48001bc6efba6c2ed59cd728cdf46a55
    #  - 0x.....

  - name: "miner2"
    apiendpoint: ""
    port: 15002
    UseSpace: 1000
    UseCpu: 2
    earningsAcc: "cXxxx"
    stakingAcc: ""
    mnemonic: "xxx"
    diskPath: "/mnt/cess_storage2"
    chainWsUrl: "ws://127.0.0.1:9944"
    backupChainWsUrls: [ "wss://testnet-rpc.cess.network" ]
    Timeout: 12
    
    
# nodes monitor service, send alert with email/webhook when nodes is down or get punishment
watchdog:
  # enable storage nodes monitor or not
  enable: false
  # external: run with 0.0.0.0 or 127.0.0.1
  external: false
  # apiUrl: watchdog-web request this apiUrl to fetch data from watchdog: <public_ip:13081 or a domain>
  apiUrl: ""
  # watchdog server listen http port at: 13081 (watchdog-web listen at 13080)
  port: 13081
  # the interval of scrape data from chain for each storage node, 30 <= scrapeInterval <= 300
  scrapeInterval: 60
  # watchdog can scrape nodes data from this hosts
  hosts:
    - ip: 127.0.0.1 # 127.x, 10.0.0.0/8, 172.16.0.0/12, 192.168.0.0/16
      # make sure docker daemon listen at 2375: https://docs.docker.com/config/daemon/remote-access/
      # will be bind at 127.0.0.1:2375 when install mineradm
      port: 2375
    # Configure remote access for Docker daemon in public network must use tls to make sure mnemonic safe
    # set ca/crt/key path if the ip no belongs to [ 127.x, 10.0.0.0/8, 172.16.0.0/12, 192.168.0.0/16 ]
    - ip: 1.1.1.1 # 1.1.1.1 is a public IP
      # make sure docker daemon tls listen at 2376: https://docs.docker.com/engine/security/protect-access/
      port: 2376
      # please make sure each file name is unique, can get help from: https://doc.cess.network/cess-miners/storage-miner/troubleshooting
      # will mount this files from host to container automatically
      ca_path: /etc/docker/tls/1.1.1.1_ca.pem
      cert_path: /etc/docker/tls/1.1.1.1_cert.pem
      key_path: /etc/docker/tls/1.1.1.1_key.pem
  alert:
    # enable alert or not
    enable: false
    # send webhook to alert someone
    webhook:
      - https://hooks.slack.com/services/XXXXXXXXX/XXXXXXXXX/XXXXXXXXXXXXXXXXXXXXXXXX
      - https://discordapp.com/api/webhooks/XXXXXXXXXXXXXXXXXXXXXXXXXXXXXXXXXXXXXXXXX
    # send email to alert someone
    email:
      smtp_endpoint: smtp.example.com
      smtp_port: 80
      smtp_account: myservice@example.com
      smtp_password: my_pwd
      receive_addr:
        - example1@gmail.com
        - example2@outlook.com
  auth:
    username: "admin" # env: WATCHDOG_USERNAME, default: cess
    password: "passwd" # env: WATCHDOG_PASSWORD, default: Cess123456
    jwt_secret_key: "your-random-secret-key" # env: WATCHDOG_JWT_SECRET
    token_expiry: 1  # 1 hour # env: WATCHDOG_TOKEN_EXPIRY
```

## 3. Generate configuration

The following command will generate `config.yaml` for each storage node and generate `docker-compose.yaml` based on the file located at: `/opt/cess/mineradm/config.yaml`.

```bash
sudo mineradm config generate
```

* Generate each storage node configuration at `$diskPath/miner/config.yaml`. For example, miner1's configuration generate at: `/mnt/cess_storage1/miner/config.yaml`
* Generate docker-compose.yaml at `/opt/cess/mineradm/build/docker-compose.yaml`
* If set enable watchdog service, its config will be generated at `/opt/cess/mineradm/build/watchdog/config.yaml`

{% hint style="info" %}
Leave `watchdog.apiUrl` empty in `/opt/cess/mineradm/config.yaml` can set this value as `http://<your public ip>:13081` automatically.

If you want access to the watchdog dashboard via a `domain`, please set your domain in `/opt/cess/mineradm/config.yaml`: **watchdog.apiUrl** and then re-run command: `mineradm config generate`. Set your domain as apiUrl in `/opt/cess/mineradm/build/docker-compose.yaml`: **watchdog-web.environment.NEXT\_PUBLIC\_API\_URL** also has the same effect.

A nginx proxy example as below:

```txt
server {
  listen 80;
  server_name mydomain.com;
  location / {
	proxy_pass http://127.1:13081;
    proxy_set_header Host $host;
    proxy_set_header X-Real-IP $remote_addr;
	proxy_set_header X-Forwarded-For $proxy_add_x_forwarded_for;
  }
}
```

{% endhint %}

## 4. Installation

### Install all services

Install watchTower, rpc node, watchdog, watchdog-web and storage nodes services

```bash
sudo mineradm install
```

### Skip install rpcnode

If an official RPC node or other known RPC node is configured in the configuration file, you can skip starting a local RPC node with `--skip-chain`.

```bash
sudo mineradm install --skip-chain
```

## 5. Common Operations

**Stop all services**

```bash
  sudo mineradm stop
```

**Stop one or more specific service**

Such as execute `sudo mineradm stop miner1 miner2` to stop `miner1` and `miner2`

```bash
  sudo mineradm stop [miner name]
```

**Stop and remove all services**

```bash
  sudo mineradm down
```

**Stop and remove one or more specific service**

Such as execute `sudo mineradm down miner1` to remove `miner1`

```bash
  sudo mineradm down [miner name]
```

**Restart all services**

```bash
  sudo mineradm restart
```

**Restart one or more specific service**

Such as execute `sudo mineradm restart miner1` to restart `miner1`

```bash
  sudo mineradm restart [miner name]
```

**Get version information**

```bash
  sudo mineradm version
```

**Check services status**

```bash
  sudo mineradm status
```

**Pull and update images**

```bash
  sudo mineradm pullimg
```

**Check local disk usage**

```bash
  sudo mineradm tools space-info
```

**View all storage nodes status**

If you get the result of `you are not registered as a storage miner yet...`, please allow several hours for the rpc node block synchronization when you first run.

```bash
  sudo mineradm miners stat
```

**Increase all storage nodes staking**

Only all storage nodes signatureAcc(mnemonic) is the same as its stakingAcc can use this command, otherwise can only transfer staking to stakingAcc in browser [manually](https://doc.cess.network/storage-miner/troubleshooting).

Such as execute `sudo mineradm miners increase staking 4000` to increase all storage nodes staking

```bash
  sudo mineradm miners increase staking $deposit_amount
```

**Increase a specific storage node's staking**

Make sure that the storage node's signatureAcc(mnemonic) is the same as its stakingAcc can use this command, otherwise can only transfer staking to stakingAcc in browser [manually](https://doc.cess.network/storage-miner/troubleshooting).

Such as `sudo mineradm miners increase staking miner1 4000`

```bash
  sudo mineradm miners increase staking $miner_name $deposit_amount
```

**Increase all storage nodes declaration space**

space\_amount unit: TiB, The `declaration space` on chain is auto set by the value of `UseSpace after round up to the closest TB` when the storage node first run

Before increase `declaration space`, please make sure that the storage node have sufficient TCESS in `stakingAcc`. For example, increase staking from `4000` to `8000` before increase `declaration space` from `1 Tib` to `2 TiB`

Execute: `sudo mineradm miners stat` to check current `declaration space` at first

After increase staking in stakingAcc, then execute `sudo mineradm miners increase space 2` to increase all storage nodes staking declaration space to 2 TiB

```bash
  sudo mineradm miners increase space $space_amount
```

**Increase a specific storage node's declaration space**

space\_amount unit: TiB, command usage as same as above

```bash
  sudo mineradm miners increase space $miner_name $space_amount
```

**Change all storage nodes UseSpace**

UseSpace unit: GiB

The `UseSpace` in each storage node is less or equal to `declaration space`, the storage node can only use storage space less or equal to `UseSpace`

If set UseSpace to 2100 when storage node first run, that means the storage node declare 3 TiB space on the chain, if set UseSpace to 300 when storage node first run, that means declare 1 TiB space on the chain(at least 1 TB)

Example 1: The miner1's disk size is 1.5 TiB in current, but only set 800 GiB UseSpace for running, then you can run `sudo mineradm tools set use-space miner1 1200` to increase UseSpace to 1200 GiB

Example 2: The miner1's disk size is 1.5 TiB in current, and set 1400 GiB UseSpace for running, so you can run `sudo mineradm tools set use-space mienr1 1000` to decrease miner1's UseSpace to 1000 GiB if the result of `used space` with `mineradm miners stat` is less than 1000 GiB

{% hint style="warning" %}
If only declare 1 TiB on the chain, but set UseSpace greater than 1024 GiB, the additional UseSpace in storage node can not be used
{% endhint %}

```bash
  sudo mineradm tools set use-space $UseSpace
```

**Change a specific storage node's UseSpace**

UseSpace unit: GiB, command usage as same as above

```bash
  sudo mineradm tools set use-space $miner_name $UseSpace
```

**Query all storage nodes reward**

```bash
  sudo mineradm miners reward
```

**Claim all storage nodes reward**

```bash
  sudo mineradm miners claim
```

**Claim a specific storage node's reward**

Such as `sudo mineradm miners claim miner1`

```bash
  sudo mineradm miners claim $miner_name
```

**Update a storage node's earnings account**

Such as change miner1's earningsAcc to $earnings\_account: `sudo mineradm miners update account miner1 $earnings_account`

```bash
  sudo mineradm miners update account $miner_name $earnings_account
```

**Update all storage nodes earnings account**

```bash
  sudo mineradm miners update account $earnings_account
```

{% hint style="warning" %}
The process of exiting the CESS network will last for hours, and forcing an exit in the middle of the process might make the storage node being punished.
{% endhint %}

**Make all storage nodes exit the network of cess**

```bash
  sudo mineradm miners exit
```

**Make a specific storage node exit the network of cess**

Such as `sudo mineradm miners exit miner1`

```bash
  sudo mineradm miners exit $miner_name
```

**Withdraw all storage nodes staking**

After all storage nodes **has exited CESS Network** (see above), run

```bash
  sudo mineradm miners withdraw
```

**Withdraw a specific storage node's staking**

After this node **has exited CESS Network** (see above), run

```bash
  sudo mineradm miners withdraw $miner_name
```

**Remove the local chain data**

```bash
  sudo mineradm purge
```

## 6. Upgrade mineradm client

Upgrade the mineradm client by execute command as below:

```bash
cd /tmp
sudo wget https://github.com/CESSProject/cess-multiminer-admin/archive/latest.tar.gz -O /tmp/latest.tar.gz
sudo tar -xvf latest.tar.gz
cd cess-multiminer-admin-latest
sudo bash ./install.sh --no-rmi --retain-config --skip-dep --keep-running
```

After the program update is completed, please regenerate your configuration as below:

```bash
sudo cat /opt/cess/mineradm/.old_config.yaml > /opt/cess/mineradm/config.yaml
sudo mineradm config generate
```

Options help:

```
    -n | --no-rmi              do not remove the corresponding image when uninstalling/upgrade the old services
    -r | --retain-config       retain old config at: /opt/cess/mineradm/.old_config.yaml when upgrade mineradm
    -s | --skip-dep            skip install the dependencies
    -k | --keep-running        do not stop the services if cess services is running
```


# Node Troubleshooting

## Issues During Installation

<details>

<summary>Unable to download docker image</summary>

During the installation process, docker is used to download cess image. If the following error occurs when installing the `cess-nodeadm`:

<img src="https://github.com/CESSProject/doc-v2/blob/main/cess-miners/assets/storage-miner/troubleshooting/docker-daemon-issue.png" alt="Docker Daemon Issue" data-size="original">

Make sure commands are in the root privilege or prefixed with `sudo` command. Start docker on your system:

```bash
systemctl start docker
```

Reinstall the `cess-nodeadm`:

```bash
./install.sh
```

⚠️ Note that most CESS program commands must have root privileges.

</details>

<details>

<summary>Failed to locate docker package</summary>

If the following error occurs when installing the `cess-nodeadm`:

<img src="https://github.com/CESSProject/doc-v2/blob/main/cess-miners/assets/storage-miner/troubleshooting/docker-package-issue.webp" alt="Docker Package Issue" data-size="original">

Try to delete Docker with following commands:

```bash
sudo systemctl stop docker
docker stop $(docker ps -aq)
docker rm -v $(docker ps -aq)
docker rmi $(docker images -aq)
docker volume rm $(docker volume ls -q)
brew uninstall docker
```

Reinstall Docker:

```bash
sudo apt-get install docker-ce
sudo systemctl enable docker
sudo systemctl start docker
```

</details>

## Issues After Installation

<details>

<summary>Increase Stake Manually</summary>

If signatureAcc different from stakingAcc is provided as below: ![CESS Account Issue](https://github.com/CESSProject/doc-v2/blob/main/cess-miners/assets/storage-miner/troubleshooting/different-acc.png)

You can not increase stake by command with client:

```bash
sudo cess storage node increase staking $deposit_amount
# or
sudo mineradm miners increase staking $miner_name $deposit_amount

# Execute command as above might get message like: `!! 2024-03-28 13:22:18 0xxxxxxxxxxxxxxxxxxxxxxxxxxxxxxxxxxxxxxxxxxxxxxxxxxxxxxxxxx`
```

Try to access to [block browser](https://polkadot.js.org/apps/?rpc=wss%3A%2F%2Ftestnet-rpc.cess.network%2Fws%2F#/accounts) and send TCESS manually

**Step 1**: Select an account which have sufficient TCESS, then click `send` ![CESS Account Issue](https://github.com/CESSProject/doc-v2/blob/main/cess-miners/assets/storage-miner/troubleshooting/send-in-browser.png)

**Step 2**: Enter the staking account and amount, then click `Make Transfer` ![CESS Account Issue](https://github.com/CESSProject/doc-v2/blob/main/cess-miners/assets/storage-miner/troubleshooting/make-transfer-in-browser.png)

**Step 3**: Finally, enter the password for the account you have selected that has sufficient TCESS.

</details>

## Issues During Configuration

<details>

<summary>Failed to download CESS image</summary>

If the following error occurs when setting up the config:

<img src="https://github.com/CESSProject/doc-v2/blob/main/cess-miners/assets/storage-miner/troubleshooting/cess-image-download-issue.png" alt="CESS Image Download Issue" data-size="original">

Ensure the commands are run in the root privilege or prefixed with `sudo` command.

Try `cess config set` command.

</details>

<details>

<summary>Invalid config file (config.yaml)</summary>

<img src="https://github.com/CESSProject/doc-v2/blob/main/cess-miners/assets/storage-miner/troubleshooting/invalid-config-issue.webp" alt="Invalid Config Issue" data-size="original">

Delete file `/usr/bin/yq`:

```bash
sudo rm /usr/bin/yq
```

Reinstall `cess-nodeadm` again:

```bash
./install.sh
```

</details>

<details>

<summary>Set Docker Daemon Access with TLS</summary>

`mineradm` will enable docker daemon access at port: `2375` automatically when install `mineradm`, but if you want to watchdog access to a host in public network, you need to set that host's docker daemon start with TLS.

Because watchdog need to request each storage node's config file from others hosts by docker api, and this config file contain storage node's mnemonic, so it must encrypt when transferring in public network.

It is a shell demo to generate files by openssl. change the `<IP where watchdog run>` to your watchdog server ip. You can get more detail information from [Docker Daemon Access with TLS](https://docs.docker.com/engine/security/protect-access/).

**Please keep your file safe and make sure no one can get your key file.**

```bash
PASSPHRASE=
openssl genrsa -aes256 -passout pass:$PASSPHRASE -out ca-key.pem 4096
openssl req -new -x509 -passin pass:$PASSPHRASE -days 36500 -key ca-key.pem -sha256 -subj "/C=US" -out ca.pem
openssl genrsa -aes256 -passout pass:$PASSPHRASE -out server-key.pem 4096
openssl req -subj "/C=US" -passin pass:$PASSPHRASE -passout pass:$PASSPHRASE -sha256 -new -key server-key.pem -out server.csr
echo subjectAltName = DNS:IP:<IP where watchdog run> >> extfile.cnf
echo extendedKeyUsage = serverAuth >> extfile.cnf
openssl x509 -req -days 36500 -passin pass:$PASSPHRASE -sha256 -in server.csr -CA ca.pem -CAkey ca-key.pem -CAcreateserial -out server-cert.pem -extfile extfile.cnf
openssl genrsa -out key.pem 4096
openssl req -subj '/CN=client' -new -key key.pem -out client.csr
echo extendedKeyUsage = clientAuth > extfile-client.cnf
openssl x509 -req -days 36500 -passin pass:$PASSPHRASE -sha256 -in client.csr -CA ca.pem -CAkey ca-key.pem -CAcreateserial -out cert.pem -extfile extfile-client.cnf
openssl rsa -passin pass:$PASSPHRASE -in server-key.pem -out server-key-decrypted.pem
rm -v client.csr server.csr extfile.cnf extfile-client.cnf
chmod -v 0444 ca.pem server-cert.pem cert.pem
```

After generate files by openssl, start listen docker daemon with TLS at port: 2376

```bash
# Testing: docker can run with tls successfully
systemctl stop docker
dockerd --tlsverify --tlscacert=ca.pem --tlscert=server-cert.pem --tlskey=server-key-decrypted.pem -H=0.0.0.0:2376 -H unix:///var/run/docker.sock &
```

Recommend to use `systemd` to start docker daemon with TLS.

```bash

# 1: edit file: /lib/systemd/system/docker.service

# 2: modify row: `ExecStart=...` to
ExecStart=/usr/bin/dockerd --tlsverify --tlscacert=/etc/docker/ca.pem --tlscert=/etc/docker/server-cert.pem --tlskey=/etc/docker/server-key-decrypted.pem -H tcp://0.0.0.0:2376 -H unix:///var/run/docker.sock

systemctl daemon-reload && systemctl restart docker

```

Finally, copy files(ca.pem/key.pem/cert.pem) to the server where watchdog run, then config the files path in `/opt/cess/mineradm/config.yaml` and run `mineradm config generate`

⚠️ Expose Docker API Port at `0.0.0.0:2375` without TLS is unsafe, it may get network attack like `kdevtmpfsi`

If you have already get attack, please execute command as down below

```bash

docker stop $(docker ps -a | grep ubuntu | awk '{print $1}')
docker rm $(docker ps -a | grep ubuntu | awk '{print $1}')
docker rmi $(docker images | grep ubuntu | awk '{print $3}')


sudo sed -i 's/^ExecStart=.*/ExecStart=\/usr\/bin\/dockerd -H fd:\/\/ -H unix:\/\/\/var\/run\/docker.sock -H tcp:\/\/127.0.0.1:2375/' /lib/systemd/system/docker.service
sudo systemctl daemon-reload
sudo systemctl restart docker
sudo mineradm install
```

</details>


# Storage Miner Upgrade Guide

## Introduction

**For better data transmission, we need to upgrade our storage miner to latest version which is incompatible with the old version.**

**Add configuration:** `apiendpoint` and `timeout`

* apiendpoint: An external `ip:port` or `domain` which can be accessed by public network, default value: `hostPublicIP:port`
* Timeout: Default `12` seconds for transaction with chain.

**Delete configuration:** `Boot`

**Attention:** Storage miner will not use `public tee nodes` on chain if set `custom tee nodes` in config.yaml

### Old Configuration File Schema

```yaml
Name: miner1
Port: 15001
EarningsAcc: cXxxx
StakingAcc: cXxxx
Mnemonic: expand left depict favorite busy marriage good curtain celery misery fly obscure
Rpc:
  - 'ws://127.0.0.1:9944'
  - 'wss://testnet-rpc.cess.network'
UseSpace: 1000
Workspace: /opt/miner-disk
UseCpu: 2
TeeList:
  - '127.0.0.1:8080'
  - '127.0.0.1:8081'
Boot:
  - _dnsaddr.boot-miner-testnet.cess.network
```

### New Configuration File Schema

```yaml
app:
  workspace: /opt/miner-disk
  port: 15001
  maxusespace: 1000
  cores: 2
  apiendpoint: '1.1.1.1:15001'
chain:
  mnemonic: expand left depict favorite busy marriage good curtain celery misery fly obscure
  stakingacc: null
  earningsacc: cXxxx
  timeout: 12
  rpcs:
    - 'ws://127.0.0.1:9944'
    - 'wss://testnet-rpc.cess.network'
```

## How to Upgrade

### For nodeadm user

```bash
# step 1: update nodeadm client
# https://github.com/CESSProject/cess-nodeadm/releases
wget https://github.com/CESSProject/cess-nodeadm/archive/vx.x.x.tar.gz
tar -xvf vx.x.x.tar.gz
cd cess-nodeadm-x.x.x
sudo ./install.sh --skip-dep

# step 2: update related images
$ sudo cess pullimg

# step 3: update config file
$ sudo cess config set
# Start configuring the endpoint to access Storage-Miner from the internet
# Do you need to automatically detect extranet address as endpoint? (y/n)  need_detect
# ...

# step 4: restart service
$ sudo cess restart
```

### For mineradm user

```bash
# step 1: update mineradm client
sudo wget https://github.com/CESSProject/cess-multiminer-admin/archive/latest.tar.gz -O /tmp/latest.tar.gz && cd /tmp
sudo tar -xvf latest.tar.gz
cd cess-multiminer-admin-latest
sudo bash ./install.sh --no-rmi --retain-config --skip-dep --keep-running

# step 2: update related images
$ sudo mineradm pullimg

# step 3: update config file
# Attention: Storage miner will not use public tee nodes on chain if set custom tee nodes in config.yaml
method 1: edit /opt/cess/mineradm/config.yaml based on the old config file: /opt/cess/mineradm/.old_config.yaml
method 2: use default value of apiendpoint/Timeout: cat /opt/cess/mineradm/.old_config.yaml > /opt/cess/mineradm/config.yaml

# step 4: generate new config file
$ sudo mineradm config generate

# step 5: restart service
$ sudo mineradm down
$ sudo mineradm install
```


# CDN Nodes

CESS CDN Nodes constitute the fundamental infrastructure units within the CESS content delivery network, engineered to deliver three mission-critical functions:

1. Intelligent load balancing for distributed data retrieval systems
2. Proactive DDoS attack mitigation through decentralized architecture
3. Bidirectional data orchestration between end-users and the CESS network

A key differentiator lies in our native infrastructure support for AI workflows. The network's underlying architecture seamlessly integrates processing capabilities for AI training datasets, machine learning models, and associated metadata - positioning CESS as an enabler of next-generation AI ecosystem development.

**Operational Roles & Incentives** The CDN Node framework operates through two specialized components:

| **Cachers** 🗄️                                 | **Retrievers** ⚡                                              |
| ----------------------------------------------- | ------------------------------------------------------------- |
| • Lightweight deployment on DePin edge devices  | • Advanced compute-intensive operations                       |
| • Distributed data caching layer implementation | • Intelligent load scheduling & inter-node coordination       |
| • Revenue generation via bandwidth contribution | • Dual revenue streams: computational power + data throughput |

**Resource Monetization** Network participants can dynamically configure dedicated nodes through automated scripting tools, enabling flexible role assignment (Cacher/Retriever) based on real-time resource availability and market demand. This creates an adaptive economic model where hardware resources translate directly into network value.

## Retriever Node: The Intelligent Data Orchestrator

The Retriever serves as the computational backbone of the network, integrating four core capabilities:

1. **Distributed Data Retrieval**: Implements efficient data location and transfer protocols
2. **Smart Caching Management**: Optimizes storage allocation through real-time demand analysis
3. **On-demand Computation**: Executes data processing tasks at the network edge
4. **Intelligent Scheduling**: Implements dynamic load balancing across nodes

A unique feature is its integrated traffic verification mechanism, which cryptographically validates cache effectiveness and data integrity. Through native IPFS network integration, Retrievers establish a decentralized data sharing layer, enabling seamless cross-network interoperability and optimized content delivery.

## Cacher Node: The Edge Scaling Solution

Cachers represent the distributed storage layer, specifically designed for:

* **Lightweight Operation**: Optimized for low-power DePin devices with minimal resource footprint
* **Incentivized Participation**: Generates revenue through verifiable bandwidth contribution
* **Massive Scalability**: Enables linear cache capacity expansion with each added node

This architecture achieves unprecedented edge network scalability, allowing CESS to deploy an elastic caching infrastructure that dynamically adapts to global demand patterns. The distributed nature of Cachers ensures both geographic coverage and system resilience.

Read about [how to run a Retriever](/cess-miners/cdn-node/running-retriever) or [how to run a Cacher](/cess-miners/cdn-node/running-cacher)


# Running a Cacher

Cacher nodes are edge caching nodes distributed across the CD²N network, designed to operate efficiently with minimal resources. They are suitable for deployment on various devices including personal computers, servers, smartphones, and Raspberry Pi. The primary functions of Cacher nodes include providing or caching user data for Retrievers in CD²N, creating value through contributions of cache storage and bandwidth resources. Cacher nodes currently operate in three modes:

1. Receiving user data shards from gateways and distributing them to connected storage nodes, accelerating persistent storage processes;
2. Retrieving data shards from local cache, storage nodes, or alternative sources (e.g., IPFS) to fulfill data requests from Retriever nodes;
3. Storing user data offloaded from Retriever nodes in local cache for rapid response, enabling dynamic scaling of Retriever node cache capacity;

Typical deployment scenarios for Cacher nodes include:

1. Independent operation on personal devices to earn rewards by caching offloaded data from Retriever nodes;
2. Co-deployment with storage nodes to enhance mining rewards through data provisioning and earn additional income by serving data from storage nodes to Retrievers;
3. Integration with external platforms (e.g., IPFS nodes) to facilitate cross-platform resource interoperability and earn rewards by serving data from these platforms to Retrievers;

Cacher node rewards are calculated based on verifiable data volume contributed to Retriever nodes. Rewards are distributed periodically according to the Proof of Traffic (PoT) protocol, with properly configured nodes automatically claiming earnings each operational cycle.

## Hardware Requirements

* Processor: 2.0 GHz or higher
* Memory: 2 GB or higher
* Storage: 32 GB or higher
* Bandwidth: 10 Mbps or higher
* OS: Ubuntu, CentOS
* Network: TCP/IP support

## Account Preparation

Operating a Cacher node requires two Ethereum wallet accounts:

1. **Node Operational Account**: For node registration and reward collection
2. **Token Account**: Holds the NFT access certificate for CD²N network participation

Key considerations:

* Both accounts interact with smart contracts on CESS consensus nodes' EVM
* Each NFT token can only authorize one Cacher node
* Testnet phases:
  * Early phase: No token required
  * Mid phase: Tokens distributed by CESS community
  * Final phase: Test contract activation

Setup steps:

1. Create Operational Account:
   * Generate Ethereum wallet
   * Fund with $CESS for transaction fees
2. Create Token Account:
   * Generate Ethereum wallet
   * Acquire token via purchase or community distribution
3. Generate Token Authorization:
   * Use CD²N signing tool with token account's private key
   * Sign node operational account and token details
   * This signature serves as proof of token-node binding

## Configuration File

When leaving account, token, and signature fields empty, the node operates in altruistic mode - contributing resources without financial rewards. This mode gains gateway trust for increased data shard allocation to enhance storage node mining efficiency, used during debugging and early testnet phases.

```yaml
# Workspace is the root directory of all working subdirectories of the node. Please reserve at least 16 GiB of storage space for it.
WorkSpace: "./cacher"
# CacheSize: 17179869184 #default 16GB
# The RPC address of the blockchain where the cache protocol smart contract is deployed, usually the CESS chain
Rpcs: 
  - "wss://xxx.cess.network"
# SecretKey is the key of the node working account (Ethereum wallet account), which is used to initiate a call request to the cache protocol contract (working on EVM). 
# By default, it is not filled in, which means that it does not participate in the CD²N network and only has the most basic data interaction with the gateway.
SecretKey: ""
# Token is the NFT access certificate for nodes to join the CD²N network and will be released in subsequent versions.
Token: ""
# TokenAcc is the holder account(Ethereum wallet account) of the above NFT token.
TokenAcc: ""
# TokenAccSign is an Ethereum account signature, which is the token holder's proof of holding the token. 
# Signature methods and tools will be published in the document.
TokenAccSign: ""
# CD²N cache protocol contract address, which is responsible for node traffic statistics and reward distribution, and works on EVM.
ProtoContract: "0xce078A9098dF68189Cbe7A42FC629A4bDCe7dDD4"
# Local storage nodes configuration file, currently only available for the "Cess Multi-Miner Admin" script.
# The cacher automatically imports the storage node information started by the script through it.
MinerConfigPath: "/opt/cess/mineradm/config.yaml"
# You can manually configure the following connection options to make the cacher serve the specified retriever node:
# By default, it points to the CESS official retriever node. 
# If you register your cacher to the cache protocol contract, 
# it will automatically connect to some publicly available retriever nodes to get more opportunities to get rewards.
Retrievers:
  - Account: "0xb7B43408864aEa0449D8F813380f8ec424F7a775" 
    Endpoint: "http://154.194.34.195:1306" 

# You can also manually import storage nodes through the following configuration. 
# The cacher will automatically check the availability of the storage node and complete other information from the chain.
# StorageNodes:
#   - Account: ""  # CESS account address
#     Endpoint: "" # Http address
```

## Running via Docker

Download the cesslab/cacher image from Docker Hub and launch with:

```shell
sudo docker run -d --name cacher  \
    -v /opt/cd2n/cacher:/opt/cess  \
    -v /opt/cess/config.yaml:/opt/cess/config.yaml \
    cesslab/cacher:premainnet -c config.yaml run
```

Replace /opt/cd2n/cacher with your host's data directory and `/opt/cess/config.yaml` with your config file path. Configuration updates require container restart.

## Running via Nodeadm

The mineradm program (latest version) will natively support Cacher operations, enabling communication between storage nodes in NAT environments and Retriever nodes for bidirectional data flow between users and the CESS network. By default, Cacher operates in altruistic mode. Configure Cacher nodes through mineradm's default config file at `/opt/cess/mineradm/config.yaml`.


# Running a Retriever

Retriever nodes serve as the data retrieval backbone of CD²N, requiring high-performance CPUs with SGX support, substantial memory, and large-capacity storage. When handling data requests via FID/CID identifiers, Retrievers first check local storage before querying Cacher nodes if necessary. Retrieved data may be cached locally based on retention policies before returning to requesters. Key operational features include:

* **Fee-for-Service Model**: Requesters prepay retrieval fees before service initiation
* **SGX-Based Verification**: Data validation occurs within SGX enclaves for audit integrity
* **Incentive Distribution**: Rewards are proportionally allocated to participating nodes post-validation
* **Cache Priority Rewards**: Retrievers claiming 100% rewards for locally cached data
* **Global Data Accessibility**: Multi-hop caching mechanism enables worldwide data reachability

## Justicar: Trusted Execution Environment (TEE) Auditor

The containerized Justicar module operates independently with HTTP communication to Retrievers (potential future expansion to standalone audit service). Its workflow includes:

1. **Escrow Handling**: Receiving prepaid fees into encrypted accounts during cache order creation
2. **Secure Data Processing**: Temporary key negotiation for encrypted data transfer from Retrievers/Cachers
3. **Cryptographic Verification**:
   * Data decryption using private keys
   * FID/CID consistency checks
4. **Reward Management**:
   * Generating verifiable traffic proofs
   * Distributing fees per cache protocol smart contract rules

Rewards accumulate per operational cycle with cooling periods before distribution. Nodes must claim rewards before cycle completion.

![CD²N retrieval/caching architecture](/files/Ga80X5nGFCVBEvxjCXNe)

## Gateway Integration

Retrievers feature an optional built-in gateway module with DeOSS-equivalent capabilities:

* **Upload Processing**:
  * Automatic data sharding via Cachers
  * LBSS protocol-compliant distribution to storage nodes
  * Custom storage policy support
* **Download Handling**:
  * Request decomposition into shard retrievals
  * Data reconstruction from sufficient shards
* **Enterprise Features**:
  * Sharded uploads with resume capabilities
  * Range requests
  * Proxy re-encryption
  * Custom billing implementations

Gateway operations use prepaid retrieval fees, enabling developers to implement bespoke billing solutions through secondary development.

## Hardware Requirements

* Processor: 2.5 GHz+ (SGX support required)
* Memory: 32 GB+
* Storage: 2 TB+
* Bandwidth: 1000 Mbps+
* OS: Ubuntu/CentOS
* Network: TCP/IP support

## Account Preparation

Two Ethereum wallet accounts required:

1. **Node Operational Account**:
   * Node registration & reward collection
   * Funded with $CESS for gas fees
2. **Token Account**:
   * Holds NFT access certificate
   * Token acquisition:
     * Early testnet: Not required
     * Mid testnet: Community distribution
     * Late testnet: Contract purchases

**Additional Requirement for Gateway**:

* CESS wallet account for OSS operations
* Prefunded with tokens for storage order creation

**Authorization Process**:

1. Generate node-token binding signature using CD²N signing tools
2. Use token account's private key to sign:
   * Operational account
   * Token metadata
   * Node configuration details

## Configuration & Operation

### Nodeadm GUI Management

The Python-based [Nodeadm](https://github.com/CESSProject/cd2n-nodeadm.git) tool provides graphical configuration for:

1. Justicar settings
2. Retrieval module parameters
3. Redis pub/sub configuration
4. RPC node setup

```sh
 cd nodeadm
 sudo python app.py
```

![nodeadm gui index](/files/krJqQVaaXngwy5JclPAK)

![nodeadm gui submod](/files/tVW83Un287MAKg06NWlj)

Through the nodeadm program, you can perform simple configurations on each module, such as configuring the working directory, port, working account, etc. After completing the configuration of each sub-module, click the `Save and Return` button to save the configuration, or click the `Cancel` button to cancel the save. After the configuration is completed, return to the homepage and click the `Run CD²N Right Now!` button to start all modules in a containerized manner with one click, and click `Stop CD²N!` to stop all services with one click.

In addition, you can also enter the nodeam/config directory to configure Retriever and Redis in more detail:

Open the `nodeadm/config/retriever_config.yaml` file and configure it as follows:

```yaml
DiskConfig:
  # The unit of disk size configuration is GiB
  # File buffer is used to temporarily store intermediate data
  FileBuffervize: 128
  # Gateway cache is used to cache complete files uploaded by users to improve access efficiency
  GatewayCachevize: 128
  # all the data of the node will be stored in workspace.
  Workvpace: "./cd2n_retriever"

ChainConfig:
  # The test network ID is 11330, and the main network ID is 11331
  ChainId: 11330
  # You can fill in multiple RPC addresses. It is recommended to fill in one official and one local address.
  Rpcs:
    - "ws://cess-chain:9944" 
    - "wss://xxx.cess.network"
  # Cache protocol smart contract address
  ProtoContract: "0xD185AF24121d0D6a9A3e128fB27C3704569b5E91"
  # When the cache capacity is insufficient, the cache capacity of the configuration is automatically recharged
  Rechargevize: 8589934592 # default: 8 GiB
 
NodeConfig:
  # Node working account private key (since the EVM contract is used, please use the Ethereum account)
  SecretKey: "060cde84e263a9cacc609899a4f577cc008625e6cea58304233923c5ca9f267d" 
  # NFT tokens required to run node
  Token: ""
  # Ethereum wallet account address of NFT token holder
  TokenAcc: ""
  # The signature of the NFT holder, please use the signature tool included in the script to generate
  TokenAccvign: ""
  # Polkadot wallet account mnemonics, used to register the Ovv gateway on the CEvv chain
  Mnemonic: "spatial paper alcohol less zoo defy please glare stumble pony your title"

ServerConfig:
  # Mining pool name, default is "CEvv CD²N OFFICAL POOL"
  PoolName: ""
  # Whether to run the gateway. If true, the node comes with the gateway function.
  LaunchGateway: true
  # Debug mode, do not enable it in production environments!!!
  Debug: true
  # Required configuration, default is local node
  RedisAddress: "domain name or external ip:6379"
  # TEE(justicar) service address, currently it must be a local node
  TeeAddress: "http://justicar_host:1309"
  # Retriever node external service address
  Endpoint: "http://154.194.34.195:1306"
  # The secret of the redis local account, please reset it and keep it consistent with the redis.conf (requirepass Cd2n@cess.net, line 903).
  # Please configure uniformly in the redis module of nodeadm, and it will be automatically refreshed to the file.
  RedisPwd: "cess_network@6379"
  # Node service port, please keep it consistent with the configuration in the visual script
  SvcPort: 1306
  RedisLoacl: "redis_host:6379"
```

If necessary, you can also open the `nodeadm/config/redis.cof` file to configure Redis, but we recommend using the default configuration. The Redis account configuration can be configured in the Redis module of the nodeam program, and there is no need to configure it in the configuration file.

You need to configure the configuration file first, and then open the nodeadm program to configure and run it. Clicking the nodeadm configuration save button will not only save the configuration file, but also copy the configuration file to the working directory. Therefore, please give it sufficient permissions before running Nodeadm, and reopen the nodeadm program to save it every time you complete the configuration file modification.


# TEE Nodes

TEE node is one of the most important core components in the CESS network. It securely stores the unique key of the entire network and uses the key in its internal algorithm to verify and sign the proof data of the miners. Read about [how to run a Tee Node client](/cess-miners/tee-node/running).


# What is TEE Node

## Introduction

TEE Node is a node running in the Intel SGX trusted execution environment. It mainly authenticates the legality of idle space of storage nodes and initializes stored user data based on the PoDR2 algorithm through the trusted execution environment. It also acts as a proxy for consensus nodes to achieve efficient verification of random challenge proofs of idle space and inservice data. Running TEE Node does not directly gain any benefits, but it can improve the efficiency of storage nodes and accumulate workload for their proxy consensus nodes to help them increase the probability of successfully becoming validators. Users can use node running script tools to quickly set up TEE Nodes on devices that meet the requirements, serving their own storage nodes or consensus nodes.

TEE Node is developed based on [Gramine library](https://gramineproject.io/) and currently only supports [Intel series chips](https://www.intel.com/content/www/us/en/developer/articles/tool/intel-trusted-execution-technology.html). TEE Nodes can be divided into three types:

1. **Marker Mode**: The marker mode of TEE Node refers to a running mode of TEE Node that only supports functions other than random challenge verification. It usually only includes initialization of inservice data, authentication of idle space, and replacement functions. TEE Node running in this mode does not need to be bound to a specific consensus node.
2. **Verifier Mode**: The verifier mode of TEE Node refers to a running mode of TEE Node that only supports random challenge verification function. Running this mode or a full mode that includes this mode function requires binding a consensus node to the TEE Node.
3. **Full Mode**: The full mode of TEE Node refers to a running mode that supports all functions of TEE Node, which usually includes functions such as initialization of inservice data, authentication and replacement of idle space, and verification of random challenges of idle space and inservice data.

## Income Introduction

Running TEE Node itself does not directly obtain any benefits, but obtains more rewards for its related nodes by performing effective security services of the storage network. TEE Node has two deployment methods, each of which can obtain different benefits:

* It is bound to run with the consensus node and can only work after being bound and registered with the consensus node stash account. It requires relatively high hardware requirements, but its tied consensus miners will also receive higher rewards.
* Independent registration can run a specific type of TEE Node without being bound to a consensus node, specifically marking data and verification space for specific storage miners to help storage miners obtain higher rewards from each random challenge.

## Why deploying independently registered TEE Nodes bring more rewards to storage miners?

During random challenges, rewards will be divided based on the proportion of the user data (service data) effectively stored by storage miners and certified idle space in the entire network. User data needs to be marked by TEE Node before it can pass the random challenge. Similarly, the idle space generated in batches by storage miners also needs to be verified by TEE Node. However, the TEE Node resources disclosed in the entire network are limited, and they need to queue up to receive the service. For storage miners with higher performance, this is often one of the main bottlenecks restricting their production efficiency. And due to limitations of regional network differences, storage nodes scattered around the world do not receive TEE Node services equally efficiently. Therefore, in order to minimize the effect of this bottleneck and accelerate the verification of data across the entire network, CESS encourages users with a large number of storage miners to independently register and run several TEE Nodes to verify their own nodes.

## Working Principle

The working principle of Marker type TEE Node is shown in the figure below:

![Marker TEE Node workflow](/files/0emhrnB29lvyjLVBumuB)

TEE Node protects the PoDR² key through the SGX Trusted Execution Environment, which is used to mark user service file fragments, and to verify and sign the results of idle space certification or replacement certification. The PoDR² key is generated in a trusted environment and transferred to the trusted environment of other TEE Nodes through a secure key exchange channel without being leaked to the outside, thus ensuring the security of the algorithm; the trusted environment also encapsulates the internal code, and needs to pass Intel remote authentication. The remote authentication report also needs to be verified when TEE Node is registered to ensure that the code running in SGX is officially disclosed by CESS and has not been maliciously tampered with, thereby ensuring the correctness of the service.

In addition, any user request parameters that enter SGX need to be verified to ensure that the data will not be tampered with during the process.


# Running a TEE Node

## System Requirement

If you're planning to run the Tee node, it's important to make sure your system meets the recommended requirements to ensure that your miner performs at its best.

| Resource                      | Specification               |
| ----------------------------- | --------------------------- |
| Recommended OS                | Ubuntu-22.04(x64) or higher |
| CPU Processor Num             | ≥ 4                         |
| Intel SGX Enabled             | required                    |
| Memory (SGX encrypted memory) | ≥ 16 GB                     |
| Bandwidth                     | ≥ 5 Mbps                    |
| Public Network IP             | required                    |
| Linux Kernel Version          | 5.11 or higher              |

{% hint style="info" %}

### Enabled Intel SGX

For a system to support **Intel Software Guard Extensions** ([Intel SGX](https://www.intel.com/content/www/us/en/architecture-and-technology/software-guard-extensions.html)) and **Flexible Launch Control** (FLC), it needs a CPU that supports these features. The CPU should be either Intel ME, Intel SPS, or both Intel SPS and Intel ME. Additionally, the BIOS must support Intel SGX and the SGX option must be enabled. To enable SGX functionality, please refer to the server manufacturer's BIOS guide. You can also check out the [list of CPU models that support SGX](https://ark.intel.com/content/www/us/en/ark/search/featurefilter.html?productType=873&2_SoftwareGuardExtensions=Yes%20with%20both%20Intel%C2%AE%20SPS%20and%20Intel%C2%AE%20ME) to ensure your system supports Intel SGX.

* CPU Recommended Models: Intel E, E3, Celeron (some models), Core series CPUs, with Intel Core i5-10500 being the optimal choice.
* Recommended Motherboard BIOS: Preferred options include mainstream manufacturers such as Supermicro.

### Static Public IP

The server requires a static public IPv4 IP. Please ensure that the IP address is accessible and not behind a NAT. Run the following command to confirm your public IP.

```bash
curl -4 ifconfig.co
```

{% endhint %}

## Select Tee Node Type

Running a TEE node can increase the reputation points of a running Consensus Node. TEE nodes are divided into several roles. Some TEE nodes need to be bound to a Consensus Node to run. You can choose to bind your own Consensus Node or a Consensus Node account you are familiar with.

* **Full**: Full node is a type of node that has all the necessary functions to operate as a fully-capable Tee Node. This includes generating random challenges, verifying data, computing tags, and generating and replacing space holder data, etc.
* **Verifier**: Verifier nodes handles random challenges for idle and service data.
* **Marker**: These nodes are called Markers, and their role is to compute tags for the user's data, also known as service data. They are also responsible for creating, verifying, and replacing idle data segments. These nodes can be registered independently and serve a designated Storage Node cluster. **It's important to note that operating the TEE Node in this capacity does not increase reputation points**.

## Prepare CESS Wallet Accounts

To run the TEE node in both `full` and `verifier` operational capacities, you need two separate accounts.

* **Stash Account**: This is the account where you keep all the tokens you want to stake. This account requires at least 3,000,000 TCESS for staking it can be either from the node owner itself or delegated by other users.
* **Controller Account**: This account is a wallet used to pay the transaction gas fees required to run the TEE node and that these tokens are not safe, please do not put too much token in this account.

If you only run a TEE node with the `marker` role, then you only need prepare the `Controller Account`

{% hint style="info" %}
You can also refer to the artcle [Creating CESS Accounts](/user/cess-account) for creating a CESS account.

You can either use [CESS premainnet faucet](https://cess.network/faucet.html) to get TCESS, or [contact us](/readme/contact) to receive TCESS tokens for staking.
{% endhint %}

## Install CESS Client

{% hint style="info" %}
Before running, if you have previously deployed a previous version of CESS Tee Node on your instance, please be sure to uninstall it before running. The uninstallation method is as follows (if it is a new machine, please ignore it)
{% endhint %}

```bash
    #Delete all information of the previous version
    cess purge
    #Delete old scripts
    /opt/cess/nodeadm/scripts/uninstall.sh
```

The `cess-nodeadm` is a CESS node deployment and management tool. It helps deploying and managing Storage nodes, Tee nodes, and Consensus nodes, simplifying the devOps for all CESS miners.

```bash
wget https://github.com/CESSProject/cess-nodeadm/archive/refs/tags/v0.7.0.tar.gz
tar -xvf v0.7.0.tar.gz
cd cess-nodeadm-0.7.0
sudo ./install.sh

```

{% hint style="info" %}
You can verify that you are running the latest version of [cess-nodeadm here](https://github.com/CESSProject/cess-nodeadm/releases).
{% endhint %}

On successful installation of cess-nodeadm you will see `Install cess nodeadm success` message.

If the installation fails, please check the [troubleshooting procedures](/cess-miners/storage-miner/troubleshooting).

## Configure CESS Client

Execute:

```bash
sudo cess config set
```

The following is an operational example of running the miner in the `full` capacity mode:

*Tips: You can press Enter to skip when the default value of 'current' is suitable*

```bash
Enter cess node mode from 'tee/storage/validator/rpcnode' (current: tee, press enter to skip): tee
```

If you select the "tee" option, the Intel SGX driver on your device will be initiated in software mode. You might encounter a notification that reads "Software enable has been set. Please reboot your system to finish enabling Intel SGX." Therefore, it is recommended that you restart your device after completing the configuration and before moving on to the next steps.

You will see the following message printed on the screen.

```bash
Begin install sgx_enable ...
Reading package lists... Done
Building dependency tree... Done
Reading state information... Done
0 upgraded, 0 newly installed, 0 to remove and 23 not upgraded.
sgx_enable install successful
Intel SGX is already enabled on this system
```

The next prompt you will asked to set the TEE Node port. You can either set a custom port or leave it as default. Once the port is set the public IP of the system is automaticallt detected. In case you find that the public ip is incorrect you can enter it manually. Instead or IP you can also use your domain name here.

```bash
Enter the public port for TEE worker (current: 19999, press enter to skip):
Start configuring the endpoint to access TEE worker from the Internet
  Try to get your external IP ...
Enter the TEE worker endpoint (current: http://xx.xxx.xx.xx:19999, press enter to skip)
```

The current version of TEE Node supports `DCAP` remote attestation only.

You can choose role now. **`full`** mode has all the capabilities of TEE Node, **`verifier`** only has the capabilities of TEE Node to verify the proof from miners, and **`marker`** only has the capabilities of TEE Node to tag file from miners. When you choose the **`marker`** role, you do not need to fill in the CESS validator stash account in the next step.

```bash
Enter what kind of tee worker would you want to be [full/verifier/marker]: full 
```

Then enter your CESS Controller account mnemonic phrase.

```bash
Enter cess validator stash account (current: null, press enter to skip): cXic3WhctsJ9cExmjE9vog49xaLuVbDLcFi2odeEnvV5Sbq4f
Enter the wallet mnemonic for sending transactions: xxxxxxxxxxxxxx
```

Lastly, you will see the following messages printed on the screen which downloads all the required docker images.

```bash
Set configurations successfully
Start generate configurations and docker compose file
Unable to find image 'cesslab/config-gen:premainnet' locally
premainnet: Pulling from cesslab/config-gen
7264a8db6415: Pull complete 
eee371b9ce3f: Pull complete 
93b3025fe103: Pull complete 
d9059661ce70: Pull complete 
45f3da3bc313: Pull complete 
d4758bd5aaf9: Pull complete 
e205f8927d12: Pull complete 
0bc1d94251ef: Pull complete 
5a1ea37daadf: Pull complete 
a8485f413033: Pull complete 
Digest: sha256:07808904b7fb5bf097b21f06739f7623d9e6be2d94c179aff05fcde9df87a012
Status: Downloaded newer image for cesslab/config-gen:premainnet
debug: Loading config file: config.yaml
info: Generating configurations done
info: Generating docker compose file done
dbb2a522283b052e20cb8b59109a00f43f678158a9a43f2f663994d8230a26be
Configurations generated at: /opt/cess/nodeadm/build
```

## Common Operations

### Start Consensus Node

```bash
cess start
```

### Query Miner Status

```bash
$ cess status

-----------------------------------------
 NAMES           STATUS
ceseal          Up 2 minutes (healthy)
watchtower      Up 2 minutes (healthy)
autoheal        Up 2 minutes (healthy)
-----------------------------------------
```

### Examine Config Information

```bash
cess config show
```

## Upgrade CESS Client

### Stop and Remove All Services

```bash
cess stop
cess down
```

### Remove All Chain Data

{% hint style="warning" %}
If your has some serious problems, and you want to completely reinstall your Tee Node, you can use the following command to clear all runtime data from you instance.
{% endhint %}

```bash
cess purge
```

### Update `cess-nodeadm`

```bash
wget https://github.com/CESSProject/cess-nodeadm/archive/refs/tags/<new-version>.tar.gz
tar -xvf <new-version>.tar.gz
cd cess-nodeadm-<new-version>
./install.sh --skip-dep
```

### Pull Images

```bash
cess pullimg
```

## Questions & Answers

1. I don't want to expose my IP address on the chain. What should I do?

   During the cess config set process, you can set your endpoint with a domain name. For example, if your registered domain is tee-xxx.cess.network, you can enter <http://tee-xxx.cess.network> when setting the endpoint. The script will then ask you if you want to enable one-click domain proxy. You can enter y to enable it, as shown below:

   ```bash
   .....
   $ cess config set
   Start configuring the endpoint to access TEE worker from the Internet
   Try to get your external IP ...
   Enter the TEE worker endpoint (current: http://x.x.x.x:19999, press enter to skip): https://tee1.cess.network
   Do you want to configure a domain name proxy with one click? (y/n): y
   .....
   ```

   Alternatively, you can manually configure a nginx proxy. Please avoid using the intermediate proxy provided by the domain service provider.
2. How do I know if the program is working properly?

   You can select Chain State in the block explorer. Through this method, you can check whether the registration was successful.

   ![check-register](/files/gIjXXo6pag7rLFd5T0LL)
3. I don't want the program to update automatically. What should I do?

   After the program has started successfully, a watchtower service will manage local services on behalf of the user. When the CESS official updates a component, the watchtower will pull the latest program for automatic upgrading. If you don't want to use the automatic upgrade feature, you can disable it with the following command before the cess config set.

   ```bash
   ## Disable the update of the ceseal service.
   cess tools no_watchs ceseal

   ## Disable the update of the cifrost service.
   cess tools no_watchs cifrost
   ```

   Every automatic upgrade from you means a bug fix for the consensus miner program by the official, and we **strongly discourage** you from turning off the automatic upgrade feature, as this may render your service **unusable**.
4. How do I know which remote attestation method my machine supports? If the processor supports Intel® SGX and FLC, then DCAP is supported. There are two options to determine if your system's processor supports FLC:
   * First Option: On Linux\* systems, execute cpuid in a terminal:
     1. Open a terminal and run: $ cpuid | grep -i sgx
     2. Look for the output: SGX\_LC: SGX launch config supported = true
   * Second Option: Using test-sgx.c:
     1. Go to the [SGX hardware Github](https://github.com/ayeks/SGX-hardware) and download the file test-sgx.c or clone the repository
     2. Compile and run test-sgx.c according to the following instructions:

        ```bash
        gcc test-sgx.c -o test-sgx
        ./test-sgx
        ```
     3. Find Output: sgx launch control: 1


# Misc


# Running a RPC Node

RPC nodes do not directly participate in block production like consensus nodes. Instead, they are responsible for verifying transactions and facilitating communication between different nodes and between nodes and clients, promoting transaction verification and on-chain information retrieval.

### 1. Run with cess-nodeadm

1.1 Check the latest version of cess-nodeadm Latest version of cess-nodeadm: <https://github.com/CESSProject/cess-nodeadm/tags>\
⚠️ Replace all occurrences of `x.x.x` in the following text with the latest version number. For example, if the latest version is `v0.7.0`, then replace `x.x.x` with `0.7.0`.

1.2 Check the installed version of cess-nodeadm Enter `cess version` in the console to check if the `nodeadm version` is the latest. If nodeadm is the latest version, you can skip step 3. If not, proceed to step 3 to install. If you do not see nodeadm version, it means cess-nodeadm is not installed, and you need to proceed to step 3 to install.

1.3 Download and install the cess-nodeadm

```shell
wget https://github.com/CESSProject/cess-nodeadm/archive/vx.x.x.tar.gz
tar -xvf vx.x.x.tar.gz
cd cess-nodeadm-x.x.x/
./install.sh
```

1.4 Stop the RPC node service Enter the command: `cess stop chain` to stop the running RPC node service.

1.5 Define script configuration parameters

**The archive mode saves all blocks, which is suitable for full node operation, otherwise, you can set the number of blocks to be saved**

```shell
Enter cess node mode from 'tee/storage/validator/rpcnode' (current: rpcnode, press enter to skip): rpcnode
Enter cess node name (current: cess, press enter to skip): local-chain
Enter cess chain pruning mode, 'archive' or number (current: archive, press enter to skip): archive  #number of blocks saved
```

1.6 Start the RPC node

```shell
cess start chain
```

1.7 Check if the RPC node is synchronizing blocks normally

```shell
docker logs chain
```

{% hint style="info" %}
An RPC node will also be started automatically when the user runs the storage node using `nodeadm` or `mineradm`, unless an external chain is specified.
{% endhint %}

### 2. Run with source code

2.1 Environment Setup Requirements

* OS required: Ubuntu 22+
* Rust install:

  ```shell
  curl --proto '=https' --tlsv1.2 -sSf https://sh.rustup.rs | sh
  ```
* Dependencies install:

  ```shell
  apt update && apt install -y gcc llvm clang make git libssl-dev pkg-config wget unzip
  ```
* ProtoBuf install (run as root):

  ```shell
  mkdir pb && cd pb \
    && wget --show-progress -q https://github.com/protocolbuffers/protobuf/releases/download/v25.2/protoc-25.2-linux-x86_64.zip \
    && unzip protoc-25.2-linux-x86_64.zip \
    && cp bin/protoc /usr/local/bin/protoc \
    && chmod +x /usr/local/bin/protoc \
    && cp -r include/* /usr/local/include \
    && rm -rf ./* \
    && protoc --version
  ```

2.2 Get the latest release version of cess-node [Check the latest version of cess-node](https://github.com/CESSProject/cess/tags)

You can get the latest version using one of the following methods:

**Method 1**: Download and unzip the release (e.g., cess-0.7.9-venus as example):

```shell
wget https://github.com/CESSProject/cess/archive/refs/tags/v0.8.0-premainnet.tar.gz
tar -zxvf v0.8.0-premainnet.tar.gz
```

**Method 2**: Clone the repository with the latest tag:

```shell
git clone https://github.com/CESSProject/cess.git
cd cess
git checkout $(git describe --tags $(git rev-list --tags --max-count=1))
```

2.3 Compile **cess-node**

Enter the cess-node directory:

```shell
make
```

⚠️ Note: The compilation may take approximately 25 minutes on an 8-core machine.

2.4 Start the RPC service

```shell
./target/release/cess-node --base-path 【Your custom database path】 --chain cess-premainnet --port 【Your custom p2p port】 --rpc-port 【Your custom rpc port】 --prometheus-external --unsafe-rpc-external --name 【Your custom name】 --rpc-cors all --rpc-max-connections 5000 --state-pruning archive
```

Use the `-h` flag to view more command options.

If the node is printing block synchronization logs, it means it's running successfully.

⚠️ It is recommended to use `systemd`, `screen` or `tmux` commands to run cess-node(RPC) if you want to keep cess-node running.

### 3. Run with Container

3.1 Environment Setup Requirements `shell curl -fsSL https://get.docker.com | bash docker --version docker pull cesslab/cess-chain:premainnet`

3.2 Running Command

**Make sure that port 30336 and 9944 are not occupied by other processes.**

```bash
mkdir -p /opt/cess/premainnet-rpc-data

docker run -d \
--name premainnet-rpc \
-v /opt/cess/premainnet-rpc-data:/opt/cess/data \
-p 30336:30336 \
-p 9944:9944 \
cesslab/cess-chain:premainnet \
--base-path /opt/cess/data \
--chain cess-premainnet \
--port 30336 \
--rpc-port 9944 \
--rpc-external \
--execution WASM \
--wasm-execution compiled \
--in-peers 75 \
--out-peers 75 \
--state-pruning archive \
--rpc-max-connections 65535 \
--rpc-cors all \
--prometheus-external
```

**Execute `docker run -it --rm --entrypoint /opt/cess/cess-node cesslab/cess-chain:premainnet --help` to get more information about the command options.**

3.3 Check if the RPC node is synchronizing blocks normally

```bash
   docker logs premainnet-rpc
```

The rpc node log is down below and start to synchronize blocks.

```
   2025-04-30 09:47:13 CESS Node
   2025-04-30 09:47:13 ✌️  version 0.10.0-c902006
   2025-04-30 09:47:13 ❤️  by CESS LAB, 2017-2025
   2025-04-30 09:47:13 📋 Chain specification: cess-premainnet
   2025-04-30 09:47:13 🏷  Node name: better-ink-0467
   2025-04-30 09:47:13 👤 Role: FULL
   2025-04-30 09:47:13 💾 Database: RocksDb at /opt/cess/data/chains/cess-premainnet/db/full
   2025-04-30 09:47:20 🏷  Local node identity is: 12D3KooWJJbr7xMCByzzHCUD8NXz52JDRC7pcXdf6otopvZCAreG
   2025-04-30 09:47:20 Running libp2p network backend
   2025-04-30 09:47:20 💻 Operating system: linux
   2025-04-30 09:47:20 💻 CPU architecture: x86_64
   2025-04-30 09:47:20 💻 Target environment: gnu
   2025-04-30 09:47:20 💻 CPU: Intel(R) Xeon(R) Gold 6148 CPU @ 2.40GHz
   2025-04-30 09:47:20 💻 CPU cores: 40
   2025-04-30 09:47:20 💻 Memory: 257412MB
   2025-04-30 09:47:20 💻 Kernel: 6.8.0-51-generic
   2025-04-30 09:47:20 💻 Linux distribution: Ubuntu 22.04.5 LTS
   2025-04-30 09:47:20 💻 Virtual machine: no
   2025-04-30 09:47:20 📦 Highest known block at #2370
   2025-04-30 09:47:20 Running JSON-RPC server: addr=0.0.0.0:9944,[::]:36421
   2025-04-30 09:47:20 🏁 CPU single core score: 760.78 MiBs, parallelism score: 734.78 MiBs with expected cores: 8
   2025-04-30 09:47:20 🏁 Memory score: 4.82 GiBs
   2025-04-30 09:47:20 🏁 Disk score (seq. writes): 768.54 MiBs
   2025-04-30 09:47:20 🏁 Disk score (rand. writes): 337.66 MiBs
   2025-04-30 09:47:20 〽️ Prometheus exporter started at 0.0.0.0:9615
   2025-04-30 09:47:20 discovered: 12D3KooWEpnboX55ceLkf2wqUQ6LBujEReiCqmvj5SLLdoJJP3oQ /ip4/172.17.0.1/tcp/30336/ws
   2025-04-30 09:47:20 🔍 Discovered new external address for our node: /ip4/154.194.34.206/tcp/30336/ws/p2p/12D3KooWJJbr7xMCByzzHCUD8NXz52JDRC7pcXdf6otopvZCAreG
   2025-04-30 09:47:23 [#2469] 🗳  Starting phase Off, round 2.
   2025-04-30 09:47:23 [2469] 💸 new validator set of size 5 has been processed for era 1
   2025-04-30 09:47:25 ⚙️  Syncing, target=#3711019 (5 peers), best: #2939 (0x87db…8c38), finalized #2936 (0xa33a…c890), ⬇ 757.8kiB/s ⬆ 5.7kiB/s
```


# Developers

To explore what you can do with CESS SDKs or APIs, please check our tutorials. To learn more about a certain topic on development, goto our guides.

## Advanced Guides

* [Commonly Used Libraries and Toolchains in Development](/developer/advanced-guides/common-libs)
* [Substrate and EVM Address Conversion](/developer/advanced-guides/substrate-evm)
* [CESS Code Overview](/developer/advanced-guides/src-overview)

## Smart Contract

* [Issue an ERC-20 Smart Contract on CESS](/developer/smart-contract/issue-erc20)
* [Deploy an ink!(Wasm) Smart Contract on CESS](/developer/smart-contract/deploy-sc-ink)
* [Deploy a Solidity Smart Contract on CESS](/developer/smart-contract/deploy-sc-solidity)
* [Build a Proof of Existence dApp (ink!)](/developer/smart-contract/poe-ink)
* [Build a Proof of Existence dApp (Solidity)](/developer/smart-contract/poe-solidity)

## CESS SDK

* [Develop App with CESS Golang SDK](/developer/cess-sdk/sdk-golang)
* [Develop App with CESS Javascript SDK](broken://pages/xMP6zW43jxESaaeuZ4AO)
* [Develop App with CESS Rust SDK](/ref/in-depth-feat)


# CESS SDK

* [Develop App with CESS Golang SDK](/developer/cess-sdk/sdk-golang)
* [Develop App with CESS Rust SDK](/developer/cess-sdk/sdk-rust)


# Golang SDK(new version)

Welcome to the CESS new Golang SDK usage guide!

* [Installation and Initialization](/developer/cess-sdk/sdk-go-new-version/install)
* [Sending transactions](/developer/cess-sdk/sdk-go-new-version/transfer)
* [Parsing Events](/developer/cess-sdk/sdk-go-new-version/event)
* [Interacting with the Gateway](/developer/cess-sdk/sdk-go-new-version/retrieve)


# Installation and Initialization

### Installation Environment

* Use Golang 1.23.

Please refer to [golang installation](https://go.dev/doc/install/source) to download and install the Go compilation and running environment. After Go is installed, please create a new system variable GOPATH and point it to your code directory. To learn more about GOPATH, execute the command go help gopath.

### Download Go SDK

* [Download via Github](https://github.com/CESSProject/go-sdk)
* [Historical version download](https://github.com/CESSProject/go-sdk/releases)

### Install Go SDK

Add the following dependencies in the go.mod file, the following takes version v0.2.1 as an example. Other versions need to be replaced with corresponding version numbers.

```bash
go get github.com/CESSProject/go-sdk@v0.2.1
```

### Creating a CESS Client

The CESS client is used to interact with the CESS chain. It can initiate various transactions, query on-chain data, call smart contracts, and monitor and analyze on-chain events.

If you just want to use it and don't want to do too much configuration, you can quickly create a lightweight client in the following way. This client has the same functions as the regular version.

```golang
	cli, err := chain.NewLightCessClient(
		"your mnemonic",
		[]string{"wss://rpc.cess.network"},
	)
    if err!=nil{
        log.Fatal(err)
    }
    log.Println(cli.Metadata)
```

You can also create a standard client by passing a series of configuration parameters.

```golang
    rpcs:=[]string{
        "wss://rpc.cess.network",
        ...
    }
    mnemonics:=[]string{
        "your mnemonic 1",
        "your mnemonic 2",
        "your mnemonic 3",
        ...
    }

	cli, err := chain.NewClient(
		chain.OptionWithRpcs(rpcs),
		chain.OptionWithAccounts(mnemonics), //Support multiple accounts
		chain.OptionWithConnNum(4), //Support establishing multiple RPC connections with the chain
        chain.OptionWithTimeout(time.Second*30),
	)
    if err!=nil{
        log.Fatal(err)
    }
    log.Println(cli.Metadata)
```

When the CESS chain client starts, a coroutine is automatically started to maintain the stability of the RPC connection with the CESS chain.Generally speaking, it is best practice to maintain 2-4 connections, which can ensure both stability and concurrent transaction performance.

When multiple accounts are configured and you do not specify an account when trading, the CESS client will evenly poll each account to initiate a transaction. You can also use the `chain.NewKeyrings` method to create a keyrings object to manually manage your account so that you can specify the account in a specific way to initiate transactions.


# Sending transactions

The following is an example of using the chain.Client client to concurrently send transfer transactions to the CESS chain:

```golang
	cli, err := chain.NewLightCessClient(
		"white income exile ethics sick excess water deliver medal jump update fault",
		[]string{"wss://t2-rpc.cess.network"},
	)
	if err != nil {
		log.Fatal(err)
	}
	total, errCount := 4000, &atomic.Int32{}
	wg := sync.WaitGroup{}
	wg.Add(total)
	st := time.Now()
	pool, err := ants.NewPool(500)
	if err != nil {
		log.Fatal(err)
	}
	for i := range total {
		idx := i
		pool.Submit(func() {
			defer wg.Done()
			tx, err := cli.TransferToken("cXjTYBWUY68uGG2t3ShAhmLtNhz3WdBfXrYn4XaQYg5pKLZcF", "1000000000000000000", nil, nil) // transferred 1 $CESS 
			if err != nil {
				log.Println(err)
				errCount.Add(1)
				return
			}
			log.Println(idx, "success,block hash:", tx)
		})
	}
	wg.Wait()
	log.Println("time:", time.Since(st), "total:", total, "errors:", errCount.Load())
```

In the above example, the last two parameters of the cli.TransferToken method are `caller` (\*signature.KeyringPair, user-specified caller account) and `event`(any, Corresponding event pointer) respectively. When `caller` is nil, the account configured when creating the client is used by default. When `event` is nil, the event is not parsed by default. You can find the events you need in `chain/events.go` or at [go-substrate-rpc-client](https://github.com/centrifuge/go-substrate-rpc-client/tree/v4.2.1/types). The CESS chain client is built on `go-substrate-rpc-client`, so it supports the use of event types in `go-substrate-rpc-client`.

For other transactions, please refer to the above transfer transactions. The transaction methods in the CESS chain client natively support concurrency, so you can call them simultaneously in different goroutines without doing too much extra operations.


# Parsing Events

### Parsing transaction event

You can obtain transaction events by passing the pointer type of the corresponding event to each transaction sending method.The following is an example of getting a transfer event:

```golang
	cli, err := chain.NewLightCessClient(
		"white income exile ethics sick excess water deliver medal jump update fault",
		[]string{"wss://t2-rpc.cess.network"},
	)
	if err != nil {
		log.Fatal(err)
	}
    var event types.EventBalancesTransfer // import "github.com/centrifuge/go-substrate-rpc-client/v4/types"
    tx, err := cli.TransferToken("cXjTYBWUY68uGG2t3ShAhmLtNhz3WdBfXrYn4XaQYg5pKLZcF", "1000000000000000000", nil, &event)
    if err != nil {
		log.Fatal(err)
	}
    log.Println("tx hash:",tx,"event:",event)
```

How to know the type of event? You can observe it in the Substrate event stream, or retrieve it from the /chain/events.go file in the SDK.

### Registering and parsing block data

You can use the `ParseBlockDataWithBlockNumber` and `ParseBlockData` method in CESS Client to parse all registered events in a block.A block may contain many events, and registered events are events that have been registered in the SDK and are required by the caller.They are usually a subset of all events in the blockchain. You can add the event type you want to parse to the subset by calling the `chain.RegisterEventType` method.

The currently registered event table includes the following events, which cover most of the high-frequency events.

```golang
	commonEventsTypeMap = map[string]reflect.Type{

		// Treasury
		"Treasury.Burnt":           reflect.TypeOf(types.EventTreasuryBurnt{}),
		"Treasury.Awarded":         reflect.TypeOf(types.EventTreasuryAwarded{}),
		"Treasury.SpendApproved":   reflect.TypeOf(types.EventTreasurySpendApproved{}),
		"Treasury.Deposit":         reflect.TypeOf(types.EventTreasuryDeposit{}),
		"Treasury.Spending":        reflect.TypeOf(types.EventTreasurySpending{}),
		"Treasury.UpdatedInactive": reflect.TypeOf(types.EventTreasuryUpdatedInactive{}),
		"Treasury.Rollover":        reflect.TypeOf(types.EventTreasuryRollover{}),

		// System
		"System.UpgradeAuthorized": reflect.TypeOf(types.EventParachainSystemUpgradeAuthorized{}),
		"System.ExtrinsicSuccess":  reflect.TypeOf(types.EventSystemExtrinsicSuccess{}),
		"System.ExtrinsicFailed":   reflect.TypeOf(types.EventSystemExtrinsicFailed{}),

		// Balances
		"Balances.Slashed":    reflect.TypeOf(types.EventBalancesSlashed{}),
		"Balances.Deposit":    reflect.TypeOf(types.EventBalancesDeposit{}),
		"Balances.Withdraw":   reflect.TypeOf(types.EventBalancesWithdraw{}),
		"Balances.Unreserved": reflect.TypeOf(types.EventBalancesUnreserved{}),
		"Balances.BalanceSet": reflect.TypeOf(types.EventBalancesBalanceSet{}),
		"Balances.Transfer":   reflect.TypeOf(types.EventBalancesTransfer{}),
		"Balances.Reserved":   reflect.TypeOf(types.EventBalancesReserved{}),

		// TransactionPayment
		"TransactionPayment.TransactionFeePaid": reflect.TypeOf(types.EventTransactionPaymentTransactionFeePaid{}),

		// Audit
		"Audit.SubmitServiceProof":        reflect.TypeOf(EventSubmitServiceProof{}),
		"Audit.GenerateChallenge":         reflect.TypeOf(EventGenerateChallenge{}),
		"Audit.VerifyProof":               reflect.TypeOf(EventVerifyProof{}),
		"Audit.SubmitIdleVerifyResult":    reflect.TypeOf(EventSubmitIdleVerifyResult{}),
		"Audit.SubmitServiceVerifyResult": reflect.TypeOf(EventSubmitServiceVerifyResult{}),
		"Audit.SubmitIdleProof":           reflect.TypeOf(EventSubmitIdleProof{}),

		// Sminer
		"Sminer.MinerExitPrep":            reflect.TypeOf(EventMinerExitPrep{}),
		"Sminer.RegisterPoisKey":          reflect.TypeOf(EventRegisterPoisKey{}),
		"Sminer.Deposit":                  reflect.TypeOf(EventDeposit{}),
		"Sminer.LessThan24Hours":          reflect.TypeOf(EventLessThan24Hours{}),
		"Sminer.FaucetTopUpMoney":         reflect.TypeOf(EventFaucetTopUpMoney{}),
		"Sminer.IncreaseCollateral":       reflect.TypeOf(EventIncreaseCollateral{}),
		"Sminer.Receive":                  reflect.TypeOf(EventReceive{}),
		"Sminer.UpdateBeneficiary":        reflect.TypeOf(EventUpdateBeneficiary{}),
		"Sminer.AlreadyFrozen":            reflect.TypeOf(EventAlreadyFrozen{}),
		"Sminer.DrawFaucetMoney":          reflect.TypeOf(EventDrawFaucetMoney{}),
		"Sminer.Registered":               reflect.TypeOf(EventRegistered{}),
		"Sminer.IncreaseDeclarationSpace": reflect.TypeOf(EventIncreaseDeclarationSpace{}),

		// TeeWorker
		"TeeWorker.MasterKeyLaunched":             reflect.TypeOf(EventMasterKeyLaunched{}),
		"TeeWorker.WorkerAdded":                   reflect.TypeOf(EventWorkerAdded{}),
		"TeeWorker.WorkerUpdated":                 reflect.TypeOf(EventWorkerUpdated{}),
		"TeeWorker.MinimumCesealVersionChangedTo": reflect.TypeOf(EventMinimumCesealVersionChangedTo{}),

		// OSS
		"Oss.OssUpdate":       reflect.TypeOf(EventOssUpdate{}),
		"Oss.OssDestroy":      reflect.TypeOf(EventOssDestroy{}),
		"Oss.CancelAuthorize": reflect.TypeOf(EventCancelAuthorize{}),
		"Oss.OssRegister":     reflect.TypeOf(EventOssRegister{}),
		"Oss.Authorize":       reflect.TypeOf(EventAuthorize{}),

		// FileBank
		"FileBank.UploadDeclaration":     reflect.TypeOf(EventUploadDeclaration{}),
		"FileBank.DeleteFile":            reflect.TypeOf(EventDeleteFile{}),
		"FileBank.TerritoryFileDelivery": reflect.TypeOf(EventTerritorFileDelivery{}),
		"FileBank.ReplaceIdleSpace":      reflect.TypeOf(EventReplaceIdleSpace{}),
		"FileBank.ReplaceFiller":         reflect.TypeOf(EventReplaceFiller{}),
		"FileBank.ClaimRestoralOrder":    reflect.TypeOf(EventClaimRestoralOrder{}),
		"FileBank.GenerateRestoralOrder": reflect.TypeOf(EventGenerateRestoralOrder{}),
		"FileBank.CalculateReport":       reflect.TypeOf(EventCalculateReport{}),
		"FileBank.RecoveryCompleted":     reflect.TypeOf(EventRecoveryCompleted{}),
		"FileBank.StorageCompleted":      reflect.TypeOf(EventStorageCompleted{}),
		"FileBank.TransferReport":        reflect.TypeOf(EventTransferReport{}),
		"FileBank.IdleSpaceCert":         reflect.TypeOf(EventIdleSpaceCert{}),

		//StorageHandler
		"StorageHandler.ExpansionSpace":       reflect.TypeOf(EventExpansionSpace{}),
		"StorageHandler.RenewalSpace":         reflect.TypeOf(EventRenewalSpace{}),
		"StorageHandler.PaidOrder":            reflect.TypeOf(EventPaidOrder{}),
		"StorageHandler.CreatePayOrder":       reflect.TypeOf(EventCreatePayOrder{}),
		"StorageHandler.BuySpace":             reflect.TypeOf(EventBuySpace{}),
		"StorageHandler.LeaseExpired":         reflect.TypeOf(EventLeaseExpired{}),
		"StorageHandler.LeaseExpireIn24Hours": reflect.TypeOf(EventLeaseExpireIn24Hours{}),
	}
```

### Custom Events

As the business on the CESS chain is updated, many new events will appear. These events may not be widely used, so developers need to manually build the corresponding event structure. You can build a new event structure like the following structure, keeping the sandwich structure and adding custom fields of the event in the middle

```golang
    type EventVerifyProof struct {
        Phase     types.Phase
        ...
        Topics    []types.Hash
    }
```

The specific type of event can be obtained in the source code of [CESS Node](https://github.com/CESSProject/cess), or viewed in the Substrate browser after sending a transaction.

![recent events](/files/7JFKra1wQ2poanroKtRD)


# Interacting with the Gateway

The CESS network currently has two types of gateways: one is the old version gateway, namely DeOSS, which has stopped maintenance; the other is the CD²N gateway, which is the gateway that natively supports the CESS CDN network. This SDK only supports interaction with the CD²N gateway.

## Authorize the gateway

Before uploading files using a gateway, you need to authorize it. You can use `retriever.AuthorizeGateways` in the SDK to authorize the gateway pointed to by a given URL and all its peer gateways within the same cluster.

```golang
	gatewayUrl := "http://gateway.cess.network"
	rpc := "wss://t2-rpc.cess.network"
	mnemonic := "outcome follow exile ethics sick excess show deliver medal jump update default"

	if err := retriever.AuthorizeGateways(gatewayUrl, rpc, mnemonic); err != nil {
		log.Fatal(err)
	}
```

## Get a token

Before requesting operations such as file upload, you need to apply for a JWT token, which is valid for any gateway node in the cluster within the specified expiration time. When the expiration time is set to zero, the default maximum expiration time is 72 hours.

```golang
	baseUrl := "http://gateway.cess.network"
	mnemonic := "outcome follow exile ethics sick excess show deliver medal jump update default"
	message := fmt.Sprint(time.Now().Unix())
	account := "cXkGyzXtxnK2Ebw8XfgArXc9VGqKqE7b517muih45ds9Eadbc"

	sign, err := retriever.SignedSR25519WithMnemonic(mnemonic, []byte(message))
	if err != nil {
		log.Fatal(err)
	}

	token, err := retriever.GenGatewayAccessToken(baseUrl, message, account, sign,time.Minute*30)
	if err != nil {
		log.Fatal(err)
	}

    log.Println(token)
```

The signed message must be the latest Unix time. To prevent attacks, signatures older than one minute will be invalid.

## Upload data

Before uploading files, you must first authorize the gateway. You can call the `Authorize` method on the CESS Client to authorize, or you can manually perform the operation in the Substrate browser. In subsequent versions, authorization will be automatically performed when obtaining a token.

Call the `retriever.UploadFile` method to upload the file to the gateway. The last parameter indicates whether encryption is required for upload. If it is configured as true, the proxy re-encryption technology is used to encrypt the data on the gateway side.

```golang
    baseUrl := "http://gateway.cess.network"
    territory := "your territory name"

    file,err:=os.Open("your file path")
    if err!=nil{
        log.Fatal(err)
    }
    defer file.Close()

    fid, err := retriever.UploadFile(baseUrl, token, territory, file.Name(), file, false)  
    if err!=nil{
        log.Fatal(err)
    }

    log.Println(fid)
```

The above request will wait for the gateway to pre-process the user data and upload the metadata to the chain before returning the FID of the file. If you want to return the result immediately, you can use the asynchronous upload method:

```golang
    info, err := retriever.AsyncUploadFile(baseUrl, token, territory, file.Name(), file,false ,false)  
    if err!=nil{
        log.Fatal(err)
    }

    log.Println(info.Fid)
```

The last parameter of the above request indicates whether to upload encrypted data. The second-to-last parameter indicates whether to allow the gateway to send the file storage order on behalf of the client. The default value is false. Otherwise, the user needs to manually create a storage order on the chain based on the returned file information.

In addition, you can also upload your data in shards, which is particularly useful when network conditions are poor. It should be noted that the gateway will automatically clear the request data on the unfinished shards within 24 hours.

```golang
    file,err:=os.Open("your file path")
    if err!=nil{
        log.Fatal(err)
    }
    defer file.Close()

	hash, err := retriever.RequestBatchUpload(baseUrl, token, territory, file.Name(), file.Size(), false, false, false)
	if err != nil {
		log.Fatal(err)
	}

	log.Println(hash)

    block:=int64(1024*1024)

    for size := int64(0); size < file.Size(); size += block {
    res, err := retriever.BatchUploadFile(baseUrl, token, hash, f, size, size+block)
    if err != nil {
        log.Fatal(err)
    }
    log.Println("upload response:",res)
	}

```

## Retrieving data

You can use the `DownloadData` function to download data from the gateway. When only Fid is passed in, it means downloading the entire file pointed to by Fid. When segmentId is passed in at the same time, it means downloading only the corresponding segment.

```golang
	baseUrl := "https://retriever.cess.network"
	fid := "704db5a38548c13ef23ff465622e474354acd2ccfd32f0313cb33e3cf3f8a652"
    filePath:="The path where the file will be saved"
    segmentId:=""

    err = retriever.DownloadData(baseUrl, fid, segmentId, filePath,nil, nil, nil)
	if err != nil {
		log.Fatal(err)
	}
	log.Println("success")
```

If the file you want to download is encrypted by the gateway (the encrypt parameter is true when uploading the file), you need to obtain the re-encryption parameters first, and re-encrypt the key before downloading it as a parameter. If the key is correct, you will get the decrypted data.

```golang
	baseUrl := "https://retriever.cess.network"
	fid := "704db5a38548c13ef23ff465622e474354acd2ccfd32f0313cb33e3cf3f8a652"
    filePath:="The path where the file will be saved"
    segmentId:=""
	mnemonic := "wram horse perfect monkey build squirrel embrace joke frist save know make"

	capsule, pubkey, err := retriever.GetPreCapsuleAndGatewayPubkey(baseUrl, fid)
	if err != nil {
		log.Fatal(err)
	}

    rk, pkX, err := retriever.GenReEncryptionKey(mnemonic, pubkey)
	if err != nil {
		log.Fatal(err)
	}

    err = retriever.DownloadData(baseUrl, fid, segmentId, filePath, capsule, rk, pkX)
	if err != nil {
		log.Fatal(err)
	}
	log.Println("success")
```

It should be noted that after encrypting and uploading the file, the `capsule` parameters must be downloaded as soon as possible and saved locally or on the chain. The gateway will delete it after 72 hours.

The following is the process of using CESS proxy re-encryption. For more code, please refer to the pre.go file in the retriever directory of the SDK.

![recent events](/files/cV4DDu8aVj3MKYCHsKug)


# Golang SDK

This article introduces sample codes for various usage scenarios of CESS Network's Go SDK.

* [Preface](/developer/cess-sdk/sdk-golang/preface)
* [Install](/developer/cess-sdk/sdk-golang/install)
* [Initialization](/developer/cess-sdk/sdk-golang/initialization)
* [Properties](/developer/cess-sdk/sdk-golang/properties)
* [Data Process](/developer/cess-sdk/sdk-golang/data_process)
* [Object / File](/developer/cess-sdk/sdk-golang/object_file)
* [Chain Related](/developer/cess-sdk/sdk-golang/chain_related)
* [RPC Calls](/developer/cess-sdk/sdk-golang/chain_related/rpc_call)
* [Storage Network](https://github.com/CESSProject/doc-v2/blob/main/developer/cess-sdk/sdk-golang/storage/storage.md)
* [Toolset](/developer/cess-sdk/sdk-golang/toolset)


# Preface

If you need to access the CESS chain, conduct transactions, upload and download files, etc., you can install Go SDK first. This article provides multiple installation methods for Go SDK.

### SDK source code and API documentation

Please visit [GitHub](https://github.com/CESSProject/cess-go-sdk) to obtain the Go SDK source code. For more information, see [the Go SDK API documentation](https://pkg.go.dev/github.com/CESSProject/cess-go-sdk).

### Sample Program

Go SDK provides a wealth of sample programs for your reference or direct use. Examples include the following:

| Sample Files                                                                                                | Sample Content                                                                                                                                            |
| ----------------------------------------------------------------------------------------------------------- | --------------------------------------------------------------------------------------------------------------------------------------------------------- |
| [NewChainClient](https://github.com/CESSProject/cess-go-sdk/blob/main/chain/chain.go#L99)                   | [Initialize Client](/developer/cess-sdk/sdk-golang/initialization)                                                                                        |
| [StoreFile](https://github.com/CESSProject/cess-go-sdk/blob/main/core/process/gateway.go#L49)               | [Store files on the gateway](/developer/cess-sdk/sdk-golang/object_file/storefile)                                                                        |
| [StoreObject](https://github.com/CESSProject/cess-go-sdk/blob/main/core/process/gateway.go#L157)            | [Store objects on the gateway](/developer/cess-sdk/sdk-golang/object_file/storeobject)                                                                    |
| [RetrieveFile](https://github.com/CESSProject/cess-go-sdk/blob/main/core/process/gateway.go#L218)           | [Retrieve files from the gateway](/developer/cess-sdk/sdk-golang/object_file/retrievefile)                                                                |
| [RetrieveObject](https://github.com/CESSProject/cess-go-sdk/blob/main/core/process/gateway.go#L300)         | [Retrieve objects from the gateway](/developer/cess-sdk/sdk-golang/object_file/retrieveobject)                                                            |
| [StoreFileToMiners](https://github.com/CESSProject/cess-go-sdk/blob/main/core/process/storage.go#L50)       | [Store a file to miners](https://github.com/CESSProject/doc-v2/blob/main/developer/cess-sdk/sdk-golang/object_file/StoreFileToMiners/README.md)           |
| [RetrieveFileFromMiners](https://github.com/CESSProject/cess-go-sdk/blob/main/core/process/storage.go#L175) | [Retrieve a file from miners](https://github.com/CESSProject/doc-v2/blob/main/developer/cess-sdk/sdk-golang/object_file/RetrieveFileFromMiners/README.md) |


# Install

### Installation Environment

* Use Golang 1.22.

Please refer to [golang installation](https://go.dev/doc/install/source) to download and install the Go compilation and running environment. After Go is installed, please create a new system variable GOPATH and point it to your code directory. To learn more about GOPATH, execute the command go help gopath.

### Download Go SDK

* [Download via Github](https://github.com/CESSProject/cess-go-sdk)
* [Historical version download](https://github.com/CESSProject/cess-go-sdk/releases)

### Install Go SDK

* go mod way

Add the following dependencies in the go.mod file, the following takes version 0.7.0 as an example. Other versions need to be replaced with corresponding version numbers.

```golang
require (
    github.com/CESSProject/cess-go-sdk v0.7.0
)
```

* source code method

```bash
go get github.com/CESSProject/cess-go-sdk@v0.7.0
```

### Verify SDK

Run the following code to view the Go SDK version:

```golang
package main

import (
  "fmt"
  sdkgo "github.com/CESSProject/cess-go-sdk"
)

func main() {
  fmt.Println("CESS Go SDK Version: ", sdkgo.Version)
}
```


# Initialization

Before using SDK, it is necessary to create an SDK object that includes some configuration items in the following table. Please fill in according to the actual situation:

| configuration       | Description                                                         | Method                   |
| ------------------- | ------------------------------------------------------------------- | ------------------------ |
| RPC address         | CESS chain rpc address                                              | sdkgo.ConnectRpcAddrs    |
| Mnemonic            | CESS wallet mnemonic phrase, if empty, no transaction can be made.  | sdkgo.Mnemonic           |
| Transaction timeout | Timed out waiting for transaction completion, default is 30 seconds | sdkgo.TransactionTimeout |
| SDK name            | It's just a name, default is `cess-sdk-go`                          | sdkgo.Name               |

### Create a query-only sdk client

```golang
package main

import (
    "context"
    "fmt"

    sdkgo "github.com/CESSProject/cess-go-sdk"
)

var RPC_ADDRS = []string{
    //testnet
    "wss://testnet-rpc.cess.network/ws/",
}

func main() {
    sdk, err := cess.New(
        context.Background(),
        sdkgo.ConnectRpcAddrs(RPC_ADDRS),
    )
    if err != nil {
        panic(err)
    }
    defer sdk.Close()
    fmt.Println(sdk.SystemVersion())
}
```

### Create a fully functional sdk client

```golang
package main

import (
    "context"
    "fmt"
    "time"

    sdkgo "github.com/CESSProject/cess-go-sdk"
)

// Substrate well-known mnemonic:
//
//   - https://github.com/substrate-developer-hub/substrate-developer-hub.github.io/issues/613
//   - cXgaee2N8E77JJv9gdsGAckv1Qsf3hqWYf7NL4q6ZuQzuAUtB
var MY_MNEMONIC = "bottom drive obey lake curtain smoke basket hold race lonely fit walk"

var RPC_ADDRS = []string{
    //testnet
    "wss://testnet-rpc.cess.network/ws/",
}

func main() {
    sdk, err := cess.New(
        context.Background(),
        sdkgo.ConnectRpcAddrs(RPC_ADDRS),
        sdkgo.Mnemonic(MY_MNEMONIC),
        sdkgo.TransactionTimeout(time.Second*10),
    )
    if err != nil {
        panic(err)
    }
    defer sdk.Close()
    fmt.Println(sdk.SystemVersion())
}
```


# Properties

This section mainly introduces how to obtain some properties of the SDK client.

```golang
package main

import (
    "context"
    "fmt"
    "time"

    cess "github.com/CESSProject/cess-go-sdk"
)

// Substrate well-known mnemonic:
//
//   - https://github.com/substrate-developer-hub/substrate-developer-hub.github.io/issues/613
//   - cXgaee2N8E77JJv9gdsGAckv1Qsf3hqWYf7NL4q6ZuQzuAUtB
var MY_MNEMONIC = "bottom drive obey lake curtain smoke basket hold race lonely fit walk"

var RPC_ADDRS = []string{
    //testnet
    "wss://testnet-rpc.cess.network/ws/",
}

func main() {
    sdk, err := cess.New(
        context.Background(),
        cess.ConnectRpcAddrs(RPC_ADDRS),
        cess.Mnemonic(MY_MNEMONIC),
        cess.TransactionTimeout(time.Second*10),
    )
    if err != nil {
        panic(err)
    }
    defer sdk.Close()

    // get sdk name
    fmt.Println(sdk.GetSDKName())

    // get the current rpc address being used
    fmt.Println(sdk.GetCurrentRpcAddr())

    // get the rpc connection status flag
    //   - true: connection is normal
    //   - false: connection failed
    fmt.Println(sdk.GetRpcState())

    // get your current account address
    //   - make sure you fill in mnemonic when you create the sdk client
    fmt.Println(sdk.GetSignatureAcc())

    // get your current account public key
    //   - make sure you fill in mnemonic when you create the sdk client
    fmt.Println(sdk.GetSignatureAccPulickey())

    // get substrate api
    fmt.Println(sdk.GetSubstrateAPI())

    // get the mnemonic for your current account
    fmt.Println(sdk.GetURI())

    // get token symbol
    fmt.Println(sdk.GetTokenSymbol())

    // get network environment
    fmt.Println(sdk.GetNetworkEnv())
}
```

Output example:

```bash
cess-sdk-go
wss://testnet-rpc.cess.network/ws/
true
cXgaee2N8E77JJv9gdsGAckv1Qsf3hqWYf7NL4q6ZuQzuAUtB
[70 235 221 239 140 217 187 22 125 195 8 120 215 17 59 126 22 142 111 6 70 190 255 215 125 105 211 155 173 118 180 122]
&{0xc000290200 0xc00028c090}
bottom drive obey lake curtain smoke basket hold race lonely fit walk
TCESS
cess-testnet
```


# Data Process

This section introduces the process of uploading files to the CESS network, how to ensure multiple copies of files, and how to recover files that have lost some data.

The data processing is divided into 3 steps in total: Step 1: Padding the data Step 2: Sequential cut of the data Step 3: Redundancy calculation is performed on the data Step 4: Calculate the Merkel hash of the data

### Data Padding

Data padding is in order to unify the size of the data, but also for subsequent processing can be obtained in the form of uniform data specifications, at present, the CESS in accordance with the smallest integer multiples of 32MiB file padding, padding content is '0' (ASCII value is 48). Therefore, controlling the size of uploaded files to an integer multiple of 32MiB is the most effective use of space.

Example: For a 1MiB file: it willbe padded to 32MiB For 33MiB file: it will be padded to 64MiB For a 500MiB file: it will be padded to 512MiB And so on...

Please refer to the implementation: [FillAndCut](https://github.com/CESSProject/cess-go-sdk/blob/main/core/process/process.go#L32)

### Data Cutting

The data cut is a sequential cut of the data according to the 32MiB size, and since the data must be an integer multiple of 32MiB after padding, the number of chunks after the cut is also an integer. Due to the different sizes of the files, the final number of blocks after cutting is also not fixed. We call the cut block `segment`.

Please refer to the implementation: [FillAndCut](https://github.com/CESSProject/cess-go-sdk/blob/main/core/process/process.go#L32)

### Data Redundancy

Data redundancy is the redundancy calculation of the filled data, the redundant part of the data will be obtained, according to the amount of redundancy to determine the final size of the occupied space, CESS currently provides 2x the redundancy, plus 1x the original data, which is equivalent to 1 copy of the data occupies 3x space. The advantage of this multiple redundancy is that each redundant data is different, the redundant data and the body data are also different, so as to avoid exogenous attacks, this way allows the loss of any two data (body or redundancy can be) will be able to recover the original data.

CESS chooses 2x redundancy, 4 data slices and 8 redundancy slices, the slices are uniformly called `fragment`, see [pattern.go](https://github.com/CESSProject/cess-go-sdk/blob/main/chain/pattern.go#L45-L48).

CESS redundancy algorithm adopts the [Reed-Solomon](https://en.wikipedia.org/wiki/Reed%E2%80%93Solomon_error_correction), the specific implementation of the reference [klauspost/reedsolomon](https://github.com/klauspost/reedsolomon).

See [rs.go](https://github.com/CESSProject/cess-go-sdk/blob/main/core/erasure/rs.go) for the implementation in sdk.

### Merkle Hash

A file after padded, cut, redundant processing, will get a batch of segments and corresponding fragments, the number of segments based on the size of the file, and the number of fragments for each segment is a fixed number of 12, all the segments as a Merkle tree, the calculation of the root hash of the Merkle tree as the file's unique identifier, which we call `fid`.

Please refer to [hashtree.go](https://github.com/CESSProject/cess-go-sdk/blob/main/core/hashtree/hashtree.go) for the implementation of calculation merkle hash.


# Object/File

This section introduces object/file upload and download interfaces.

* [StoreFile](/developer/cess-sdk/sdk-golang/object_file/storefile)
* [StoreObject](/developer/cess-sdk/sdk-golang/object_file/storeobject)
* [RetrieveFile](/developer/cess-sdk/sdk-golang/object_file/retrievefile)
* [RetrieveObject](/developer/cess-sdk/sdk-golang/object_file/retrieveobject)
* [StoreFileToMiners](https://github.com/CESSProject/doc-v2/blob/main/developer/cess-sdk/sdk-golang/object_file/StoreFileToMiners.md)


# StoreFile

This is the interface for uploading files to the gateway.

```golang
// StoreFile stores files to the gateway
//
// Receive parameter:
//   - url: gateway url
//   - file: stored file
//   - territory: territory name
//   - mnemonic: polkadot account mnemonic
//
// Return parameter:
//   - string: [fid] unique identifier for the file.
//   - error: error message.
//
// Preconditions:
//  1. Account requires purchasing space, refer to [BuySpace] interface.
//  2. Authorize the space usage rights of the account to the gateway account,
//     refer to the [AuthorizeSpace] interface.
//
// Explanation:
//   - Account refers to the account where you configured mnemonic when creating an SDK.
func StoreFile(url, file, territory, mnemonic string) (string, error)
```

Example code:

```golang
package main

import (
	"bytes"
	"context"
	"fmt"
	"io"
	"log"
	"time"

	sdkgo "github.com/CESSProject/cess-go-sdk"
	"github.com/CESSProject/cess-go-sdk/core/process"
	"github.com/CESSProject/cess-go-sdk/utils"
)

// Substrate well-known mnemonic:
//
//	https://github.com/substrate-developer-hub/substrate-developer-hub.github.io/issues/613
//  - cXgaee2N8E77JJv9gdsGAckv1Qsf3hqWYf7NL4q6ZuQzuAUtB
var MY_MNEMONIC = "bottom drive obey lake curtain smoke basket hold race lonely fit walk"

var RPC_ADDRS = []string{
	//testnet
	"wss://testnet-rpc.cess.network/ws/",
}

const PublicGateway = "http://deoss-pub-gateway.cess.network/"
const PublicGatewayAccount = "cXhwBytXqrZLr1qM5NHJhCzEMckSTzNKw17ci2aHft6ETSQm9"
const UploadFile = "Your File"
const Territory = "Your Territory"

func main() {
	sdk, err := sdkgo.New(
		context.Background(),
		sdkgo.ConnectRpcAddrs(RPC_ADDRS),
		sdkgo.Mnemonic(MY_MNEMONIC),
	)
	if err != nil {
		panic(err)
	}
	defer sdk.Close()

	puk, err := utils.ParsingPublickey(PublicGatewayAccount)
	if err != nil {
		panic(err)
	}

	// authorize to public gateway
	_, err = sdk.Authorize(puk)
	if err != nil {
		panic(err)
	}

	// upload file to gateway
	fid, err := process.StoreFile(PublicGateway, UploadFile, Territory, MY_MNEMONIC)
	if err != nil {
		panic(err)
	}

	fmt.Println("fid:", fid)
}
```


# StoreObject

This is the interface for uploading objects to the gateway.

```golang
// StoreObject stores object to the gateway
//
// Receive parameter:
//   - url: gateway url
//   - territory: territory name
//   - mnemonic: polkadot account mnemonic
//   - reader: strings, byte data, file streams, network streams, etc
//
// Return parameter:
//   - string: [fid] unique identifier for the file
//   - error: error message
//
// Preconditions:
//  1. Account requires purchasing space, refer to [BuySpace] interface.
//  2. Authorize the space usage rights of the account to the gateway account,
//     refer to the [AuthorizeSpace] interface.
//
// Explanation:
//   - Account refers to the account where you configured mnemonic when creating an SDK.
func StoreObject(url string, territory, mnemonic string, reader io.Reader) (string, error)
```

Example code:

```golang
package main

import (
	"bytes"
	"context"
	"fmt"
	"io"
	"log"
	"time"

	sdkgo "github.com/CESSProject/cess-go-sdk"
	"github.com/CESSProject/cess-go-sdk/core/process"
	"github.com/CESSProject/cess-go-sdk/utils"
)

// Substrate well-known mnemonic:
//
//	https://github.com/substrate-developer-hub/substrate-developer-hub.github.io/issues/613
//  - cXgaee2N8E77JJv9gdsGAckv1Qsf3hqWYf7NL4q6ZuQzuAUtB
var MY_MNEMONIC = "bottom drive obey lake curtain smoke basket hold race lonely fit walk"

var RPC_ADDRS = []string{
	//testnet
	"wss://testnet-rpc.cess.network/ws/",
}

const PublicGateway = "http://deoss-pub-gateway.cess.network/"
const PublicGatewayAccount = "cXhwBytXqrZLr1qM5NHJhCzEMckSTzNKw17ci2aHft6ETSQm9"
const Territory = "Your Territory"

func main() {
	sdk, err := sdkgo.New(
		context.Background(),
		sdkgo.ConnectRpcAddrs(RPC_ADDRS),
		sdkgo.Mnemonic(MY_MNEMONIC),
	)
	if err != nil {
		panic(err)
	}
	defer sdk.Close()

	puk, err := utils.ParsingPublickey(PublicGatewayAccount)
	if err != nil {
		panic(err)
	}

	// authorize to public gateway
	_, err = sdk.Authorize(puk)
	if err != nil {
		panic(err)
	}

	// upload file to gateway
	fid, err := process.StoreObject(PublicGateway, Territory, MY_MNEMONIC, bytes.NewReader([]byte("test date")))
	if err != nil {
		panic(err)
	}

	fmt.Println("fid:", fid)
}
```


# RetrieveFile

This is the interface for retrieving files from the gateway.

```golang
// RetrieveFile downloads files from the gateway
//   - url: gateway url
//   - fid: fid
//   - mnemonic: polkadot account mnemonic
//   - savepath: file save path
//
// Return:
//   - string: fid
//   - error: error message
func RetrieveFile(url, fid, mnemonic, savepath string) error
```

Example code:

```golang
package main

import (
	"bytes"
	"context"
	"fmt"
	"io"
	"log"
	"time"

	sdkgo "github.com/CESSProject/cess-go-sdk"
	"github.com/CESSProject/cess-go-sdk/core/process"
	"github.com/CESSProject/cess-go-sdk/utils"
)

// Substrate well-known mnemonic:
//
//	https://github.com/substrate-developer-hub/substrate-developer-hub.github.io/issues/613
//  - cXgaee2N8E77JJv9gdsGAckv1Qsf3hqWYf7NL4q6ZuQzuAUtB
var MY_MNEMONIC = "bottom drive obey lake curtain smoke basket hold race lonely fit walk"

const PublicGateway = "http://deoss-pub-gateway.cess.network/"
const PublicGatewayAccount = "cXhwBytXqrZLr1qM5NHJhCzEMckSTzNKw17ci2aHft6ETSQm9"
const RetrieveFid = "Your Fid"
const SavePath = "Your file path"

func main() {
	// download file from gateway
	fid, err := process.RetrieveFile(PublicGateway, RetrieveFid, MY_MNEMONIC, SavePath)
	if err != nil {
		panic(err)
	}
}
```


# RetrieveObject

This is the interface for retrieving objects from the gateway.

```golang
// RetrieveFile downloads files from the gateway
//   - url: gateway url
//   - fid: fid
//   - mnemonic: polkadot account mnemonic
//   - savepath: file save path
//
// Return:
//   - string: fid
//   - error: error message
func RetrieveFile(url, fid, mnemonic, savepath string) error
```

Example code:

```golang
package main

import (
	"bytes"
	"context"
	"fmt"
	"io"
	"log"
	"time"

	sdkgo "github.com/CESSProject/cess-go-sdk"
	"github.com/CESSProject/cess-go-sdk/core/process"
	"github.com/CESSProject/cess-go-sdk/utils"
)

// Substrate well-known mnemonic:
//
//	https://github.com/substrate-developer-hub/substrate-developer-hub.github.io/issues/613
//  - cXgaee2N8E77JJv9gdsGAckv1Qsf3hqWYf7NL4q6ZuQzuAUtB
var MY_MNEMONIC = "bottom drive obey lake curtain smoke basket hold race lonely fit walk"

const PublicGateway = "http://deoss-pub-gateway.cess.network/"
const PublicGatewayAccount = "cXhwBytXqrZLr1qM5NHJhCzEMckSTzNKw17ci2aHft6ETSQm9"
const RetrieveFid = "Your Fid"

func main() {
	// download file from gateway
	fid, err := process.RetrieveObject(PublicGateway, RetrieveFid, MY_MNEMONIC)
	if err != nil {
		panic(err)
	}
    defer body.Close()
	data, err := io.ReadAll(body)
	if err != nil {
		panic(err)
	}
	fmt.Println(string(data))
}
```


# StoreFileToMiners

This is the interface for uploading the file to miners.

```golang
// StoreFileToMiners store a file to some miners
//
// Receive parameter:
//   - file: stored file
//   - mnemonic: account mnemonic
//   - territory: territory name
//   - timeout: timeout for waiting for block transaction to complete
//   - rpcs: rpc address list
//   - wantMiner: the wallet account of the miner you want to store. if it is empty, will be randomly selected.
//
// Return parameter:
//   - string: [fid] unique identifier for the file
//   - error: error message
//
// Preconditions:
//  1. your account needs to have money, and will be automatically created if the territory you specify does not exist.
//  2. if the number of miners you specify is less than 12, file storage will be exited if even one fails.
//  3. if the number of miners you specify is greater than 11, no other miners will be found for storage.
func StoreFileToMiners(file string, mnemonic string, territory string, timeout time.Duration, rpcs []string, wantMiner []string) (string, error)
```

Example code:

```golang
package main

import (
	"fmt"
	"time"

	"github.com/CESSProject/cess-go-sdk/core/process"
)

// Substrate well-known mnemonic:
//
//	https://github.com/substrate-developer-hub/substrate-developer-hub.github.io/issues/613
var MY_MNEMONIC = "bottom drive obey lake curtain smoke basket hold race lonely fit walk"

var RPC_ADDRS = []string{
	//testnet
	"wss://testnet-rpc.cess.network/ws/",
}

const UploadFile = "file_name"
const TerritoryName = "territory_name"

var WantMiner = []string{"cX...", "cX..."}

func main() {
	fid, err := process.StoreFileToMiners(
		UploadFile,
		MY_MNEMONIC,
		TerritoryName,
		time.Second*15,
		RPC_ADDRS,
		WantMiner,
	)
	fmt.Println("fid: ", fid)
	fmt.Println("err: ", err)
}
```


# RetrieveFileFromMiners

This is the interface for retrieving the file from miners.

```golang
// RetrieveFileFromMiners Retrieve a storaged file from storage miners
//
// Receive parameter:
//   - rpcs: rpc address list
//   - fid: [fid] unique identifier for the file
//   - cipher: decryption password, if any
//   - savedir: file save directory, final save location: <savedir>/<fid>
//
// Return parameter:
//   - error: error message
//
// Preconditions:
//  1. the file to be downloaded needs to have been stored in the miner
func RetrieveFileFromMiners(rpcs []string, mnemonic, fid, cipher, savedir string) error
```

Example code:

```golang
package main

import (
	"fmt"

	"github.com/CESSProject/cess-go-sdk/core/process"
)

// Substrate well-known mnemonic:
//
//	https://github.com/substrate-developer-hub/substrate-developer-hub.github.io/issues/613
var MY_MNEMONIC = "bottom drive obey lake curtain smoke basket hold race lonely fit walk"

var RPC_ADDRS = []string{
	//testnet
	"wss://testnet-rpc.cess.network/ws/",
}

const (
	FID    = ""
	CIPHER = ""
	DIR    = "."
)

func main() {
	err := process.RetrieveFileFromMiners(RPC_ADDRS, MY_MNEMONIC, FID, CIPHER, DIR)
	fmt.Println("err: ", err)
}
```


# Chain Related

This section introduces some methods for querying chain status.

* [Audit](https://github.com/CESSProject/doc-v2/blob/main/developer/cess-sdk/sdk-golang/chain_related/audit/audit.md)
* [Babe](https://github.com/CESSProject/doc-v2/blob/main/developer/cess-sdk/sdk-golang/chain_related/babe/babe.md)
* [Balances](https://github.com/CESSProject/doc-v2/blob/main/developer/cess-sdk/sdk-golang/chain_related/balances/balances.md)
* [Deoss](https://github.com/CESSProject/doc-v2/blob/main/developer/cess-sdk/sdk-golang/chain_related/deoss/deoss.md)
* [FileBank](https://github.com/CESSProject/doc-v2/blob/main/developer/cess-sdk/sdk-golang/chain_related/file_bank/file_bank.md)
* [SchedulerCredit](https://github.com/CESSProject/doc-v2/blob/main/developer/cess-sdk/sdk-golang/chain_related/scheduler_credit/scheduler_credit.md)
* [Session](https://github.com/CESSProject/doc-v2/blob/main/developer/cess-sdk/sdk-golang/chain_related/session/session.md)
* [Sminer](https://github.com/CESSProject/doc-v2/blob/main/developer/cess-sdk/sdk-golang/chain_related/sminer/sminer.md)
* [Staking](https://github.com/CESSProject/doc-v2/blob/main/developer/cess-sdk/sdk-golang/chain_related/staking/staking.md)
* [StorageHandler](https://github.com/CESSProject/doc-v2/blob/main/developer/cess-sdk/sdk-golang/chain_related/storage_handler/storage_handler.md)
* [System](https://github.com/CESSProject/doc-v2/blob/main/developer/cess-sdk/sdk-golang/chain_related/system/system.md)
* [Tee](https://github.com/CESSProject/doc-v2/blob/main/developer/cess-sdk/sdk-golang/chain_related/tee/tee.md)
* [CessTreasury](https://github.com/CESSProject/doc-v2/blob/main/developer/cess-sdk/sdk-golang/chain_related/cess_treasury/treasury.md)


# Audit

This section describes the use of the interface to the audit pallet on CESS chain, which is about storage miner's challenges.

The list of interfaces is as follows:

* [QueryChallengeSnapShot](/developer/cess-sdk/sdk-golang/chain_related/audit/querychallengesnapshot)
* [QueryCountedClear](/developer/cess-sdk/sdk-golang/chain_related/audit/querycountedclear)
* [QueryCountedServiceFailed](/developer/cess-sdk/sdk-golang/chain_related/audit/querycountedservicefailed)
* [SubmitIdleProof](/developer/cess-sdk/sdk-golang/chain_related/audit/submitidleproof)
* [SubmitServiceProof](/developer/cess-sdk/sdk-golang/chain_related/audit/submitserviceproof)
* [SubmitVerifyIdleResult](/developer/cess-sdk/sdk-golang/chain_related/audit/submitverifyidleresult)
* [SubmitVerifyServiceResult](/developer/cess-sdk/sdk-golang/chain_related/audit/submitverifyserviceresult)


# QueryChallengeSnapShot

QueryChallengeSnapShot query challenge snapshot data for storage miner.

```golang
// QueryChallengeSnapShot query challenge snapshot data
//   - accountID: signature account of the storage miner
//   - block: block number, less than 0 indicates the latest block
//
// Return:
//   - bool: is there any challenge snapshot data
//   - ChallengeInfo: challenge snapshot data
//   - error: error message
func (c *ChainClient) QueryChallengeSnapShot(accountID []byte, block int32) (bool, ChallengeInfo, error)
```

The return type is detailed in [ChallengeInfo](https://github.com/CESSProject/doc-v2/blob/main/developer/cess-sdk/sdk-golang/chain_related/chain_type.md#ChallengeInfo).

Example code:

```golang
package main

import (
    "context"
    "fmt"
    "time"

    sdkgo "github.com/CESSProject/cess-go-sdk"
    "github.com/CESSProject/cess-go-sdk/utils"
)

var RPC_ADDRS = []string{
    //testnet
    "wss://testnet-rpc.cess.network/ws/",
}

func main() {
    sdk, err := sdkgo.New(
        context.Background(),
        sdkgo.ConnectRpcAddrs(RPC_ADDRS),
    )
    if err != nil {
        panic(err)
    }
    defer sdk.Close()

    account_id, err := utils.ParsingPublickey("cX...")
    if err != nil {
        panic(err)
    }
    fmt.Println(sdk.QueryChallengeSnapShot(account_id, -1))
}
```


# QueryCountedClear

QueryCountedClear query the number of times to clear the challenge failure count.

```golang
// QueryCounterdClear query the number of times to clear the miner has not submitted the service proof.
//   - accountID: signature account of the storage miner
//   - block: block number, less than 0 indicates the latest block
//
// Return:
//   - uint8: cleanup count
//   - error: error message
func (c *ChainClient) QueryCountedClear(accountID []byte, block int32) (uint8, error)
```

Example code:

```golang
package main

import (
    "context"
    "fmt"
    "time"

    sdkgo "github.com/CESSProject/cess-go-sdk"
    "github.com/CESSProject/cess-go-sdk/utils"
)

var RPC_ADDRS = []string{
    //testnet
    "wss://testnet-rpc.cess.network/ws/",
}

func main() {
    sdk, err := sdkgo.New(
        context.Background(),
        sdkgo.ConnectRpcAddrs(RPC_ADDRS),
    )
    if err != nil {
        panic(err)
    }
    defer sdk.Close()

    account_id, err := utils.ParsingPublickey("cX...")
    if err != nil {
        panic(err)
    }
    fmt.Println(sdk.QueryCountedClear(account_id, -1))
}
```


# QueryCountedServiceFailed

QueryCountedServiceFailed query the number of failed service data challenge.

```golang
// QueryCountedServiceFailed query the number of failed service data challenge
//   - accountID: signature account of the storage miner
//   - block: block number, less than 0 indicates the latest block
//
// Return:
//   - uint32: Is there a value
//   - error: error message
func (c *ChainClient) QueryCountedServiceFailed(accountID []byte, block int32) (uint32, error)
```

Example code:

```golang
package main

import (
    "context"
    "fmt"
    "time"

    sdkgo "github.com/CESSProject/cess-go-sdk"
    "github.com/CESSProject/cess-go-sdk/utils"
)

var RPC_ADDRS = []string{
    //testnet
    "wss://testnet-rpc.cess.network/ws/",
}

func main() {
    sdk, err := sdkgo.New(
        context.Background(),
        sdkgo.ConnectRpcAddrs(RPC_ADDRS),
    )
    if err != nil {
        panic(err)
    }
    defer sdk.Close()

    account_id, err := utils.ParsingPublickey("cX...")
    if err != nil {
        panic(err)
    }
    fmt.Println(sdk.QueryCountedServiceFailed(account_id, -1))
}
```


# SubmitIdleProof

SubmitIdleProof is an interface used by storage miners to submit idle data proof to the chain.

```golang
// SubmitIdleProof submit idle data proof to the chain
//   - idleProof: idle data proof
//
// Return:
//   - string: block hash
//   - error: error message
func (c *ChainClient) SubmitIdleProof(idleProof []types.U8) (string, error)
```

Example code:

```golang
package main

import (
    "context"
    "fmt"
    "time"

    sdkgo "github.com/CESSProject/cess-go-sdk"
    "github.com/centrifuge/go-substrate-rpc-client/v4/types"
)

// Substrate well-known mnemonic:
//
//   - https://github.com/substrate-developer-hub/substrate-developer-hub.github.io/issues/613
//   - cXgaee2N8E77JJv9gdsGAckv1Qsf3hqWYf7NL4q6ZuQzuAUtB
var MY_MNEMONIC = "bottom drive obey lake curtain smoke basket hold race lonely fit walk"

var RPC_ADDRS = []string{
    //testnet
    "wss://testnet-rpc.cess.network/ws/",
}

func main() {
    sdk, err := sdkgo.New(
        context.Background(),
        sdkgo.ConnectRpcAddrs(RPC_ADDRS),
        sdkgo.Mnemonic(MY_MNEMONIC),
        sdkgo.TransactionTimeout(time.Second*10),
    )
    if err != nil {
        panic(err)
    }
    defer sdk.Close()

    fmt.Println(sdk.SubmitIdleProof([]types.U8{0}))
}
```


# SubmitServiceProof

SubmitServiceProof is an interface used by storage miners to submit service data proof to the chain.

```golang
// SubmitServiceProof submit service data proof to the chain
//   - serviceProof: service data proof
//
// Return:
//   - string: block hash
//   - error: error message
func (c *ChainClient) SubmitServiceProof(serviceProof []types.U8) (string, error)
```

Example code:

```golang
package main

import (
    "context"
    "fmt"
    "time"

    sdkgo "github.com/CESSProject/cess-go-sdk"
    "github.com/centrifuge/go-substrate-rpc-client/v4/types"
)

// Substrate well-known mnemonic:
//
//   - https://github.com/substrate-developer-hub/substrate-developer-hub.github.io/issues/613
//   - cXgaee2N8E77JJv9gdsGAckv1Qsf3hqWYf7NL4q6ZuQzuAUtB
var MY_MNEMONIC = "bottom drive obey lake curtain smoke basket hold race lonely fit walk"

var RPC_ADDRS = []string{
    //testnet
    "wss://testnet-rpc.cess.network/ws/",
}

func main() {
    sdk, err := sdkgo.New(
        context.Background(),
        sdkgo.ConnectRpcAddrs(RPC_ADDRS),
        sdkgo.Mnemonic(MY_MNEMONIC),
        sdkgo.TransactionTimeout(time.Second*10),
    )
    if err != nil {
        panic(err)
    }
    defer sdk.Close()

    fmt.Println(sdk.SubmitServiceProof([]types.U8{0}))
}
```


# SubmitVerifyIdleResult

SubmitVerifyIdleResult is an interface used by storage miners to submit validation result of idle data proof to the chain.

```golang
// SubmitVerifyIdleResult submit validation result of idle data proof to the chain
//   - totalProofHash: total idle data proof hash value
//   - front: idle data pre-offset
//   - rear: back offset of idle data
//   - accumulator: accumulator value
//   - result: validation result of idle data proof
//   - sig: signature from tee
//   - teePuk: tee's work public key
//
// Return:
//   - string: block hash
//   - error: error message
func (c *ChainClient) SubmitVerifyIdleResult(totalProofHash []types.U8, front, rear types.U64, accumulator Accumulator, result types.Bool, sig types.Bytes, teePuk WorkerPublicKey) (string, error) 
```

For example code, please refer to [challenge\_idle.go](https://github.com/CESSProject/cess-miner/blob/main/node/challenge_idle.go)


# SubmitVerifyServiceResult

SubmitVerifyServiceResult is an interface used by storage miners to submit validation result of service data proof to the chain.

```golang
// SubmitVerifyServiceResult submit validation result of service data proof to the chain
//   - result: validation result of idle data proof
//   - sig: signature from tee
//   - bloomFilter: bloom filter value
//   - teePuk: tee's work public key
//
// Return:
//   - string: block hash
//   - error: error message
func (c *ChainClient) SubmitVerifyServiceResult(result types.Bool, sign types.Bytes, bloomFilter BloomFilter, teePuk WorkerPublicKey)
```

For example code, please refer to [challenge\_service.go](https://github.com/CESSProject/cess-miner/blob/main/node/challenge_service.go)


# Babe

This section describes the use of the interface to the babe pallet on CESS chain, which is about consensus mechanism.

The list of interfaces is as follows:

* [QueryAuthorities](/developer/cess-sdk/sdk-golang/chain_related/babe/queryauthorities)


# QueryAuthorities

QueryAuthorities query the RRSC app public key for consensus nodes.

```golang
// QueryAuthorities query consensus rrsc public
//   - block: block number, less than 0 indicates the latest block
//
// Return:
//   - []ConsensusRrscAppPublic: all consensus rrsc public
//   - error: error message
func (c *ChainClient) QueryAuthorities(block int32) ([]ConsensusRrscAppPublic, error)
```

The return type is detailed in [ConsensusRrscAppPublic](https://github.com/CESSProject/doc-v2/blob/main/developer/cess-sdk/sdk-golang/chain_related/chain_type.md#ConsensusRrscAppPublic).

Example code:

```golang
package main

import (
    "context"
    "fmt"
    "time"

    sdkgo "github.com/CESSProject/cess-go-sdk"
    "github.com/CESSProject/cess-go-sdk/utils"
)

var RPC_ADDRS = []string{
    //testnet
    "wss://testnet-rpc.cess.network/ws/",
}

func main() {
    sdk, err := sdkgo.New(
        context.Background(),
        sdkgo.ConnectRpcAddrs(RPC_ADDRS),
    )
    if err != nil {
        panic(err)
    }
    defer sdk.Close()

    fmt.Println(sdk.QueryAuthorities(-1))
}
```


# Balances

This section describes the use of the interface to the balances pallet on CESS chain, which is about account balances.

The list of interfaces is as follows:

* [QueryTotalIssuance](/developer/cess-sdk/sdk-golang/chain_related/balances/querytotalissuance)
* [QueryInactiveIssuance](/developer/cess-sdk/sdk-golang/chain_related/balances/queryinactiveissuance)
* [TransferToken](/developer/cess-sdk/sdk-golang/chain_related/balances/transfertoken)


# QueryInactiveIssuance

QueryInactiveIssuance query the amount of inactive token issuance.

```golang
// QueryInactiveIssuance query the amount of inactive token issuance
//   - block: block number, less than 0 indicates the latest block
//
// Return:
//   - string: the amount of inactive token issuance
//   - error: error message
func (c *ChainClient) QueryInactiveIssuance(block int32) (string, error)
```

Example code:

```golang
package main

import (
    "context"
    "fmt"
    "time"

    sdkgo "github.com/CESSProject/cess-go-sdk"
    "github.com/CESSProject/cess-go-sdk/utils"
)

var RPC_ADDRS = []string{
    //testnet
    "wss://testnet-rpc.cess.network/ws/",
}

func main() {
    sdk, err := sdkgo.New(
        context.Background(),
        sdkgo.ConnectRpcAddrs(RPC_ADDRS),
    )
    if err != nil {
        panic(err)
    }
    defer sdk.Close()

    fmt.Println(sdk.QueryInactiveIssuance(-1))
}
```


# QueryTotalIssuance

QueryTotalIssuance query the total amount of token issuance.

```golang
// QueryTotalIssuance query the total amount of token issuance
//   - block: block number, less than 0 indicates the latest block
//
// Return:
//   - string: the total amount of token issuance
//   - error: error message
func (c *ChainClient) QueryTotalIssuance(block int32) (string, error)
```

Example code:

```golang
package main

import (
    "context"
    "fmt"
    "time"

    sdkgo "github.com/CESSProject/cess-go-sdk"
    "github.com/CESSProject/cess-go-sdk/utils"
)

var RPC_ADDRS = []string{
    //testnet
    "wss://testnet-rpc.cess.network/ws/",
}

func main() {
    sdk, err := sdkgo.New(
        context.Background(),
        sdkgo.ConnectRpcAddrs(RPC_ADDRS),
    )
    if err != nil {
        panic(err)
    }
    defer sdk.Close()

    fmt.Println(sdk.QueryTotalIssuance(-1))
}
```


# TransferToken

TransferToken transfers to other accounts.

```golang
// TransferToken transfers to other accounts
//   - dest: target account
//   - amount: transfer amount
//
// Return:
//   - string: block hash
//   - error: error message
func (c *ChainClient) TransferToken(dest string, amount uint64) (string, error)
```

Example code:

```golang
package main

import (
    "context"
    "fmt"
    "time"

    sdkgo "github.com/CESSProject/cess-go-sdk"
    "github.com/centrifuge/go-substrate-rpc-client/v4/types"
)

// Substrate well-known mnemonic:
//
//   - https://github.com/substrate-developer-hub/substrate-developer-hub.github.io/issues/613
//   - cXgaee2N8E77JJv9gdsGAckv1Qsf3hqWYf7NL4q6ZuQzuAUtB
var MY_MNEMONIC = "bottom drive obey lake curtain smoke basket hold race lonely fit walk"

var RPC_ADDRS = []string{
    //testnet
    "wss://testnet-rpc.cess.network/ws/",
}

func main() {
    sdk, err := sdkgo.New(
        context.Background(),
        sdkgo.ConnectRpcAddrs(RPC_ADDRS),
        sdkgo.Mnemonic(MY_MNEMONIC),
        sdkgo.TransactionTimeout(time.Second*10),
    )
    if err != nil {
        panic(err)
    }
    defer sdk.Close()

    fmt.Println(sdk.TransferToken("cXjeCHQW3totBGhQXdAUAqjCNqk1NhiR3UK37czSeUak2pqGV",10000))
}
```


# CessTreasury

This section describes the use of the interface to the treasury pallet on CESS chain, which is about treasury.

The list of interfaces is as follows:

* [QueryCurrencyReward](/developer/cess-sdk/sdk-golang/chain_related/cess_treasury/querycurrencyreward)
* [QueryEraReward](/developer/cess-sdk/sdk-golang/chain_related/cess_treasury/queryerareward)
* [QueryReserveReward](/developer/cess-sdk/sdk-golang/chain_related/cess_treasury/queryreservereward)
* [QueryRoundReward](/developer/cess-sdk/sdk-golang/chain_related/cess_treasury/queryroundreward)


# QueryCurrencyReward

This is the interface to query the current reward.

```golang
// QueryCurrencyReward query the currency rewards
//   - block: block number, less than 0 indicates the latest block
//
// Return:
//   - string: currency rewards
//   - error: error message
func (c *ChainClient) QueryCurrencyReward(block int32) (string, error)
```

Example code:

```golang
package main

import (
    "context"
    "fmt"
    "time"

    sdkgo "github.com/CESSProject/cess-go-sdk"
    "github.com/CESSProject/cess-go-sdk/utils"
)

var RPC_ADDRS = []string{
    //testnet
    "wss://testnet-rpc.cess.network/ws/",
}

func main() {
    sdk, err := sdkgo.New(
        context.Background(),
        sdkgo.ConnectRpcAddrs(RPC_ADDRS),
    )
    if err != nil {
        panic(err)
    }
    defer sdk.Close()

    fmt.Println(sdk.QueryCurrencyReward(-1))
}
```


# QueryEraReward

This is the interface for querying the rewards of an era.

```golang
// QueryEraReward query the rewards in era
//   - block: block number, less than 0 indicates the latest block
//
// Return:
//   - string: rewards in era
//   - error: error message
func (c *ChainClient) QueryEraReward(block int32) (string, error)
```

Example code:

```golang
package main

import (
    "context"
    "fmt"
    "time"

    sdkgo "github.com/CESSProject/cess-go-sdk"
    "github.com/CESSProject/cess-go-sdk/utils"
)

var RPC_ADDRS = []string{
    //testnet
    "wss://testnet-rpc.cess.network/ws/",
}

func main() {
    sdk, err := sdkgo.New(
        context.Background(),
        sdkgo.ConnectRpcAddrs(RPC_ADDRS),
    )
    if err != nil {
        panic(err)
    }
    defer sdk.Close()

    fmt.Println(sdk.QueryEraReward(-1))
}
```


# QueryReserveReward

This is the interface for querying reserved awards.

```golang
// QueryReserveReward query the reserve rewards
//   - block: block number, less than 0 indicates the latest block
//
// Return:
//   - string: reserve rewards
//   - error: error message
func (c *ChainClient) QueryReserveReward(block int32) (string, error)
```

Example code:

```golang
package main

import (
    "context"
    "fmt"
    "time"

    sdkgo "github.com/CESSProject/cess-go-sdk"
    "github.com/CESSProject/cess-go-sdk/utils"
)

var RPC_ADDRS = []string{
    //testnet
    "wss://testnet-rpc.cess.network/ws/",
}

func main() {
    sdk, err := sdkgo.New(
        context.Background(),
        sdkgo.ConnectRpcAddrs(RPC_ADDRS),
    )
    if err != nil {
        panic(err)
    }
    defer sdk.Close()

    fmt.Println(sdk.QueryReserveReward(-1))
}
```


# QueryRoundReward

This is the interface for querying a round of rewards in an era.

```golang
// QueryRoundReward querie the rewards in each era
//   - era: era id
//   - block: block number, less than 0 indicates the latest block
//
// Return:
//   - string: rewards in an era
//   - error: error message
func (c *ChainClient) QueryRoundReward(era uint32, block int32) (string, error)
```

Example code:

```golang
package main

import (
    "context"
    "fmt"
    "time"

    sdkgo "github.com/CESSProject/cess-go-sdk"
    "github.com/CESSProject/cess-go-sdk/utils"
)

var RPC_ADDRS = []string{
    //testnet
    "wss://testnet-rpc.cess.network/ws/",
}

func main() {
    sdk, err := sdkgo.New(
        context.Background(),
        sdkgo.ConnectRpcAddrs(RPC_ADDRS),
    )
    if err != nil {
        panic(err)
    }
    defer sdk.Close()

    fmt.Println(sdk.QueryRoundReward(0, -1))
}
```


# DeOSS

This section describes the use of the interface to the deoss pallet on CESS chain, which is about gateway.

The list of interfaces is as follows:

* [QueryOss](/developer/cess-sdk/sdk-golang/chain_related/deoss/queryoss)
* [QueryAllOss](/developer/cess-sdk/sdk-golang/chain_related/deoss/queryalloss)
* [QueryAuthorityList](/developer/cess-sdk/sdk-golang/chain_related/deoss/queryauthoritylist)
* [Authorize](/developer/cess-sdk/sdk-golang/chain_related/deoss/authorize)
* [CancelAuthorize](/developer/cess-sdk/sdk-golang/chain_related/deoss/cancelauthorize)
* [RegisterOss](/developer/cess-sdk/sdk-golang/chain_related/deoss/registeross)
* [UpdateOss](/developer/cess-sdk/sdk-golang/chain_related/deoss/updateoss)
* [DestroyOss](/developer/cess-sdk/sdk-golang/chain_related/deoss/destroyoss)


# Authorize

<https://deoss-sgp.cess.network/fileThis> is the interface where users authorize space usage rights to the gateway.

```golang
// Authorize to authorise space usage to another account
//   - accountID: authorised account
//
// Return:
//   - string: block hash
//   - error: error message
//
// Node:
//   - accountID should be oss account
func (c *ChainClient) Authorize(accountID []byte) (string, error)
```

Example code:

```golang
package main

import (
    "context"
    "fmt"
    "time"

    sdkgo "github.com/CESSProject/cess-go-sdk"
    "github.com/centrifuge/go-substrate-rpc-client/v4/types"
)

// Substrate well-known mnemonic:
//
//   - https://github.com/substrate-developer-hub/substrate-developer-hub.github.io/issues/613
//   - cXgaee2N8E77JJv9gdsGAckv1Qsf3hqWYf7NL4q6ZuQzuAUtB
var MY_MNEMONIC = "bottom drive obey lake curtain smoke basket hold race lonely fit walk"

var RPC_ADDRS = []string{
    //testnet
    "wss://testnet-rpc.cess.network/ws/",
}

func main() {
    sdk, err := sdkgo.New(
        context.Background(),
        sdkgo.ConnectRpcAddrs(RPC_ADDRS),
        sdkgo.Mnemonic(MY_MNEMONIC),
        sdkgo.TransactionTimeout(time.Second*10),
    )
    if err != nil {
        panic(err)
    }
    defer sdk.Close()

    account_id, err := utils.ParsingPublickey("cX...")
    if err != nil {
        panic(err)
    }

    fmt.Println(sdk.Authorize(account_id))
}
```


# CancelAuthorize

This is the interface for users to cancel gateway authorization.

```golang
// CancelAuthorize cancels authorisation for an account
//   - accountID: account with cancelled authorisations
//
// Return:
//   - string: block hash
//   - error: error message
func (c *ChainClient) CancelAuthorize(accountID []byte) (string, error)
```

Example code:

```golang
package main

import (
    "context"
    "fmt"
    "time"

    sdkgo "github.com/CESSProject/cess-go-sdk"
    "github.com/centrifuge/go-substrate-rpc-client/v4/types"
)

// Substrate well-known mnemonic:
//
//   - https://github.com/substrate-developer-hub/substrate-developer-hub.github.io/issues/613
//   - cXgaee2N8E77JJv9gdsGAckv1Qsf3hqWYf7NL4q6ZuQzuAUtB
var MY_MNEMONIC = "bottom drive obey lake curtain smoke basket hold race lonely fit walk"

var RPC_ADDRS = []string{
    //testnet
    "wss://testnet-rpc.cess.network/ws/",
}

func main() {
    sdk, err := sdkgo.New(
        context.Background(),
        sdkgo.ConnectRpcAddrs(RPC_ADDRS),
        sdkgo.Mnemonic(MY_MNEMONIC),
        sdkgo.TransactionTimeout(time.Second*10),
    )
    if err != nil {
        panic(err)
    }
    defer sdk.Close()

    account_id, err := utils.ParsingPublickey("cX...")
    if err != nil {
        panic(err)
    }

    fmt.Println(sdk.CancelAuthorize(account_id))
}
```


# DestroyOss

This is the interface for logging off the gateway.

```golang
// DestroyOss destroys the oss role of the current account
//
// Return:
//   - string: block hash
//   - error: error message
func (c *ChainClient) DestroyOss() (string, error)
```

For example code, please refer to [exit.go](https://github.com/CESSProject/DeOSS/blob/main/cmd/cmd/exit.go)


# QueryAllOss

QueryAllOss query all oss (gateway) information.

```golang
// QueryAllOss query all oss info
//   - block: block number, less than 0 indicates the latest block
//
// Return:
//   - []OssInfo: all oss info
//   - error: error message
func (c *ChainClient) QueryAllOss(block int32) ([]OssInfo, error)
```

The return type is detailed in [OssInfo](https://github.com/CESSProject/doc-v2/blob/main/developer/cess-sdk/sdk-golang/chain_related/chain_type.md#OssInfo).

Example code:

```golang
package main

import (
    "context"
    "fmt"
    "time"

    sdkgo "github.com/CESSProject/cess-go-sdk"
    "github.com/CESSProject/cess-go-sdk/utils"
)

var RPC_ADDRS = []string{
    //testnet
    "wss://testnet-rpc.cess.network/ws/",
}

func main() {
    sdk, err := sdkgo.New(
        context.Background(),
        sdkgo.ConnectRpcAddrs(RPC_ADDRS),
    )
    if err != nil {
        panic(err)
    }
    defer sdk.Close()

    fmt.Println(sdk.QueryAllOss(-1))
}
```


# QueryAuthorityList

QueryAuthorityList all accounts authorized to the oss (gateway).

```golang
// QueryAuthorityList query authorised all accounts
//   - accountID: account to be queried
//   - block: block number, less than 0 indicates the latest block
//
// Return:
//   - []types.AccountID: authorised all accounts
//   - error: error message
func (c *ChainClient) QueryAuthorityList(accountID []byte, block int32) ([]types.AccountID, error)
```

Example code:

```golang
package main

import (
    "context"
    "fmt"
    "time"

    sdkgo "github.com/CESSProject/cess-go-sdk"
    "github.com/CESSProject/cess-go-sdk/utils"
)

var RPC_ADDRS = []string{
    //testnet
    "wss://testnet-rpc.cess.network/ws/",
}

func main() {
    sdk, err := sdkgo.New(
        context.Background(),
        sdkgo.ConnectRpcAddrs(RPC_ADDRS),
    )
    if err != nil {
        panic(err)
    }
    defer sdk.Close()

    account_id, err := utils.ParsingPublickey("cX...")
    if err != nil {
        panic(err)
    }

    fmt.Println(sdk.QueryAuthorityList(account_id, -1))
}
```


# QueryOss

QueryOss query oss (gateway) information.

```golang
// QueryOss query oss info
//   - accountID: oss's account
//   - block: block number, less than 0 indicates the latest block
//
// Return:
//   - OssInfo: oss info
//   - error: error message
func (c *ChainClient) QueryOss(accountID []byte, block int32) (OssInfo, error)
```

The return type is detailed in [OssInfo](https://github.com/CESSProject/doc-v2/blob/main/developer/cess-sdk/sdk-golang/chain_related/chain_type.md#OssInfo).

Example code:

```golang
package main

import (
    "context"
    "fmt"
    "time"

    sdkgo "github.com/CESSProject/cess-go-sdk"
    "github.com/CESSProject/cess-go-sdk/utils"
)

var RPC_ADDRS = []string{
    //testnet
    "wss://testnet-rpc.cess.network/ws/",
}

func main() {
    sdk, err := sdkgo.New(
        context.Background(),
        sdkgo.ConnectRpcAddrs(RPC_ADDRS),
    )
    if err != nil {
        panic(err)
    }
    defer sdk.Close()

    account_id, err := utils.ParsingPublickey("cX...")
    if err != nil {
        panic(err)
    }

    fmt.Println(sdk.QueryOss(account_id, -1))
}
```


# RegisterOss

This is the interface for registering as a gateway.

```golang
// RegisterOss registered as oss role
//   - domain: domain name, can be empty
//
// Return:
//   - string: block hash
//   - error: error message
func (c *ChainClient) RegisterOss(domain string) (string, error)
```

For example code, please refer to [run.go](https://github.com/CESSProject/DeOSS/blob/main/cmd/cmd/run.go)


# UpdateOss

This is the interface for the gateway to update its own information.

```golang
// UpdateOss update oss's peerId or domain
//   - domain: domain name
//
// Return:
//   - string: block hash
//   - error: error message
func (c *ChainClient) UpdateOss(domain string) (string, error)
```

For example code, please refer to [run.go](https://github.com/CESSProject/DeOSS/blob/main/cmd/cmd/run.go)


# FileBank

This section describes the use of the interface to the FileBank pallet on CESS chain, which is about user files.

The list of interfaces is as follows:

* [QueryDealMap](/developer/cess-sdk/sdk-golang/chain_related/file_bank/querydealmap)
* [QueryFile](/developer/cess-sdk/sdk-golang/chain_related/file_bank/queryfile)
* [QueryRestoralOrder](/developer/cess-sdk/sdk-golang/chain_related/file_bank/queryrestoralorder)
* [QueryAllRestoralOrder](/developer/cess-sdk/sdk-golang/chain_related/file_bank/queryallrestoralorder)
* [QueryUserHoldFileList](/developer/cess-sdk/sdk-golang/chain_related/file_bank/queryuserholdfilelist)
* [QueryUserFidList](/developer/cess-sdk/sdk-golang/chain_related/file_bank/queryuserfidlist)
* [PlaceStorageOrder](/developer/cess-sdk/sdk-golang/chain_related/file_bank/placestorageorder)
* [UploadDeclaration](/developer/cess-sdk/sdk-golang/chain_related/file_bank/uploaddeclaration)
* [DeleteFile](/developer/cess-sdk/sdk-golang/chain_related/file_bank/deletefile)
* [TransferReport](/developer/cess-sdk/sdk-golang/chain_related/file_bank/transferreport)
* [GenerateRestoralOrder](/developer/cess-sdk/sdk-golang/chain_related/file_bank/generaterestoralorder)
* [ClaimRestoralOrder](/developer/cess-sdk/sdk-golang/chain_related/file_bank/claimrestoralorder)
* [ClaimRestoralNoExistOrder](/developer/cess-sdk/sdk-golang/chain_related/file_bank/claimrestoralnoexistorder)
* [RestoralOrderComplete](/developer/cess-sdk/sdk-golang/chain_related/file_bank/restoralordercomplete)
* [CertIdleSpace](/developer/cess-sdk/sdk-golang/chain_related/file_bank/certidlespace)
* [ReplaceIdleSpace](/developer/cess-sdk/sdk-golang/chain_related/file_bank/replaceidlespace)
* [CalculateReport](/developer/cess-sdk/sdk-golang/chain_related/file_bank/calculatereport)
* [TerritorFileDelivery](https://github.com/CESSProject/doc-v2/blob/main/developer/cess-sdk/sdk-golang/chain_related/file_bank/TerritorFileDelivery.md)


# QueryAllRestoralOrder

This interface is used to query the file recovery order, the storage miner can store more files by recovering the files in this order.

```golang
// QueryAllRestoralOrder query all file restoral order
//   - block: block number, less than 0 indicates the latest block
//
// Return:
//   - []RestoralOrderInfo: all restoral order info
//   - error: error message
func (c *ChainClient) QueryAllRestoralOrder(block int32) ([]RestoralOrderInfo, error)
```

The return type is detailed in [RestoralOrderInfo](https://github.com/CESSProject/doc-v2/blob/main/developer/cess-sdk/sdk-golang/chain_related/chain_type.md#RestoralOrderInfo).

Example code:

```golang
package main

import (
    "context"
    "fmt"
    "time"

    sdkgo "github.com/CESSProject/cess-go-sdk"
    "github.com/CESSProject/cess-go-sdk/utils"
)

var RPC_ADDRS = []string{
    //testnet
    "wss://testnet-rpc.cess.network/ws/",
}

func main() {
    sdk, err := sdkgo.New(
        context.Background(),
        sdkgo.ConnectRpcAddrs(RPC_ADDRS),
    )
    if err != nil {
        panic(err)
    }
    defer sdk.Close()

    fmt.Println(sdk.QueryAllRestoralOrder(-1))
}
```


# QueryUserHoldFileList

This interface is used to query all files uploaded by the user.

```golang
// QueryUserHoldFileList query user's all files
//   - accountID: user account
//   - block: block number, less than 0 indicates the latest block
//
// Return:
//   - []UserFileSliceInfo: file list
//   - error: error message
func (c *ChainClient) QueryUserHoldFileList(accountID []byte, block int32) ([]UserFileSliceInfo, error)
```

The return type is detailed in [UserFileSliceInfo](https://github.com/CESSProject/doc-v2/blob/main/developer/cess-sdk/sdk-golang/chain_related/chain_type.md#UserFileSliceInfo).

Example code:

```golang
package main

import (
    "context"
    "fmt"
    "time"

    sdkgo "github.com/CESSProject/cess-go-sdk"
    "github.com/CESSProject/cess-go-sdk/utils"
)

var RPC_ADDRS = []string{
    //testnet
    "wss://testnet-rpc.cess.network/ws/",
}

func main() {
    sdk, err := sdkgo.New(
        context.Background(),
        sdkgo.ConnectRpcAddrs(RPC_ADDRS),
    )
    if err != nil {
        panic(err)
    }
    defer sdk.Close()

    account_id, err := utils.ParsingPublickey("cX...")
    if err != nil {
        panic(err)
    }

    fmt.Println(sdk.QueryUserHoldFileList(account_id, -1))
}
```


# QueryUserFidList

This interface is used to query all fids uploaded by the user.

```golang
// QueryUserFidList query user's all fids
//   - accountID: user account
//   - block: block number, less than 0 indicates the latest block
//
// Return:
//   - []string: all fids
//   - error: error message
func (c *ChainClient) QueryUserFidList(accountID []byte, block int32) ([]string, error)
```

Example code:

```golang
package main

import (
    "context"
    "fmt"
    "time"

    sdkgo "github.com/CESSProject/cess-go-sdk"
    "github.com/CESSProject/cess-go-sdk/utils"
)

var RPC_ADDRS = []string{
    //testnet
    "wss://testnet-rpc.cess.network/ws/",
}

func main() {
    sdk, err := sdkgo.New(
        context.Background(),
        sdkgo.ConnectRpcAddrs(RPC_ADDRS),
    )
    if err != nil {
        panic(err)
    }
    defer sdk.Close()

    account_id, err := utils.ParsingPublickey("cX...")
    if err != nil {
        panic(err)
    }

    fmt.Println(sdk.QueryUserFidList(account_id, -1))
}
```


# QueryDealMap

This interface is used to query file storage orders.

```golang
// QueryDealMap query file storage order
//   - fid: file identification
//   - block: block number, less than 0 indicates the latest block
//
// Return:
//   - StorageOrder: file storage order
//   - error: error message
func (c *ChainClient) QueryDealMap(fid string, block int32) (StorageOrder, error)
```

The return type is detailed in [StorageOrder](https://github.com/CESSProject/doc-v2/blob/main/developer/cess-sdk/sdk-golang/chain_related/chain_type.md#StorageOrder).

Example code:

```golang
package main

import (
    "context"
    "fmt"
    "time"

    sdkgo "github.com/CESSProject/cess-go-sdk"
    "github.com/CESSProject/cess-go-sdk/utils"
)

var RPC_ADDRS = []string{
    //testnet
    "wss://testnet-rpc.cess.network/ws/",
}

func main() {
    sdk, err := sdkgo.New(
        context.Background(),
        sdkgo.ConnectRpcAddrs(RPC_ADDRS),
    )
    if err != nil {
        panic(err)
    }
    defer sdk.Close()

    fmt.Println(sdk.QueryDealMap("b984d0de1428d0011...a26d41f3f7abaa5b6c450", -1))
}
```

> Note: The file upload process must first create a file storage order, wait for all fragments to be stored in the storage miner after the order is completed, and then the file information is moved to the meta information to display.


# QueryFile

This interface is used to query file meta information.

```golang
// QueryFile query file metadata
//   - fid: file identification
//   - block: block number, less than 0 indicates the latest block
//
// Return:
//   - FileMetadata: file metadata
//   - error: error message
func (c *ChainClient) QueryFile(fid string, block int32) (FileMetadata, error)
```

The return type is detailed in [FileMetadata](https://github.com/CESSProject/doc-v2/blob/main/developer/cess-sdk/sdk-golang/chain_related/chain_type.md#StorageOrder).

Example code:

```golang
package main

import (
    "context"
    "fmt"
    "time"

    sdkgo "github.com/CESSProject/cess-go-sdk"
    "github.com/CESSProject/cess-go-sdk/utils"
)

var RPC_ADDRS = []string{
    //testnet
    "wss://testnet-rpc.cess.network/ws/",
}

func main() {
    sdk, err := sdkgo.New(
        context.Background(),
        sdkgo.ConnectRpcAddrs(RPC_ADDRS),
    )
    if err != nil {
        panic(err)
    }
    defer sdk.Close()

    fmt.Println(sdk.QueryFile("b984d0de1428d0011...a26d41f3f7abaa5b6c450", -1))
}
```


# QueryRestoralOrder

This interface is used to query the file recovery order, the storage miner can store more files by recovering the files in this order.

```golang
// QueryRestoralOrder query file restoral order
//   - fragmentHash: fragment hash
//   - block: block number, less than 0 indicates the latest block
//
// Return:
//   - RestoralOrderInfo: restoral order info
//   - error: error message
func (c *ChainClient) QueryRestoralOrder(fragmentHash string, block int32) (RestoralOrderInfo, error)
```

The return type is detailed in [RestoralOrderInfo](https://github.com/CESSProject/doc-v2/blob/main/developer/cess-sdk/sdk-golang/chain_related/chain_type.md#RestoralOrderInfo).

Example code:

```golang
package main

import (
    "context"
    "fmt"
    "time"

    sdkgo "github.com/CESSProject/cess-go-sdk"
    "github.com/CESSProject/cess-go-sdk/utils"
)

var RPC_ADDRS = []string{
    //testnet
    "wss://testnet-rpc.cess.network/ws/",
}

func main() {
    sdk, err := sdkgo.New(
        context.Background(),
        sdkgo.ConnectRpcAddrs(RPC_ADDRS),
    )
    if err != nil {
        panic(err)
    }
    defer sdk.Close()

    fmt.Println(sdk.QueryRestoralOrder("b984d0de1428d0011...a26d41f3f7abaa5b6c450", -1))
}
```


# CalculateReport

This is the interface for storage miners to report to the chain that a fragment's tag has been computed, and only after the tag is computed can that fragment be challenged and receive revenue.

```golang
// CalculateReport report file tag calculation completed
//   - teeSig: tee sign
//   - tagSigInfo: tag sig info
//
// Return:
//   - string: block hash
//   - error: error message
//
// Note:
//   - for storage miner use only
func (c *ChainClient) CalculateReport(teeSig types.Bytes, tagSigInfo TagSigInfo) (string, error)
```

For the type definition, please refer to [TagSigInfo](https://github.com/CESSProject/doc-v2/blob/main/developer/cess-sdk/sdk-golang/chain_related/chain_type.md#TagSigInfo)

For example code, please refer to [calculate\_tag.go](https://github.com/CESSProject/cess-miner/blob/main/node/calculate_tag.go)


# CertIdleSpace

This is the interface for the storage miner to authenticate the idle space to the chain, when the storage miner finishes generating idle data, it needs to call this interface to authenticate to the chain, if the authentication passes, the idle space of the storage miner will be increased.

```golang
// CertIdleSpace authenticates idle file to the chain
//   - spaceProofInfo: space proof info
//   - teeSignWithAcc: tee sign with account
//   - teeSign: tee sign
//   - teePuk: tee work public key
//
// Return:
//   - string: block hash
//   - error: error message
//
// Note:
//   - for storage miner use only
func (c *ChainClient) CertIdleSpace(spaceProofInfo SpaceProofInfo, teeSignWithAcc, teeSign types.Bytes, teePuk WorkerPublicKey) (string, error)
```

For the type definition, please refer to [SpaceProofInfo](https://github.com/CESSProject/doc-v2/blob/main/developer/cess-sdk/sdk-golang/chain_related/chain_type.md#SpaceProofInfo), [WorkerPublicKey](https://github.com/CESSProject/doc-v2/blob/main/developer/cess-sdk/sdk-golang/chain_related/chain_type.md#Type-definition)

For example code, please refer to [attestation\_idle.go](https://github.com/CESSProject/cess-miner/blob/main/node/attestation_idle.go)


# ClaimRestoralNoExistOrder

This is the interface for storage miners to claim recoverable files from exited storage miners, if you want to store more files, you can find them through this interface.

```golang
// ClaimRestoralNoExistOrder claim the restoral order of an exited storage miner
//   - puk: storage miner account
//   - fid: file identification
//   - fragmentHash: fragment hash
//
// Return:
//   - string: block hash
//   - error: error message
//
// Note:
//   - for storage miner use only
func (c *ChainClient) ClaimRestoralNoExistOrder(puk []byte, fid, fragmentHash string) (string, error)
```

Example code:

```golang
package main

import (
    "context"
    "fmt"
    "time"

    sdkgo "github.com/CESSProject/cess-go-sdk"
)

// Substrate well-known mnemonic:
//
//   - https://github.com/substrate-developer-hub/substrate-developer-hub.github.io/issues/613
//   - cXgaee2N8E77JJv9gdsGAckv1Qsf3hqWYf7NL4q6ZuQzuAUtB
var MY_MNEMONIC = "bottom drive obey lake curtain smoke basket hold race lonely fit walk"

var RPC_ADDRS = []string{
    //testnet
    "wss://testnet-rpc.cess.network/ws/",
}

func main() {
    sdk, err := sdkgo.New(
        context.Background(),
        sdkgo.ConnectRpcAddrs(RPC_ADDRS),
        sdkgo.Mnemonic(MY_MNEMONIC),
        sdkgo.TransactionTimeout(time.Second*10),
    )
    if err != nil {
        panic(err)
    }
    defer sdk.Close()

    account_id, err := utils.ParsingPublickey("cX...")
    if err != nil {
        panic(err)
    }

    fmt.Println(sdk.ClaimRestoralNoExistOrder(account_id, "fid", "fragment_hash"))
}
```


# ClaimRestoralOrder

This is the interface for storage miners to claim recovery orders, if you want to store more files, you can find them through this interface.

```golang
// ClaimRestoralOrder claim a restoral order
//   - fragmentHash: fragment hash
//
// Return:
//   - string: block hash
//   - error: error message
//
// Note:
//   - for storage miner use only
func (c *ChainClient) ClaimRestoralOrder(fragmentHash string) (string, error)
```

Example code:

```golang
package main

import (
    "context"
    "fmt"
    "time"

    sdkgo "github.com/CESSProject/cess-go-sdk"
)

// Substrate well-known mnemonic:
//
//   - https://github.com/substrate-developer-hub/substrate-developer-hub.github.io/issues/613
//   - cXgaee2N8E77JJv9gdsGAckv1Qsf3hqWYf7NL4q6ZuQzuAUtB
var MY_MNEMONIC = "bottom drive obey lake curtain smoke basket hold race lonely fit walk"

var RPC_ADDRS = []string{
    //testnet
    "wss://testnet-rpc.cess.network/ws/",
}

func main() {
    sdk, err := sdkgo.New(
        context.Background(),
        sdkgo.ConnectRpcAddrs(RPC_ADDRS),
        sdkgo.Mnemonic(MY_MNEMONIC),
        sdkgo.TransactionTimeout(time.Second*10),
    )
    if err != nil {
        panic(err)
    }
    defer sdk.Close()

    fmt.Println(sdk.ClaimRestoralOrder("50c54b1da4029f201465...7c8b378b6daecc0b674"))
}
```


# DeleteFile

This is the interface used to delete files.

```golang
// DeleteFile delete a bucket for owner
//   - owner: file owner account
//   - fid: file identification
//
// Return:
//   - string: block hash
//   - error: error message
//
// Note:
//   - if you are not the owner, the owner account must be authorised to you
func (c *ChainClient) DeleteFile(owner []byte, fid string) (string, error)
```

Example code:

```golang
package main

import (
    "context"
    "fmt"
    "time"

    sdkgo "github.com/CESSProject/cess-go-sdk"
)

// Substrate well-known mnemonic:
//
//   - https://github.com/substrate-developer-hub/substrate-developer-hub.github.io/issues/613
//   - cXgaee2N8E77JJv9gdsGAckv1Qsf3hqWYf7NL4q6ZuQzuAUtB
var MY_MNEMONIC = "bottom drive obey lake curtain smoke basket hold race lonely fit walk"

var RPC_ADDRS = []string{
    //testnet
    "wss://testnet-rpc.cess.network/ws/",

}

func main() {
    sdk, err := sdkgo.New(
        context.Background(),
        sdkgo.ConnectRpcAddrs(RPC_ADDRS),
        sdkgo.Mnemonic(MY_MNEMONIC),
        sdkgo.TransactionTimeout(time.Second*10),
    )
    if err != nil {
        panic(err)
    }
    defer sdk.Close()

    fmt.Println(sdk.DeleteFile(sdk.GetSignatureAccPulickey(), "b984d0de1428d0011...a26d41f3f7abaa5b6c450"))
}
```


# GenerateRestoralOrder

This is the interface for the storage miner to report the loss of a file's fragment and generate a recovery order for the lost frgment.

```golang
// GenerateRestoralOrder generate restoral orders for file fragment
//   - fid: file identification
//   - fragmentHash: fragment hash
//
// Return:
//   - string: block hash
//   - error: error message
//
// Note:
//   - for storage miner use only
func (c *ChainClient) GenerateRestoralOrder(fid, fragmentHash string) (string, error)
```

Example code:

```golang
package main

import (
    "context"
    "fmt"
    "time"

    sdkgo "github.com/CESSProject/cess-go-sdk"
)

// Substrate well-known mnemonic:
//
//   - https://github.com/substrate-developer-hub/substrate-developer-hub.github.io/issues/613
//   - cXgaee2N8E77JJv9gdsGAckv1Qsf3hqWYf7NL4q6ZuQzuAUtB
var MY_MNEMONIC = "bottom drive obey lake curtain smoke basket hold race lonely fit walk"

var RPC_ADDRS = []string{
    //testnet
    "wss://testnet-rpc.cess.network/ws/",
}

func main() {
    sdk, err := sdkgo.New(
        context.Background(),
        sdkgo.ConnectRpcAddrs(RPC_ADDRS),
        sdkgo.Mnemonic(MY_MNEMONIC),
        sdkgo.TransactionTimeout(time.Second*10),
    )
    if err != nil {
        panic(err)
    }
    defer sdk.Close()

    fmt.Println(sdk.GenerateRestoralOrder("b984d0de1428d0011...a26d41f3f7abaa5b6c450", "50c54b1da4029f201465...7c8b378b6daecc0b674"))
}
```


# PlaceStorageOrder

This is the interface used to generate file storage orders.

```golang
// PlaceStorageOrder place an order for storage file
//   - fid: file identification
//   - file_name: file name
//   - bucket_name: bucket name
//   - territory_name: territory name
//   - segment: segment info
//   - owner: account of the file owner
//   - filesize: file size
//
// Return:
//   - string: block hash
//   - error: error message
func (c *ChainClient) PlaceStorageOrder(fid, file_name, bucket_name, territory_name string, segment []SegmentDataInfo, owner []byte, file_size uint64) (string, error)
```

For the type definition, please refer to [SegmentDataInfo](https://github.com/CESSProject/doc-v2/blob/main/developer/cess-sdk/sdk-golang/chain_related/chain_type.md#SegmentInfo)

For example code, please refer to [put\_object.go](https://github.com/CESSProject/DeOSS/blob/main/node/put_object.go)


# ReplaceIdleSpace

The interface for replacing idle files with inservice files. It is called by storage nodes.

```golang
// ReplaceIdleSpace replaces idle files with inservice files
//   - spaceProofInfo: space proof info
//   - teeSignWithAcc: tee sign with account
//   - teeSign: tee sign
//   - teePuk: tee work public key
//
// Return:
//   - string: block hash
//   - error: error message
//
// Note:
//   - for storage node only
func (c *ChainClient) ReplaceIdleSpace(spaceProofInfo SpaceProofInfo, teeSignWithAcc, teeSign types.Bytes, teePuk WorkerPublicKey) (string, error)
```

For the type definition, please refer to [SpaceProofInfo](https://github.com/CESSProject/doc-v2/blob/main/developer/cess-sdk/sdk-golang/chain_related/chain_type.md#SpaceProofInfo), [WorkerPublicKey](https://github.com/CESSProject/doc-v2/blob/main/developer/cess-sdk/sdk-golang/chain_related/chain_type.md#Type-definition)

For example code, please refer to [replace\_idle.go](https://github.com/CESSProject/cess-miner/blob/main/node/replace_idle.go)


# RestoralOrderComplete

This is the interface for the storage miner to report that the fragment recovery is complete, calling this interface indicates that you have completed the recovery.

```golang
// RestoralOrderComplete submits the restored completed order
//   - fragmentHash: fragment hash
//
// Return:
//   - string: block hash
//   - error: error message
//
// Note:
//   - for storage miner use only
func (c *ChainClient) RestoralOrderComplete(fragmentHash string) (string, error)
```

Example code:

```golang
package main

import (
    "context"
    "fmt"
    "time"

    sdkgo "github.com/CESSProject/cess-go-sdk"
)

// Substrate well-known mnemonic:
//
//   - https://github.com/substrate-developer-hub/substrate-developer-hub.github.io/issues/613
//   - cXgaee2N8E77JJv9gdsGAckv1Qsf3hqWYf7NL4q6ZuQzuAUtB
var MY_MNEMONIC = "bottom drive obey lake curtain smoke basket hold race lonely fit walk"

var RPC_ADDRS = []string{
    //testnet
    "wss://testnet-rpc.cess.network/ws/",
}

func main() {
    sdk, err := sdkgo.New(
        context.Background(),
        sdkgo.ConnectRpcAddrs(RPC_ADDRS),
        sdkgo.Mnemonic(MY_MNEMONIC),
        sdkgo.TransactionTimeout(time.Second*10),
    )
    if err != nil {
        panic(err)
    }
    defer sdk.Close()

    fmt.Println(sdk.RestoralOrderComplete("50c54b1da4029f201465...7c8b378b6daecc0b674"))
}
```


# TransferReport

This is the interface for the storage miner to report that the fragment transfer is complete, telling the chain that it has been stored.

```golang
// TransferReport is used by miners to report that a file has been transferred
//   - index: index of the file fragment
//   - fid: file identification
//
// Return:
//   - string: block hash
//   - error: error message
//
// Note:
//   - for storage miner use only
func (c *ChainClient) TransferReport(index uint8, fid string) (string, error)
```

Example code:

```golang
package main

import (
    "context"
    "fmt"
    "time"

    sdkgo "github.com/CESSProject/cess-go-sdk"
)

// Substrate well-known mnemonic:
//
//   - https://github.com/substrate-developer-hub/substrate-developer-hub.github.io/issues/613
//   - cXgaee2N8E77JJv9gdsGAckv1Qsf3hqWYf7NL4q6ZuQzuAUtB
var MY_MNEMONIC = "bottom drive obey lake curtain smoke basket hold race lonely fit walk"

var RPC_ADDRS = []string{
    //testnet
    "wss://testnet-rpc.cess.network/ws/",
}

func main() {
    sdk, err := sdkgo.New(
        context.Background(),
        sdkgo.ConnectRpcAddrs(RPC_ADDRS),
        sdkgo.Mnemonic(MY_MNEMONIC),
        sdkgo.TransactionTimeout(time.Second*10),
    )
    if err != nil {
        panic(err)
    }
    defer sdk.Close()

    fmt.Println(sdk.TransferReport(0, "b984d0de1428d0011...a26d41f3f7abaa5b6c450"))
}
```


# UploadDeclaration

This is the interface used to generate file storage orders.

```golang
// UploadDeclaration generate a file storage order
//   - fid: file identification
//   - segment: segment info
//   - user: UserBrief
//   - filename: file name
//   - filesize: file size
//
// Return:
//   - string: block hash
//   - error: error message
func (c *ChainClient) UploadDeclaration(fid string, segment []SegmentList, user UserBrief, filesize uint64) (string, error)
```

For the type definition, please refer to [SegmentList](https://github.com/CESSProject/doc-v2/blob/main/developer/cess-sdk/sdk-golang/chain_related/chain_type.md#SegmentList), [UserBrief](https://github.com/CESSProject/doc-v2/blob/main/developer/cess-sdk/sdk-golang/chain_related/chain_type.md#UserBrief)

This interface has the same functionality as GenerateStorageOrder, please refer to [GenerateStorageOrder](broken://pages/AlFDWChI1nFg0fSJjTzh)


# TerritoryFileDelivery

This interface is used to transfer files to another territory.

```golang
// TerritoryFileDelivery transfer files to another territory
//   - user: file owner account
//   - fid: file id
//   - target_territory: transfer to the target territory
//
// Return:
//   - string: block hash
//   - error: error message
func (c *ChainClient) TerritoryFileDelivery(user []byte, fid string, target_territory string) (string, error)
```

Example code:

```golang
package main

import (
    "context"
    "fmt"
    "time"

    sdkgo "github.com/CESSProject/cess-go-sdk"
)

// Substrate well-known mnemonic:
//
//   - https://github.com/substrate-developer-hub/substrate-developer-hub.github.io/issues/613
//   - cXgaee2N8E77JJv9gdsGAckv1Qsf3hqWYf7NL4q6ZuQzuAUtB
var MY_MNEMONIC = "bottom drive obey lake curtain smoke basket hold race lonely fit walk"

var RPC_ADDRS = []string{
    //testnet
    "wss://testnet-rpc.cess.network/ws/",
}

func main() {
    sdk, err := sdkgo.New(
        context.Background(),
        sdkgo.ConnectRpcAddrs(RPC_ADDRS),
        sdkgo.Mnemonic(MY_MNEMONIC),
        sdkgo.TransactionTimeout(time.Second*10),
    )
    if err != nil {
        panic(err)
    }
    defer sdk.Close()

    fmt.Println(sdk.TerritoryFileDelivery(sdk.GetSignatureAccPulickey(),"fid", "target_territory"))
}
```


# SchedulerCredit

This section describes the use of the interface to the SchedulerCredit pallet on CESS chain, which is about scheduler credit.

The list of interfaces is as follows:

* [QueryCurrentCounters](/developer/cess-sdk/sdk-golang/chain_related/scheduler_credit/querycurrentcounters)


# QueryCurrentCounters

This is the interface to query the verifier's reputation score.

```golang
// QueryCurrentCounters query the validator's credit score
//   - accountId: validator's account id
//   - block: block number, less than 0 indicates the latest block
//
// Return:
//   - SchedulerCounterEntry: validator's credit score
//   - error: error message
func (c *ChainClient) QueryCurrentCounters(accountId []byte, block int32) (SchedulerCounterEntry, error)
```

For the type definition, please refer to [SchedulerCounterEntry](https://github.com/CESSProject/doc-v2/blob/main/developer/cess-sdk/sdk-golang/chain_related/chain_type.md#SchedulerCounterEntry)

Example code:

```golang
package main

import (
    "context"
    "fmt"
    "time"

    sdkgo "github.com/CESSProject/cess-go-sdk"
    "github.com/CESSProject/cess-go-sdk/utils"
)

var RPC_ADDRS = []string{
    //testnet
    "wss://testnet-rpc.cess.network/ws/",
}

func main() {
    sdk, err := sdkgo.New(
        context.Background(),
        sdkgo.ConnectRpcAddrs(RPC_ADDRS),
    )
    if err != nil {
        panic(err)
    }
    defer sdk.Close()

    account_id, err := utils.ParsingPublickey("cX...")
    if err != nil {
        panic(err)
    }

    fmt.Println(sdk.QueryCurrentCounters(account_id, -1))
}
```


# Session

This section describes the use of the interface to the session pallet on CESS chain, which is about session.

The list of interfaces is as follows:

* [QueryValidators](/developer/cess-sdk/sdk-golang/chain_related/session/queryvalidators)


# QueryValidators

This is the interface to query the account of the validator being validated.

```golang
// QueryValidators query validators account (waiting nodes not included)
//   - block: block number, less than 0 indicates the latest block
//
// Return:
//   - []types.AccountID: validators account
//   - error: error message
func (c *ChainClient) QueryValidators(block int32) ([]types.AccountID, error)
```

Example code:

```golang
package main

import (
    "context"
    "fmt"
    "time"

    sdkgo "github.com/CESSProject/cess-go-sdk"
    "github.com/CESSProject/cess-go-sdk/utils"
)

var RPC_ADDRS = []string{
    //testnet
    "wss://testnet-rpc.cess.network/ws/",
}

func main() {
    sdk, err := sdkgo.New(
        context.Background(),
        sdkgo.ConnectRpcAddrs(RPC_ADDRS),
    )
    if err != nil {
        panic(err)
    }
    defer sdk.Close()

    fmt.Println(sdk.QueryValidators(-1))
}
```


# Sminer

This section describes the use of the interface to the sminer pallet on CESS chain, which is about storage miner.

The list of interfaces is as follows:

* [QueryExpenders](/developer/cess-sdk/sdk-golang/chain_related/sminer/queryexpenders)
* [QueryMinerItems](/developer/cess-sdk/sdk-golang/chain_related/sminer/querymineritems)
* [QueryStakingStartBlock](/developer/cess-sdk/sdk-golang/chain_related/sminer/querystakingstartblock)
* [QueryAllMiner](/developer/cess-sdk/sdk-golang/chain_related/sminer/queryallminer)
* [QueryCounterForMinerItems](/developer/cess-sdk/sdk-golang/chain_related/sminer/querycounterformineritems)
* [QueryRewardMap](/developer/cess-sdk/sdk-golang/chain_related/sminer/queryrewardmap)
* [QueryRestoralTarget](/developer/cess-sdk/sdk-golang/chain_related/sminer/queryrestoraltarget)
* [QueryAllRestoralTarget](/developer/cess-sdk/sdk-golang/chain_related/sminer/queryallrestoraltarget)
* [QueryPendingReplacements](/developer/cess-sdk/sdk-golang/chain_related/sminer/querypendingreplacements)
* [QueryCompleteSnapShot](/developer/cess-sdk/sdk-golang/chain_related/sminer/querycompletesnapshot)
* [IncreaseCollateral](/developer/cess-sdk/sdk-golang/chain_related/sminer/increasecollateral)
* [IncreaseDeclarationSpace](/developer/cess-sdk/sdk-golang/chain_related/sminer/increasedeclarationspace)
* [MinerExitPrep](/developer/cess-sdk/sdk-golang/chain_related/sminer/minerexitprep)
* [MinerWithdraw](/developer/cess-sdk/sdk-golang/chain_related/sminer/minerwithdraw)
* [ReceiveReward](/developer/cess-sdk/sdk-golang/chain_related/sminer/receivereward)
* [RegisterPoisKey](/developer/cess-sdk/sdk-golang/chain_related/sminer/registerpoiskey)
* [RegnstkSminer](/developer/cess-sdk/sdk-golang/chain_related/sminer/regnstksminer)
* [RegnstkAssignStaking](/developer/cess-sdk/sdk-golang/chain_related/sminer/regnstkassignstaking)
* [UpdateBeneficiary](/developer/cess-sdk/sdk-golang/chain_related/sminer/updatebeneficiary)
* [UpdateSminerEndpoint](https://github.com/CESSProject/doc-v2/blob/main/developer/cess-sdk/sdk-golang/chain_related/sminer/UpdateSminerEndpoint.md)


# IncreaseCollateral

This is the interface for storage miners to increase staking.

```golang
// IncreaseCollateral increases the number of staking for storage miner
//   - accountID: storage miner account
//   - token: number of staking
//
// Return:
//   - string: block hash
//   - error: error message
//
// Note:
//   - The number of staking to be added is calculated in the smallest unit,
//     if you want to add 1CESS staking, you need to fill in "1000000000000000000"
func (c *ChainClient) IncreaseCollateral(accountID []byte, token string) (string, error)
```

For example code, please refer to [increase.go](https://github.com/CESSProject/cess-miner/blob/main/cmd/console/increase.go)


# IncreaseDeclarationSpace

This is the interface for storage miners to increase the size of declaration space. The declared space size corresponds to your staking. Once your staking does not meet the declared space size, you will enter a frozen state.

```golang
// IncreaseDeclarationSpace increases the size of space declared on the chain
//   - tibCount: the size of the declaration space increased, in TiB
//
// Return:
//   - string: block hash
//   - error: error message
//
// Note:
//   - the size of the declared space cannot be reduced
//   - when the staking does not meet the declared space size, you will be frozen
func (c *ChainClient) IncreaseDeclarationSpace(tibCount uint32) (string, error)
```

For example code, please refer to [increase.go](https://github.com/CESSProject/cess-miner/blob/main/cmd/console/increase.go)


# MinerExitPrep

This is the interface for storing miner pre-exits, after calling this interface, you need to wait one day to withdraw your staking.

```golang
// MinerExitPrep pre-exit storage miner
//
// Return:
//   - string: block hash
//   - error: error message
//
// Note:
//   - after pre-exit, you need to wait for one day before it will automatically exit
//   - cannot register as a storage miner again after pre-exit
func (c *ChainClient) MinerExitPrep() (string, error)
```

For example code, please refer to [exit.go](https://github.com/CESSProject/cess-miner/blob/main/cmd/console/exit.go)


# MinerWithdraw

This is the interface for storage miners to withdaw stakings. You must be in exied state to withdaw them.

```golang
// MinerWithdraw withdraws all staking
//
// Return:
//   - string: block hash
//   - error: error message
//
// Note:
//   - must be an exited miner to withdraw
//   - wait a day to withdraw after pre-exit
func (c *ChainClient) MinerWithdraw() (string, error)
```

For example code, please refer to [withdraw.go](https://github.com/CESSProject/cess-miner/blob/main/cmd/console/withdraw.go)


---

[Next Page](/llms-full.txt/1)

