> For the complete documentation index, see [llms.txt](https://doc.cess.network/llms.txt). Markdown versions of documentation pages are available by appending `.md` to page URLs; this page is available as [Markdown](https://doc.cess.network/user/cess-account.md).
# CESS Account
CESS account holds the user’s assets in CESS Network. Please keep the account mnemonic seeds and backup files **private** and **secure**. Users may lose the assets in the account forever if this information is compromised.
The following illustrate two ways to create a CESS account.
## Method 1: Create an Account Using Polkadot.js Apps
* Navigate to [Polkadot.js Apps](https://polkadot.js.org/apps/?rpc=wss%3A%2F%2Ftestnet-rpc.cess.network%2Fws%2F#/explorer).
* Click **Settings**, under *in-browser account creation*, choose **Allow local in-browser account storage**, and click the save button at the bottom right.

* Click **Accounts** under the drop-down menu and then click **Add account** to create a new account.

* Keep the twelve words mnemonic phrase secure and safe. Then proceed to the next step.

* Create an account nickname and password, click **Next**, and then click **Save** to save the account raw seed.

* Congratulations! You have successfully created a CESS account.

## Method 2: Create an Account Using Polkadot.js Wallet
* Download [Polkadot.js extension](https://polkadot.js.org/extension/) to your browser. Currently the extension supports both Chrome or Firefox.

* Click the Extension icon on the browser. The *Accounts* window pops up. Click the **+** icon in the upper right corner and click **Create New Account** to create a new wallet account.

* Give a descriptive name and input the password. Then click **Add the account with the generated seed** button. Congratulations! Your CESS account has been created successfully.

* You can view the account in [Polkadot.js Apps](https://polkadot.js.org/apps/?rpc=wss%3A%2F%2Ftestnet-rpc.cess.network%2Fws%2F#/explorer).

## Method 3: Create an Account Using SubWallet
[SubWallet](https://www.subwallet.app/) support many types of [wallet-client](https://www.subwallet.app/download.html) like extension, mobile app and web dashboard.
We only demonstrate how to create an account using [SubWallet-Chrome-Extension](https://chromewebstore.google.com/detail/subwallet-polkadot-wallet/onhogfjeacnfoofkfgppdlbmlmnplgbn) at this document.
* Download [SubWallet Chrome Extension](https://chromewebstore.google.com/detail/subwallet-polkadot-wallet/onhogfjeacnfoofkfgppdlbmlmnplgbn) to your Chrome.

* Create a SubWallet account

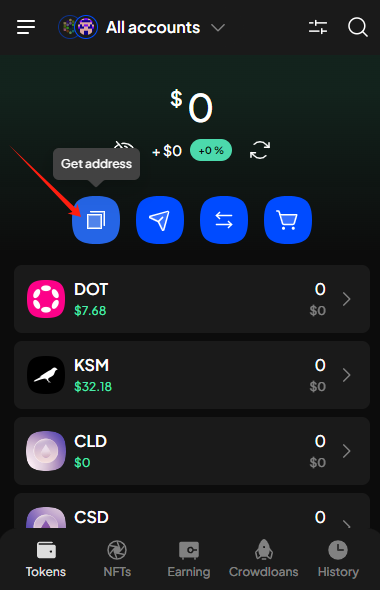
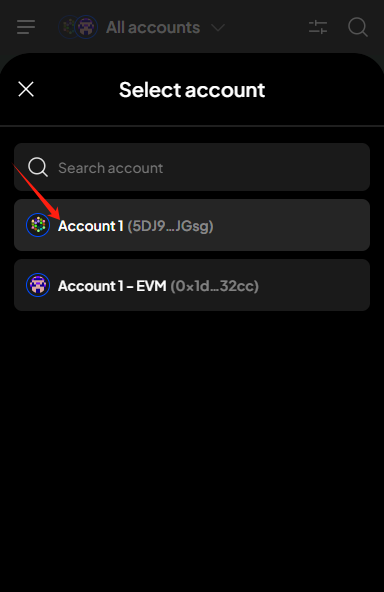
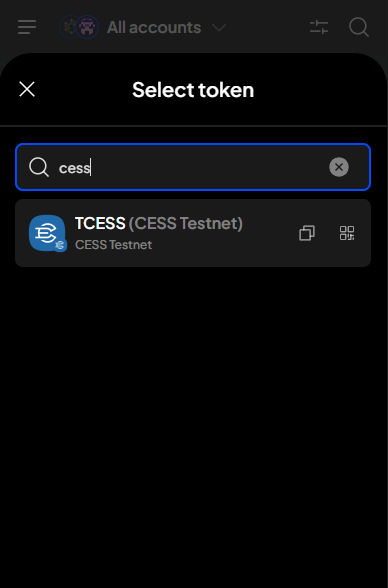
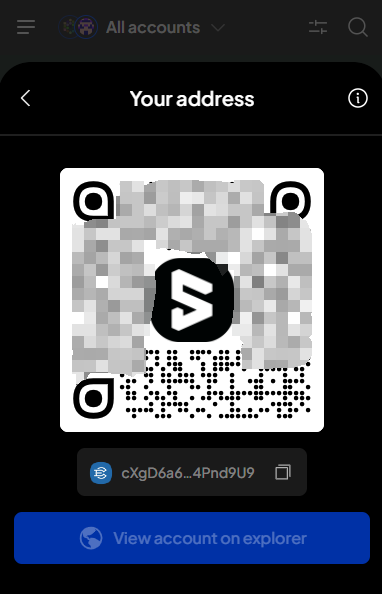
* Get your TCESS account
After create a SubeWallet account, click `Get address`, and then click `Account 1` can search token: `cess`
* Get Token by faucet and check in wallet
you can get TCESS in [Faucet](https://cess.network/faucet.html)

After get TCESS successfully, check balance in SubWallet

## How to Configure Polkadot.js Apps?
You can navigate directly to [Polkadot.js Apps](https://polkadot.js.org/apps/?rpc=wss%3A%2F%2Ftestnet-rpc.cess.network%2Fws%2F#/explorer).
If the link fails or you want to connect to the CESS network through another RPC address, you can configure it as follows:
* Navigate to [Polkadot.js Apps](https://polkadot.js.org/apps).
* Click the blue square area in the picture below to open the configuration panel:

* Scroll down the page and find the DEVELOPMENT option, click on it:

* Fill in the RPC address you want to use in the input box and click the Switch button above to save.
* The following are the available RPC addresses in CESS testnet: